Documentation
General documentation category. With some custom fields.
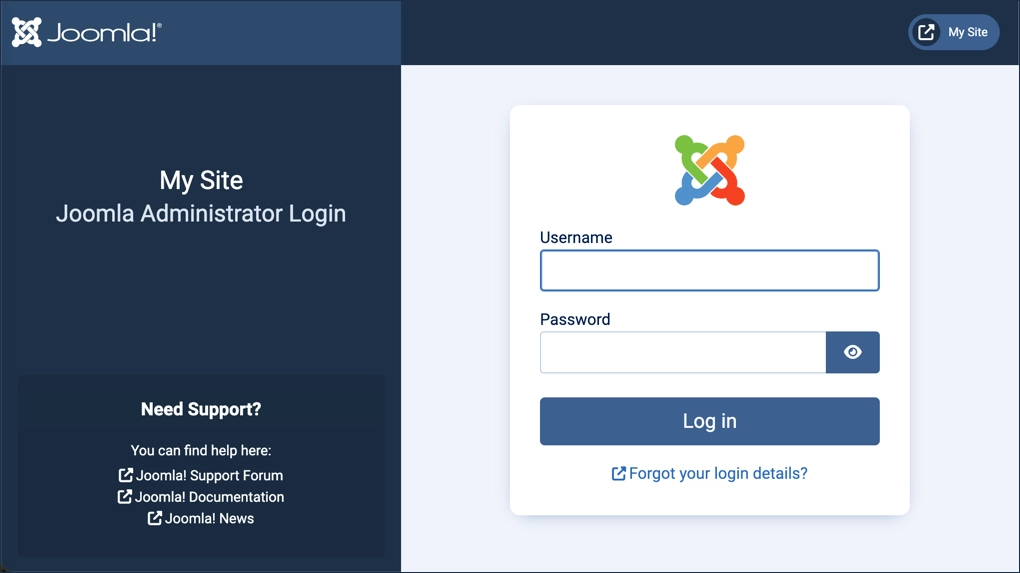
1.0 Logging in in the Administrator Side
The administrator area is the area that controls all aspects of a Joomla website such as: creating menus and content; installing site features; controlling access. A site owner has control of the entire administrative area and may create accounts for other users, configuring their access for specific responsibilities such as creating, editing, or approving content. This tutorial describes how users log in to the administrator area.
Prerequisites
You must have an administrator account, either as the site owner (e.g. if you just created a new site), or as provided by the site administrator. You will need a username and password. There will be other tutorials for building a site with Joomla.
A Joomla site configured for default login. Sites configured for advanced login options such as Single Sign-On or Passkeys are beyond the scope of this tutorial.
Steps
- Open a browser and navigate to the login screen of your site by appending /administrator to your site’s URL. For example, if your site URL is https://www.mysite.com use https://www.mysite.com/administrator.
- Enter your username and password, then click Log In.
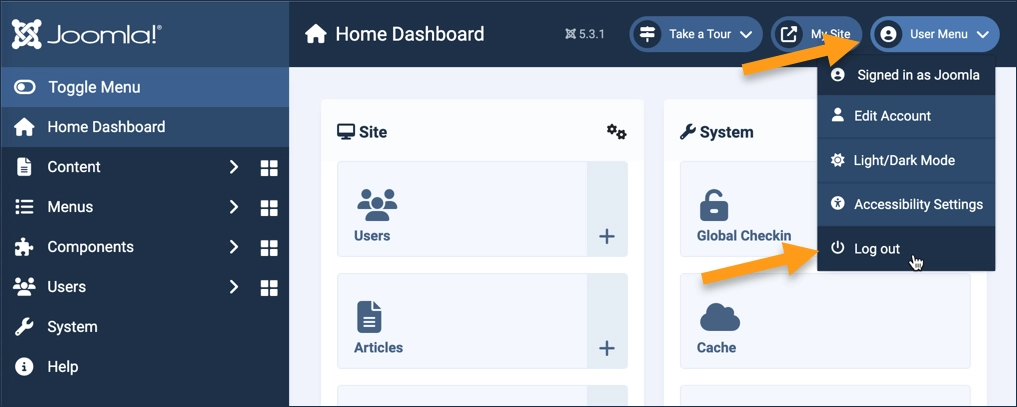
- To log out, select Log Out from the User Menu in the header.
Concepts
- Administrator side.
- Navigating to the login screen. It's important to note that the administrator login screen is different than the non-administrative login form you may see on site pages.
- Logging in with your username and password.
- Logging out.
Article in current user manual
2.0 First steps with articles, menu-items and categories
What are articles, menu-items and categories, and how are they related?
2.1 Creating an article and publishing under a menu-item
2.2 Creating a category
2.3 Menu items for a category of articles
2.4 Featuring articles on the home page
2.5 Save to menu
2.1 Creating an Article and Menu Item
Add content to your website by creating an article (web page) and adding a link to it so visitors can find it in the main menu.
Prerequisites
Administrator access to a Joomla site (version 5 or above). See 1.0 Admin Login.
Adding an article and publishing it under a menu-item
In this tutorial we will add a simple menu item that displays the article we create.
In this tutorial you will be working in the administrative dashboard of your site (backend) while occasionally viewing the site as visitors see it (frontend). Click the Open frontend link in the header to open it in a new tab. Switch between tabs to work with the frontend and backend.
Steps
- Login to Joomla as an administrator and navigate to the Home Dashboard.
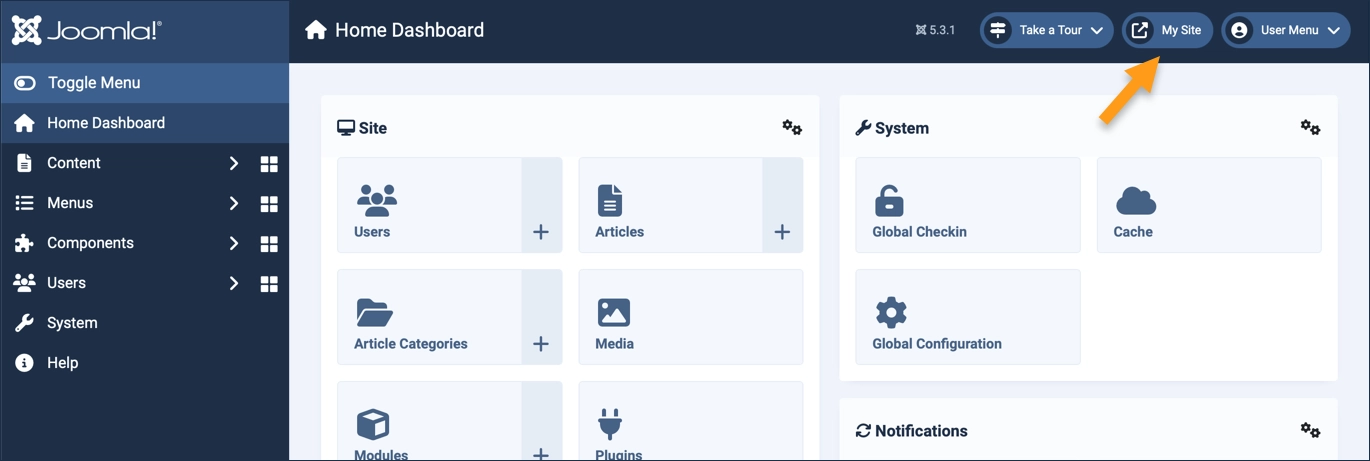
- View the frontend of the site by clicking on the link on the right side of the header.
- Find the main menu and note the menu items. In step 8 and later we will be adding a new menu item.
- In the left side menu, expand Content and click on Articles.
- Click on the New button. A new-article form appears.
- Enter a title (required) and some content in the Article Text area.
- Save and close
- In the left-side menu, expand Menus and click on Main Menu.
- Click on the New button. A new-menu-item form appears.
- Enter a title (required).
- In Menu Item Type click the Select button. From the popup, expand Articles and select Single Article.
- In Select Article click the Select button. From the popup select the article you just created.
- Save and close
- Visit your site by clicking on the visit-site button in the header.
- Find the link to your article in the Main Menu and follow it to view your article.
Concepts
- Articles in Joomla are the main content types on a web page and can display text and images.
- A menu item is a link to an article, grouped with other links in a menu.
- In this tutorial we only had links to individual articles. This is called a menu item type of Single Article. In later tutorials we will see other menu item types.
Articles in current user manual
2.2 Creating a Category and Sub-Category
Joomla organizes web content by a category hierarchy. Categories are like outlines, giving structure and organization to web content.
Each article is associated with a single category or sub-category. Menu elements then leverage categories to easily create lists of articles, blogs, and more. This tutorial describes how to create categories and sub-categories.
Prerequisites
Administrator access to a Joomla site (version 5 or above). See 1.0 Admin Login.
Creating a category and sub-category
Steps
- Login to Joomla as an administrator and navigate to the Home Dashboard.
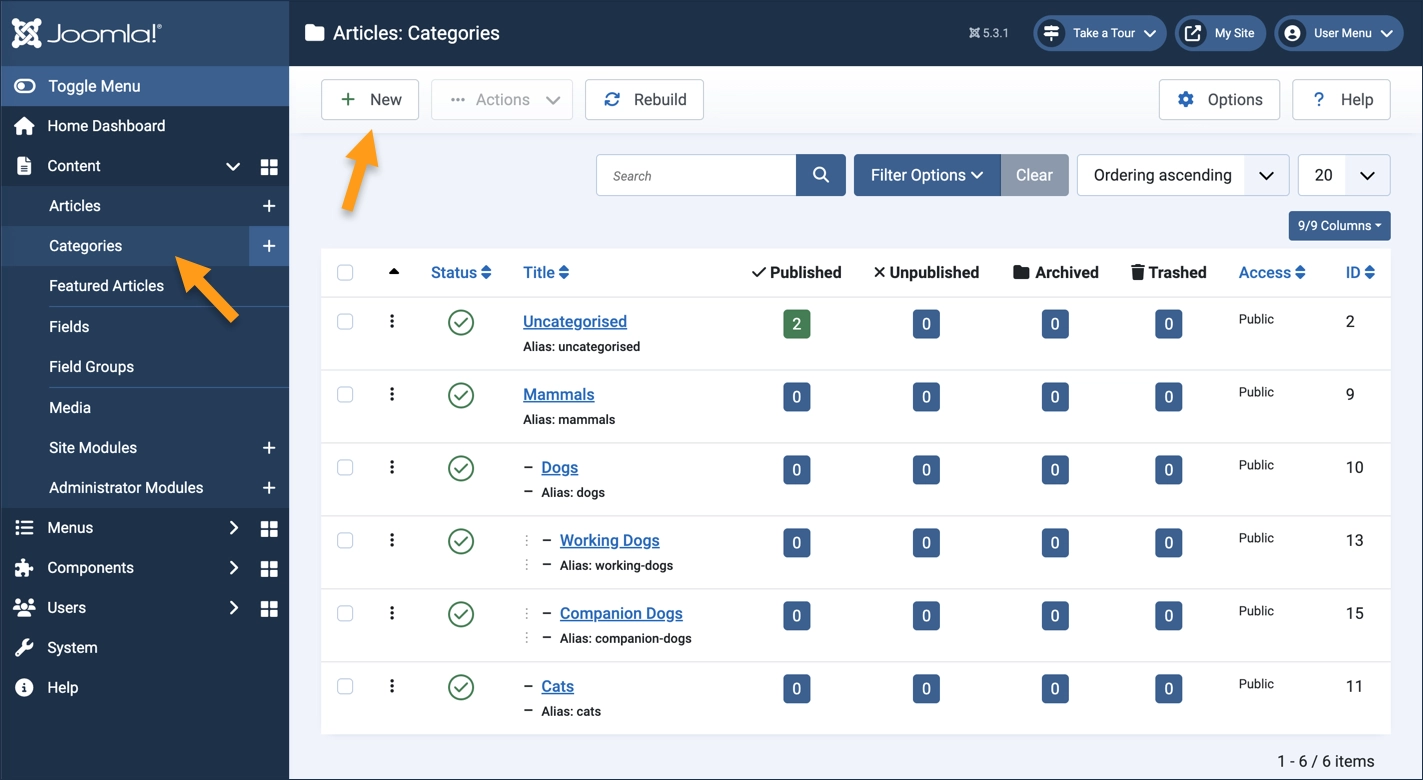
- In the left side menu, expand Content and click on Categories.
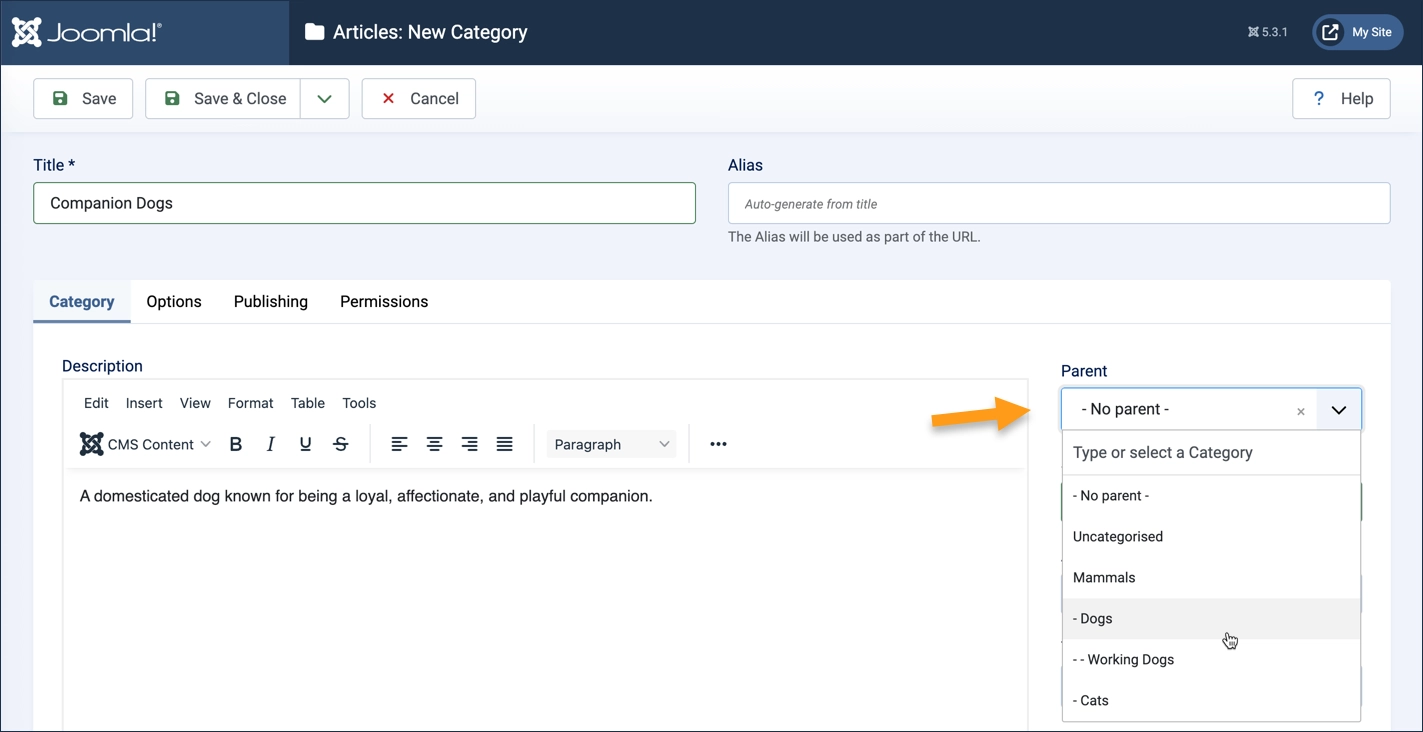
- Click on the New button. A new-category form appears.
- Enter a title then Save & Close. The categories list returns with your new category added.
- Add a sub-category. Click on the New button again.
- Enter a title, and select a parent category in the Parent field, then Save & Close. The categories list returns with your new category added as a sub-category.
Concepts
- Articles are organized by categories in Joomla, giving structure to your website, making them easier to find and assisting in navigation.
- Sub-categories may have sub-categories.
2.3 Menu items for a category of articles
Articles grouped by category can be quickly and easily displayed on your website. This tutorial explores two types of layouts, the Category Blog Layout, and Category List layout. The Category Blog Layout presents articles in a rich layout where each article is displayed with its title, an optional image, article details (such as the author or publication date) and either the full text of the article or an article teaser and Read More link. The Category List layout displays a simple list of article titles that link to the article.
This tutorial demonstrates how to create both layout types.
Prerequisites
- Create two or more articles with a common category.
- Log into Joomla as an administrator.
- From the administrator home page, open the frontend of your site using the link on the right side of the header.
- This link will have your site name, and hovering over it will indicate that it opens the frontend.
- The link will open the frontend in a new tab or window.
- Keep both these tabs open as the tutorial will have you switch between them.
- In the frontend, find the main menu and note the menu items. We will be adding two items here.
Creating a Menu Item for a Category of Articles
This tutorial uses standard Joomla test data in which there are three articles in a category called Joomla. We'll be making a menu item called Joomla Article Blog and Joomla Article List that will display these articles on our website. The tutorial uses the same articles and category to create both layouts (so only one set is required).
You should choose a category and menu item names that make sense for your site. Make sure there are two or more articles in your chosen category so you can see the result, and each article should contain a couple of paragraphs of content (lorem ipsum is fine).

Create a Category Blog Layout
The Category Blog menu item creates a page that displays a list of articles in a blog type layout. Each article includes an image, article details (e.g. author name and publication date), and the text of the article.
Steps
- In the left side menu of the administrator homepage, expand Menus and click on Main Menu.
- A list of menu items is displayed.
- Click on the New button.
- A new-menu-item form appears.
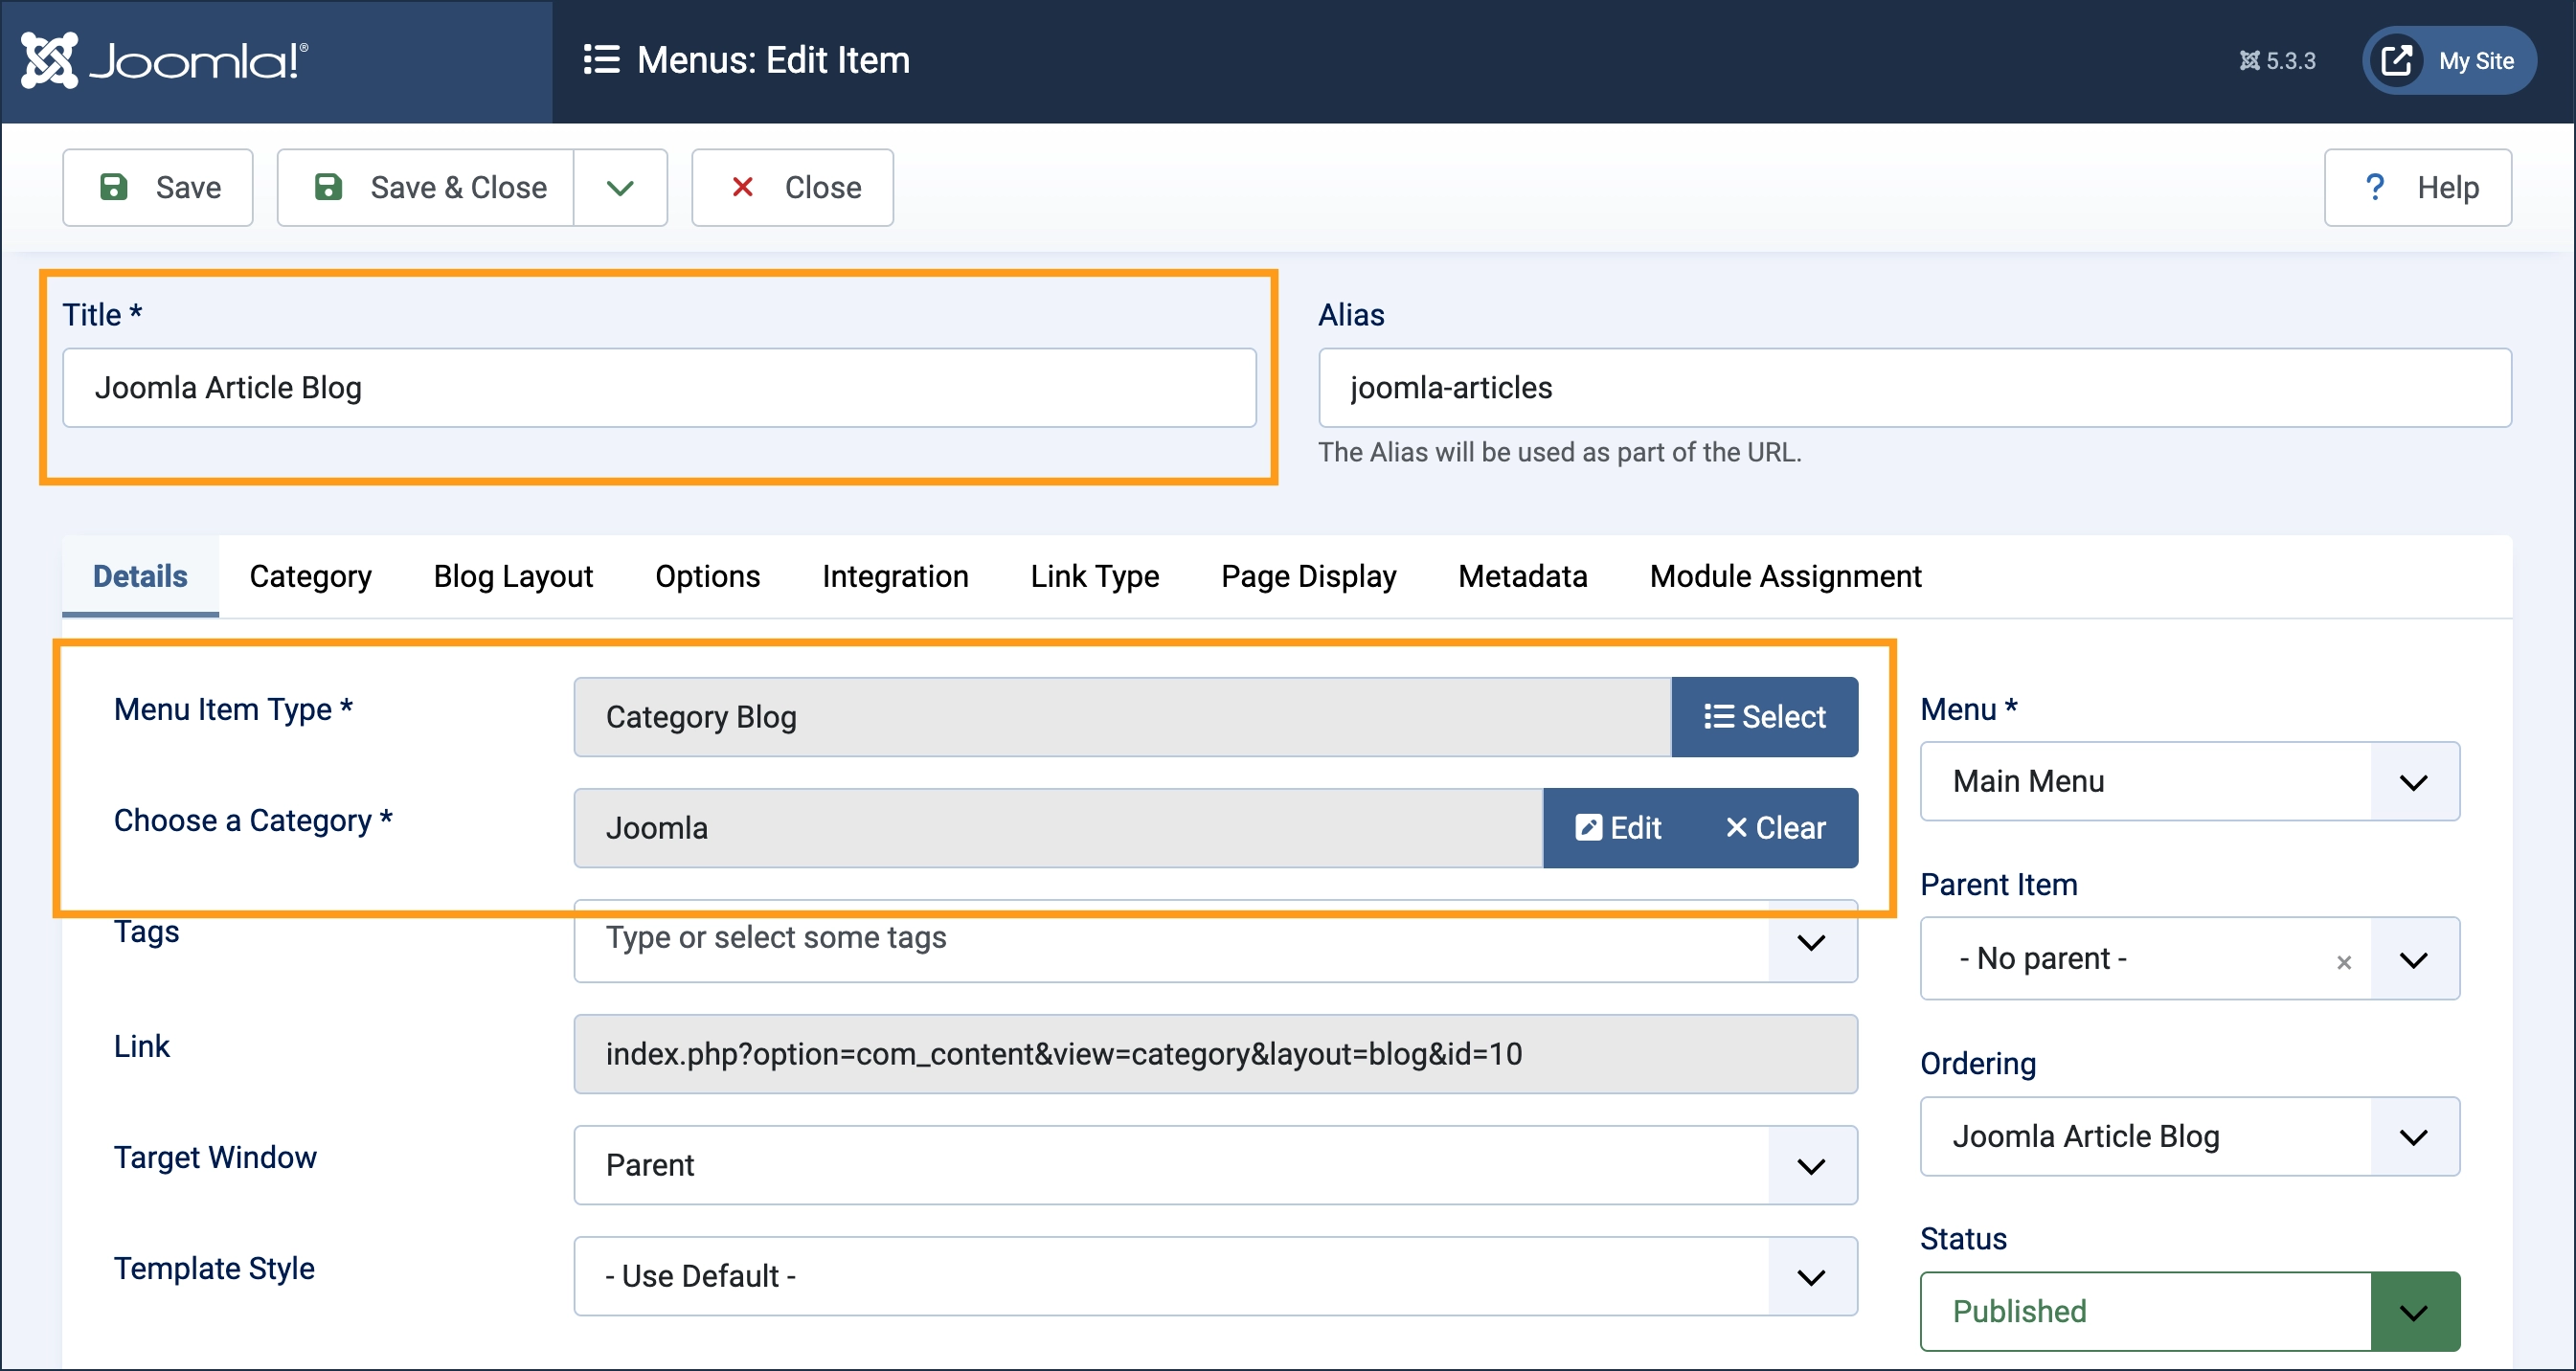
- Enter a title (required).
- We chose Joomla Article Blog but you should choose a name that makes sense for your site.
- In the Menu Item Type field click the Select button.
- A popup form appears.
- Expand Articles then click on Category Blog.
- The popup disappears.
- In the Choose a Category field select your chosen category from the popup form.
- We Chose the Joomla category but you should choose the category that makes sense for your site.
- Click Save & Close.
- The form closes and your new menu item appears in the list of main menu items.
- Switch to the frontend.
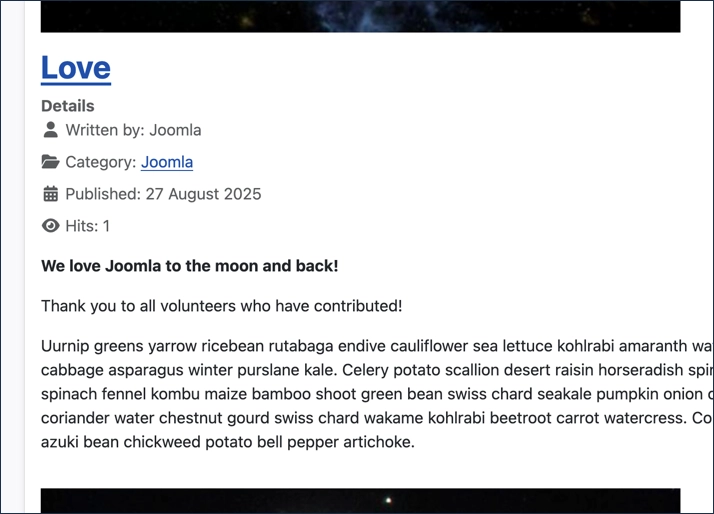
- Refresh the page then find the new link in the Main Menu. Click to follow it to view a blog layout of the articles in your chosen category.
- Clicking on the title of any article will take you to the full article.
Adding Read-More Links
Displaying the entire article in the blog layout often isn't practical; what's usually wanted here is the first part of the article, a teaser or taster, and then a Read More link that can be clicked to view the full article. Here's how to do that.
Steps
- Return to the backend.
- Edit one of your articles by clicking on Articles under Content and then clicking on one of your articles.
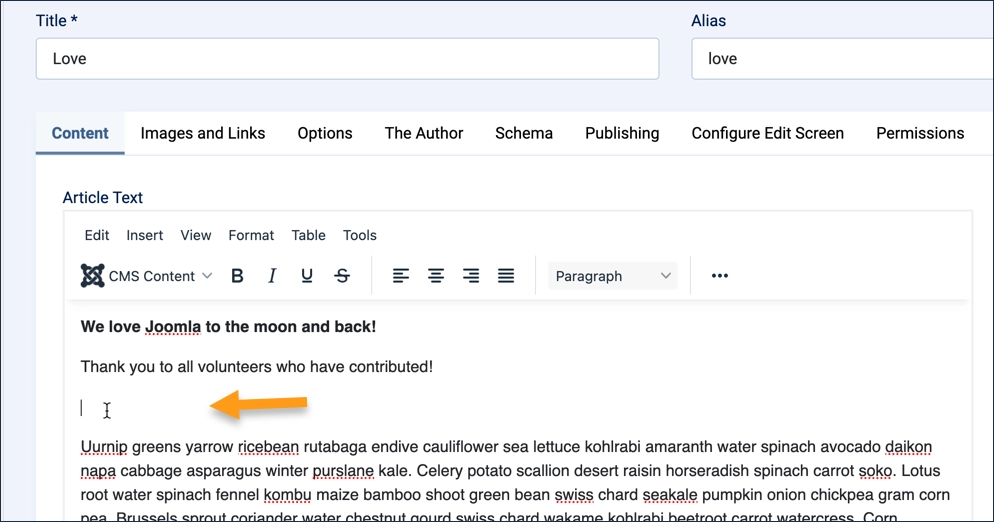
- Insert your cursor below the text you want to appear in your teaser taster (and above the remaining text in the article).
- Add a new line between paragraphs if necessary.
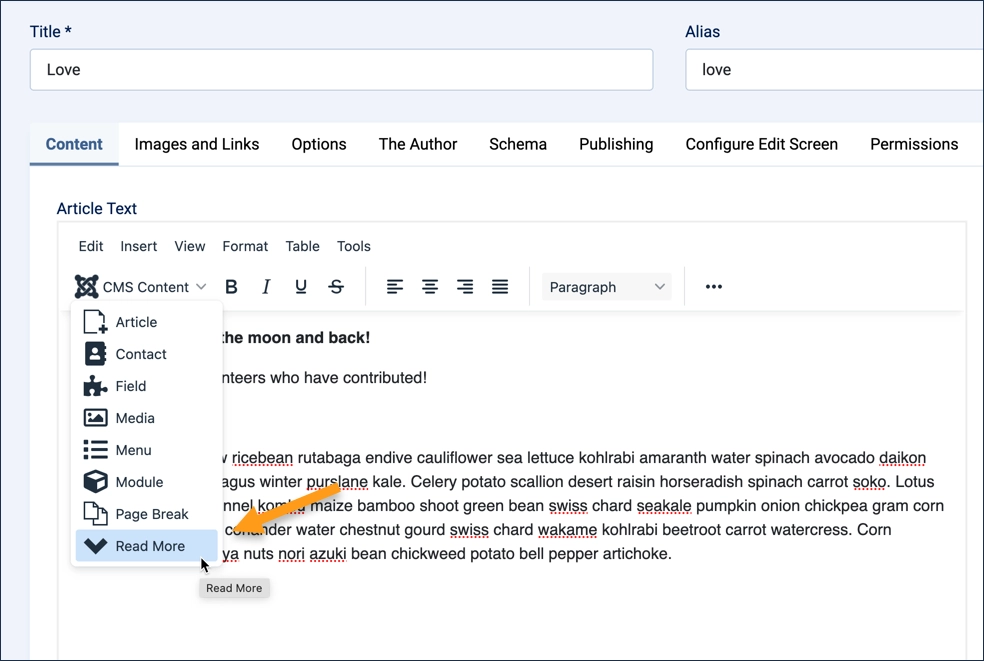
- In the editor toolbar, pick Read More from the CMS Content dropdown.
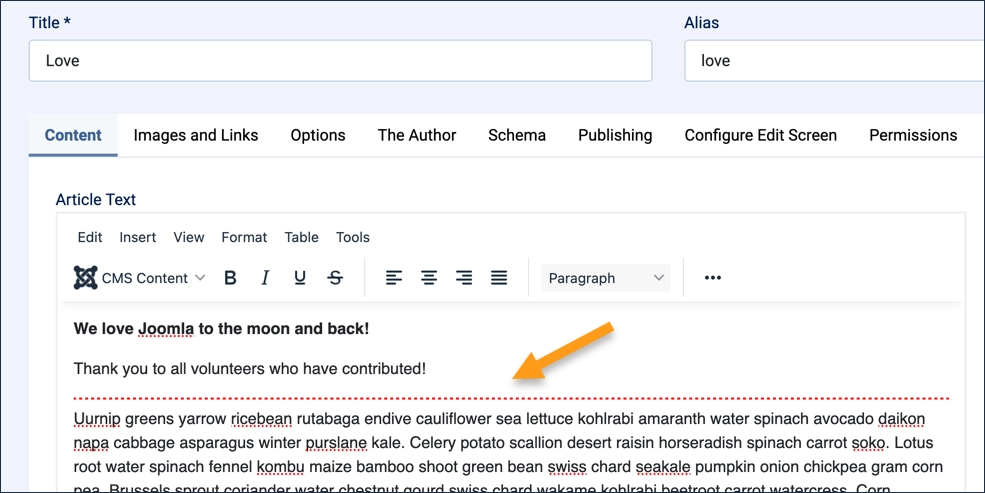
- Note that a red dotted line appears.
- Click the Save & Close button to save the article.
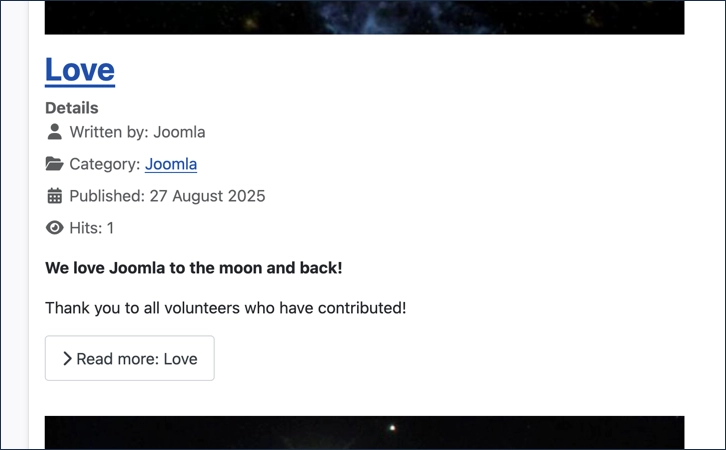
- Return to the frontend and refresh your page. Note that a Read more button appears under the teaser taster text.
- Clicking on the link will take you to the full article.
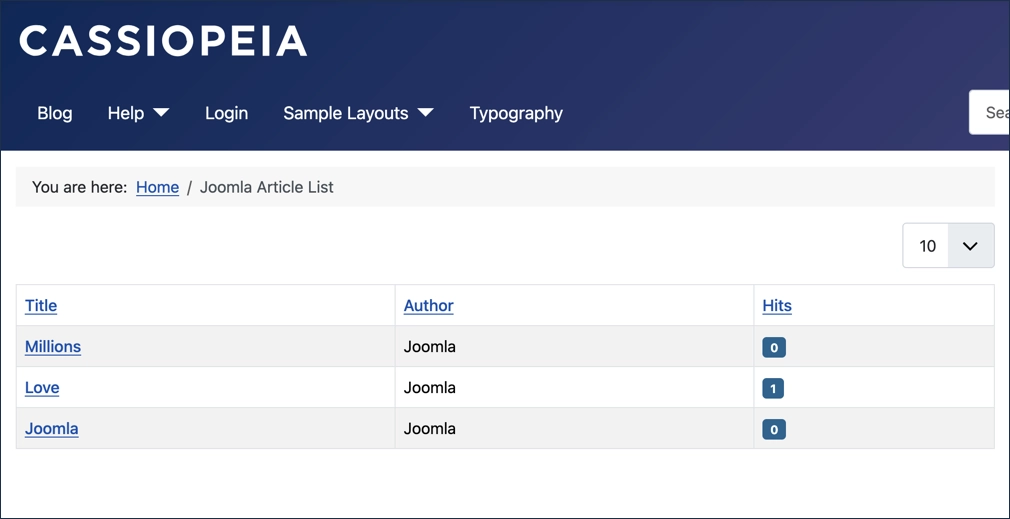
Creating a Category List Layout
The Category List menu item creates a page that displays a list of articles in a simple list. Clicking on the title of an article takes you to the full article.
Steps
- Return to the backend.
- In the left side menu, expand Menus and click on Main Menu. A list of menu items is displayed.
- Click on the New button. A new-menu-item form appears.
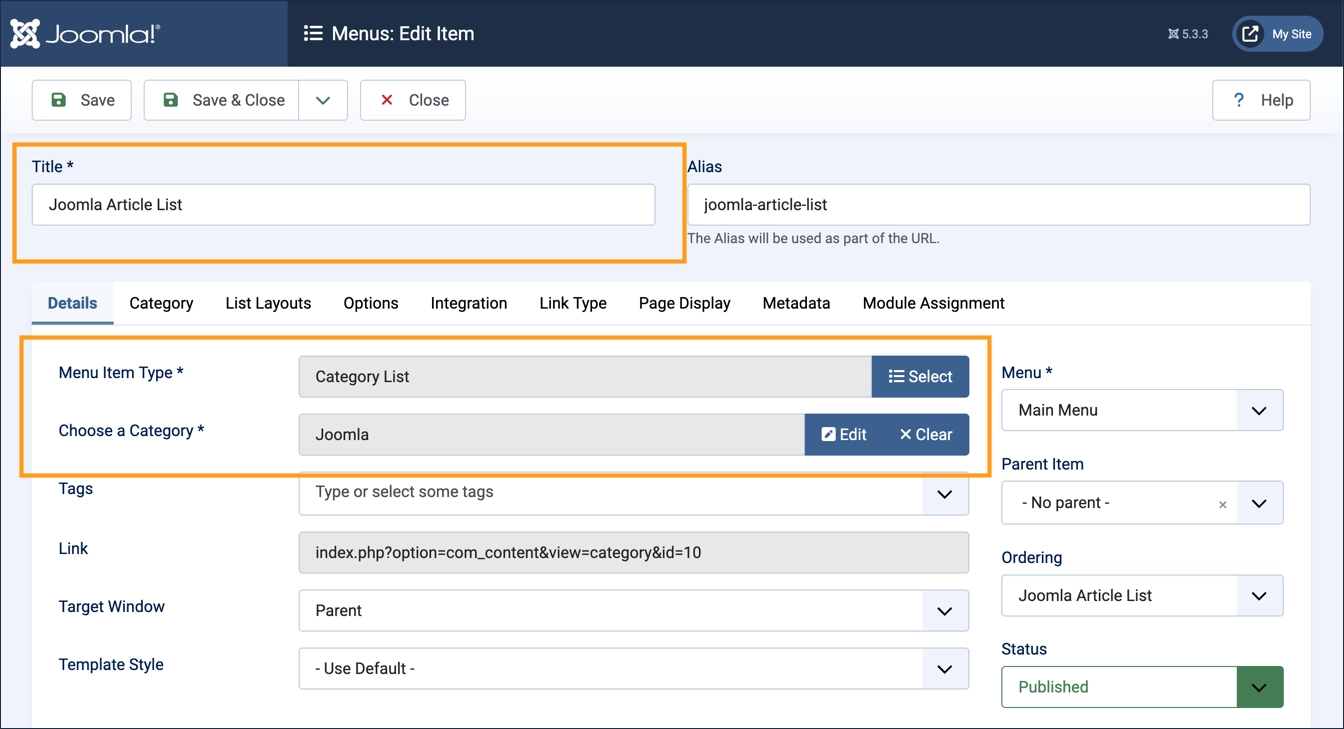
- Enter a title (required).
- We chose Joomla Article List but you should choose a name that makes sense for your site.
- In the Menu Item Type field click the Select button.
- A popup form appears.
- Expand Articles then click on Category List.
- The popup disappears.
- In the Choose a Category field select your chosen category from the popup form. We chose the Joomla category but you should choose the category that makes sense for your site.
- Click Save & Close.
- Your new menu item appears in the list of main menu items.
- Return to the frontend and refresh the page.
- Find the new link in the Main Menu and follow it to view a list layout of the articles in your chosen category.
- Clicking on the title of any article will take you to the full article.
Concepts
- This tutorial demonstrates a powerful capability of Joomla. By organizing your articles by category you can easily and quickly make lists of those articles available in either a blog format or as a simple list.
- The nature of the menu link determined the layout; the same articles and category were used for both.
Subcategories
User Guides
User Documentation, also known as The User Manual.