Test Installations
File Permissions: Linux
Introduction
The following information is for Linux based servers. If your web server is a Microsoft Windows based server(IIS), you should see Permissions: Windows.
Depending on the security configuration of your Web server the recommended default permissions are:
- 755 for directories
- 644 for files
- 444 for the
configuration.phpfile (when a Global Configuration change is saved Joomla first changes the permission to 644, saves the change and then changes the permission back to 444)
Never use 777 unless you know what you are doing! Do not use extensions that require 777 permissions!
How to Locate the Permissions
There are a variety of methods available to view and change the permissions of website files or folders. The host control panel file browser or a common File Transfer Protocol (FTP) program should each provide a method to see and change file and folder permissions. The command line is good for those who have terminal access and familiarity with system commands.
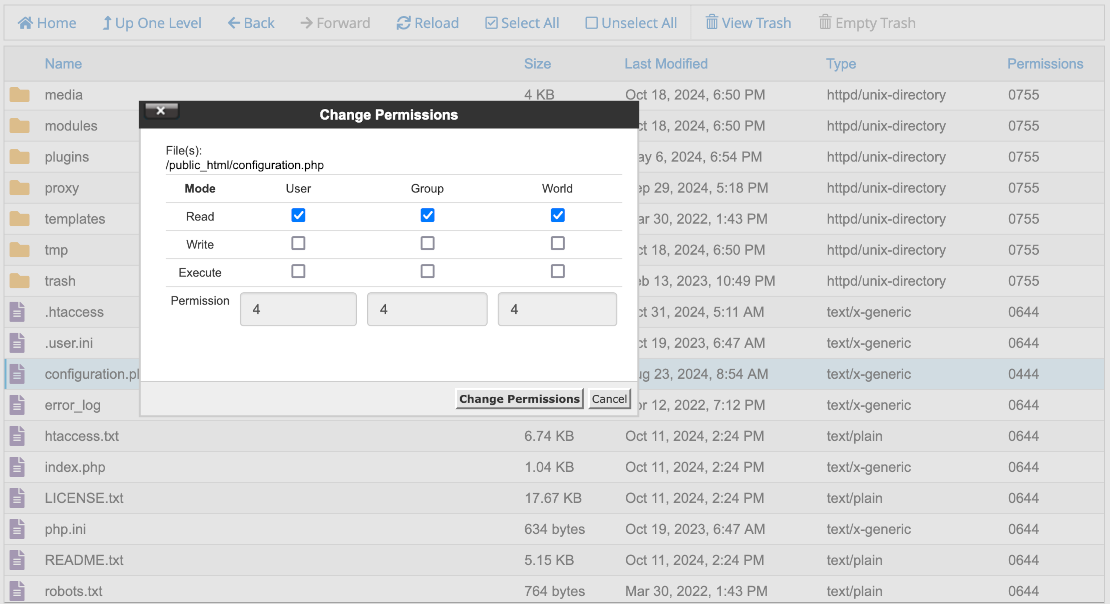
Depending on what you are using, you should see something like this image of part of the Joomla root file system as seen in cPanel:
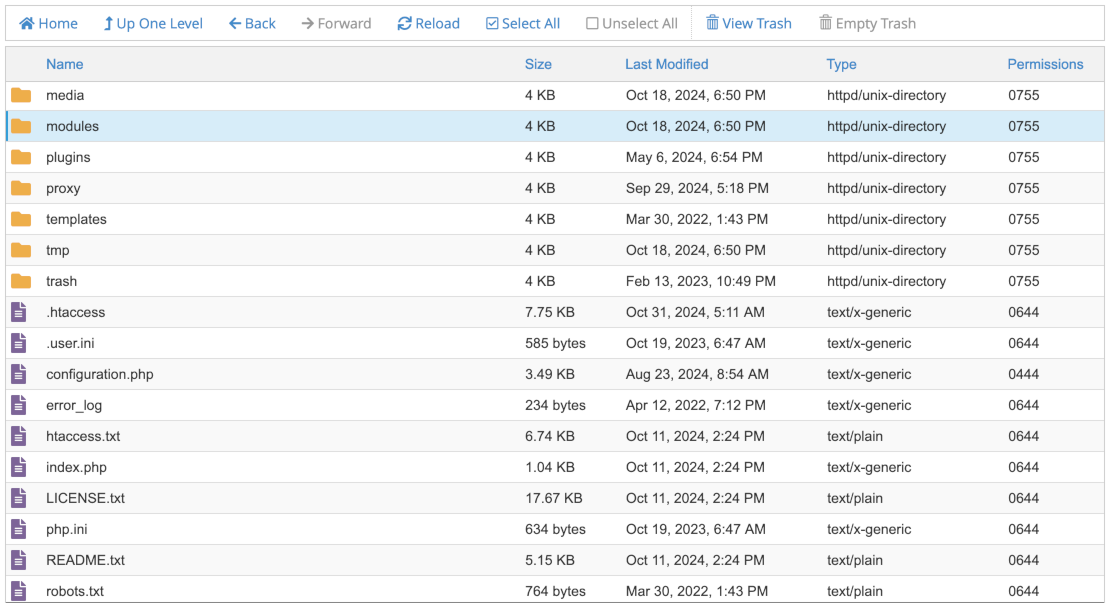
The permissions are at the far right and preceded by a zero to indicate that they are octal numbers. There should be a form to change the permissions of one or more selected items:
In a terminal window, file and folder permissions are displayed as letter groups rather than numbers (the leading d indicates the item is a directory):
drwxr-xr-x   20 ceford  staff     640 14 Oct 22:23 components
-r--r--r--    1 ceford  staff    3485 27 Oct 06:56 configuration.php
drwxr-xr-x    2 ceford  staff      64 20 Oct 14:21 files
-rw-r--r--    1 ceford  staff    6899 30 Sep 09:27 htaccess.txt
drwxr-xr-x   15 ceford  staff     480 24 Oct 12:19 images
Permission Numbers
In a permissions display of the form 777, each octal digit corresponds to three letters for three different user groups:
- First digit = owner (the item owner -
cefordin the command line list above) - Second digit = group (the group allowed access -
staffin the list above) - Third digit = others (everyone else on this computer)
Meaning of the numbers
Each octal digit is the sum of the permissions granted:
     r = Read    = 4
     w = Write   = 2
     x = Execute = 1
Add the numbers for each permission required for a given user group:
| "Octal" # | (r)ead | (w)rite | e(x)ecute | User or Group or Others |
|---|---|---|---|---|
| 0 | no | no | no | --- 0+0+0 = 0 |
| 1 | no | no | yes | --x 0+0+1 = 1 |
| 2 | no | yes | no | -w- 0+2+0 = 2 |
| 3 | no | yes | yes | -wx 0+2+1 = 3 |
| 4 | yes | no | no | r-- 4+0+0 = 4 |
| 5 | yes | no | yes | r-x 4+0+1 = 5 |
| 6 | yes | yes | no | rw- 4+2+0 = 6 |
| 7 | yes | yes | yes | rwx 4+2+1 = 7 |
Examples
- 755 is rwx (owner), r-x (group) and r-x (others) or in other words everyone may read and execute (run) but only the owner(you) may make changes to the file. It would look like this when it is all put together:
-rwxr-xr-x. This is the normal setting for folders. - 644 is rw-, r--, r-- or EVERYONE can read the file but only the owner may write to the file or
-rw-r--r--. This is the normal setting for files. - 777 or
-rwxrwxrwxmeans EVERYONE can read, write and execute ANY fileThis is something you **NEVER** want to allow on your server/website unless you are absolutely sure you know what you are doing.
Permissions are used for directories as well as files, which is why you might see this drwxr-xr-x where the d is for directory.
For a complete explanation read the Wikipedia article on Filesystem permissions
File Permissions: Windows
Introduction
For those of you that are either developing or delivering your Joomla! websites from a Windows environment, it is sometimes difficult to obtain relevant information regarding permissions. Unfortunately, it is a fact that most Web-Serving is offered under Unix and that Unix is pretty well documented within this environment. Hopefully, the following information will go some way to clear up any confusion and provide a little guidance as well.
Windows Web-Servers Overview
First, let's discuss the differences between servers. In general, most Windows folks appear to be using either Apache (Win32) or Microsoft IIS. These two web servers operate very differently and utilize slightly different models of delivery. Apache (Win32) generally runs on the host computer as the User that it was installed under, whereas IIS installs under a specific user but will run under a newly installed user IUSR_.
Permission Defaults
By default, Unix tends to only give full access to the owning user to files and directories. In contrast, Windows by default will also assign the group Everyone full permissions. The first thing any good Windows Administrator will do is remove the rights of the Everyone group to improve security. For local PC testing, this is probably not necessary, but explains why, if Everyone is not removed and you run some form of permissions check script or the Joomla! Pre-Installation check, you will have full Read, Write and Execute permissions. You are acquiring the rights of the Everyone group.
Microsoft Internet Information Server (IIS)
IIS comes in two main flavors, PWS (Personal WebServer), and IIS (Internet Information Server). Essentially these are the same application. PWS is just a cut-down version of IIS designed for desktop environments, whereas IIS is designed for Server environments. PWS limits you to a single main website, so your application installations will generally be in sub-directories of the main website. IIS, on the other hand, provides the functionality for Virtual Hosts to be run from these directories, delivering multi-site capability.
Due to the different functionality limitations, PWS does not have the Permissions Wizard as it is determined to not be needed. Only one user will be using the PWS Server. In IIS, many users will be using the Server, thus differing permission assignments are needed.
Once the Everyone account is removed, Windows IIS is now left with the IUSR_* account having top-level rights to the Web-Server directories. A permissions check now should yield different results. Only the IUSR_* account has full permissions and other users should acquire either Read Only or no rights. Rights are determined by which other users have been assigned which rights to the IIS directories manually.
Assigning Permissions
Assigning permissions in Windows is reasonably straight forward, but can be a little confusing at times. Right-Click on the appropriate folder or file. Selecting Properties or Sharing and Security will enter the Windows Security Management pane. Selecting (click once) any user name listed will display the rights that user has in the bottom half of the pane. Some rights might be greyed out. These are unavailable, either because the current user (you are logged in as) does not have high enough permissions to alter them, or they are inherited from the directory above and have been set to use that higher level directory's permissions. (This is generally the default mechanism.)
As you can see, Windows utilizes the following Permissions/Rights scheme:
| # | Control | Allows # |
|---|---|---|
| 1. | Full Control | Allows: 1, 2, 3, 4, 5, 6, 7 |
| 2. | Modify | Allows: 2, 3, 4, 5, 6 |
| 3. | Read & Execute | Allows: 3, 4 |
| 4. | List Folder Contents | Allows: 4 (but cannot run programs) |
| 5. | Read | Allows: 5 (Implies: 4) |
| 6. | Write | Allows: 6 (Implies:4 ) |
| 7. | Special Permissions | Allows: Combinations |
Windows file permissions properties
Windows file permissions can be seen as having similar properties as UNIX or Linux file (Modes) permissions. They are just represented differently. For example, if you are primarily a Unix/Linux user, you are probably used to having permissions represented as 644/666 755/777, instead of being described in the terms above. So, when you use 644, this means:
- The owner of this file can read and write to it.
- The owner's group can read the file.
- Everyone else can read the file.
Note: Windows and Unix permissions (Access Control Lists) do not equate exactly; Windows does not use the Groups mechanism in the same manner. For this discussion and in regards to the web hosting environment, they can be equated. Ah, but in Windows Groups are not used and Everyone should have been removed. This is where Windows and Unix do not quite equate, but what can be done is to match or correlate equivalent meanings.
This outline is not really going to provide you with a Windows- or an NTFS-specific permissions guide but more of an understanding of how the commonly quoted numbered UNIX/Linux style permissions correlate on a machine with an NTFS file system. The files that are placed in the www or public_html root folder, or whatever directory your site (www.domain.com or localhost) points to on your hard drive should be owned by your user account, but only if that user is not what is considered as a privileged user such as Administrator on Windows or root on UNIX/Linux. These accounts allow way too much access and should never be used for everyday use.
Best Practices
Commonly used security practices suggest that all files should have the following permissions.
- Owner Read & Write
- Group Read Only
- Others Read Only
All directories/folders should have the following permissions.
- Owner Read, Write & Execute
- Group Read & Execute
- Others Read & Execute
Arguably, this is not necessarily optimum security, but a balance must be struck between security, functionality and maintainability.
Windows, unlike Unix, does not maintain a single ACL for Execute, but simply provides Read & Execute combined, which does not imply Write. The Read & Execute ACL does however implies List Directory Contents. Therefore, if you have only Read & Write permissions on a directory but no Execute you will not be able to see the contents of the directory and may also have problems when attempting to run the file through a web browser. A little understanding of UNIX/Linux permissions is required to fully equate/correlate them to Windows permissions. The following table should assist:
| Unix Mode | Windows ACL | Comments |
|---|---|---|
| 7 | Modify | Read, Write & Execute, you should be the owner of this file |
| 6 | Read & Write | |
| 5 | Read & Execute | used for most applications |
| 4 | Read Only | security through obscurity is not a good practice |
| 3 | Write & Execute | not available through windows, unless Special Permissions is used, not commonly used |
| 2 | Write Only | not available through windows, unless Special Permissions is used, not commonly used |
| 1 | Execute Only | (not available through windows, unless Special Permissions is used, not commonly used) |
In comparison to Unix modes, when you see something like 644, break that into three elements:
The first number represents the Owner permissions, the second represents the Group permissions and the third, the Other permissions. The Windows equivalent would be:
- Owner (6) Read & Write
- Group (4) Read Only
- Others (4) Read Only
Hopefully, this example provides some insight into how to correlate Unix Modes/Permissions into Windows Permissions/ACLs. This document does not include more complex subjects such as Effective, Inherited, or Special permissions. Despite Windows ease of use, Microsoft's Permissions and ACL mechanisms are actually reasonably complex and very extensive, but this might just give you a quick reference to try and alleviate some of the confusion surrounding Unix and Windows Permissions translations.
Setting up Apache, PHP and MySQL manually
Overview
Here's a brief overview of the steps to setup a Apache, PHP and MySQL in a Windows environment and also refer to various related tools to maintain and work with most of the tasks related to Joomla!.
In order to make the instruction clear and succinct, we will assume that wherever we are not stating any explicit instruction, you will let the default setup paths apply without modification.
Warning
If you already have any of the prepackaged AMP stacks installed on your machine:
- Going back to your AMP stack will be difficult. The various installations we will do below will overwrite registry values and make general environment changes. (This applies at least to the PC/Windows environment.)
- If you need to maintain any configuration (Apache, MySQL or PHP) or data (your existing websites and related databases), before making attempts of following this instruction, make proper backups.
(needs to be expanded with specific advice on how to achieve the above...)
MySQL Setup
- Download the appropriate MySQL installer for your platform.
- Start the installation and choose Custom installation path.
- Click through the whole installation process and click Finish.
- You will now be presented with the MySQL Server Instance Configuration Wizard.
- Make sure that the Standard Configuration is selected and go to Next.
- If you already have MySQL installed you may get the message A Windows service with the name MySQL already exists. Please uninstall this service correctly or choose a different name for the new service. If so, choose an alternative service name.
- In the next window check for Include Bin Directory in Windows PATH. By doing this you will be able to access the various MySQL utilities from the command line.
- In the next window you will be able to create password for your root MySQL user, the user with highest access level on your server.
- In the final window all the changes you have configured so far will be saved when you press the Execute button and the windows service for this instance will be started.
Notes
- In order to make the instruction as accessible as possible we skipped a number of configuration scenarios of your MySQL instance, such as being able to relocate your database files.
- MySQL installs as default with a STRICT mode which might give rise to some errors when using extensions or applications that haven't considered this.
MySQL Resources
- HeidiSQL An easy to use and extensible full-client replacement of phpMyAdmin under constant development.
- MySQL Workbench Various tools among which you will appreciate the Administrator, which helps you to configure your MySQL instance. Requires the .Net framework.
- phpMyAdmin A powerful web based MySQL client for administrating anything related to MySQL.
- MySQL documentation
Apache Setup
- Download the installer of your preference.
- Run the installer wizard and click through each step until you reach the Server Information window. Give the options below respectively and in the given order in each of the fields unless you have any specific requirements as to how your web server is setup:
- localhost,
- localhost and
- admin@localhost
- Click through the wizard which will install and start the Apache web server as a windows service.
- In the windows status bar you will now see a pink colored feather with a green colored play button indicating Apache is up and running. Point your browser to http://localhost/ and you should get a page indicating its working.
- Let us now go to the location where Apache is installed which commonly is at C:\Program Files\Apache Software Foundation\Apache2.2 and go through the various directories
- bin - contains the various binary files some of which are listed below. In order to access these applications, most of which are command based, we would need to add the path to the bin directory in our global PATH variable. To do that, right click on My Computer > Properties > Advanced > Environments Variables and in the System Variables list locate and select the Variable PATH and click on Edit and add a trailing a semi-colon, if not already there, followed by the absolute path to your bin directory. Click out from the System Properties dalog by accepting.
- httpd.exe which is the Apache webserver itself, which is spawned to several child processes while serving as many simultaneous incoming clients requests as required by MaxClients directive;
- ab.exe is a benchmarking tool that comes with Apache allowing you to see how well your application can perform per time unit
- conf - folder where various configuration files are located of which the following are of most interest in our case
- httpd.conf - most of the server directives are located in this file and for easy access you should associate the .conf file type with a user friendly editor, i.e. anything other than the default Notepad.
- extra\httpd-vhosts.conf - contains directives that would allow you use your local server as virtual host, i.e. able to run several servers on your PC. One usage scenario is that during a development phase if you want to map the actual domain you are working for to your local copy, you would be able to do so by making minor tweaks in this file. We will discuss this in more detail below.
- htdocs - the default web server root, this is where the http://localhost/ is mapped, i.e. if you don't reconfigure it in httpd.conf above.
- logs - access and error logs, when trying to address various issues related to your server or even your application
- bin - contains the various binary files some of which are listed below. In order to access these applications, most of which are command based, we would need to add the path to the bin directory in our global PATH variable. To do that, right click on My Computer > Properties > Advanced > Environments Variables and in the System Variables list locate and select the Variable PATH and click on Edit and add a trailing a semi-colon, if not already there, followed by the absolute path to your bin directory. Click out from the System Properties dalog by accepting.
Apache Resources
PHP Setup
- Download PHP and choose commonly VC6 x86 Thread Safe in Zip format. The various options have to do with how the PHP code base was compiled to binary and is probably nothing you should worry about for now.
- Create a folder under your C:\Program Files\ (or wherever your program directory is located) a folder called PHP.
- Locate your downloaded Zip file and move it to the newly created folder and unpack it directly into the folder.
- Let us now add the PHP path to our global PATH variable by following the instruction above.
Configuring PHP
The configuration amounts to editing the php.ini file. A sample file for different scenarios is already in your PHP folder. Let us rename php.ini-development to php.ini and open it in your favourite text editor. The common values to tweak are as follows and all of these variables are well documented in the php.ini file. (Note that this is a server wide setting applying to all your projects.):
-
max_execution_time - whenever you have scripts that run for too long and the server returns various unexpected results which you think is due to not being able to run through the whole process
-
memory_limit
-
error_reporting
-
display_errors
-
log_errors - a variable you would need to take note of in production scenarios
-
upload_tmp_dir
-
upload_max_filesize
-
extension_dir' - in order to avoid complications we will point out the directory where the following extensions are located by uncommenting this variable and assign the absolute location of the folder. The complete line should read as follows extension_dir = "C:\Program Files\PHP\ext"
-
Dynamic extensions section contains various additional modules that you want to be loaded with, and the commented ones are those that comes prepackaged with PHP and can be found in the ext directory in your PHP folder. If you want to activate any, just remove the commenting as you should do with the following extensions:
- php_curl.dll
- php_gd2.dll
- php_mbstring.dll
- php_mysql.dll
- php_mysqli.dll
- php_pdo.dll
- php_pdo_mysql.dll
- php_xsl.dll
-
session.save_path
Configuring Apache to Work with PHP
Now that we have configured PHP to work as we want it, let's go to Apache and do the same.
-
Open httpd.conf and in the "Dynamic Shared Object (DSO) Support" section add the following directives. (If you have located your PHP folder differently do make corresponding change for php5apache2_2.dll below.): LoadModule php5_module "C:/Program Files/PHP/php5apache2_2.dll" AddType application/x-httpd-php .php
-
In the DirectoryIndex add index.php and index.htm as possible files to serve when directory is requested as follows: DirectoryIndex index.html index.htm index.php
-
At the end of the file add the following line which will point out where the php.ini file is located PHPIniDir "C:/Program Files/PHP"
Restart and Test PHP
As soon as you make any change to php.ini, httpd.conf or any other configuration files, you need to restart Apache to see the effect of the changes. So let's now restart Apache by using the Apache Monitor tool that you can find in your Windows status bar. Hopefully you are not prompted with any dialogues and the Apache Monitor continues to run green.
We will now test that PHP is working. Go to your web server's document root (in the default case C:\Program Files\Apache Software Foundation\Apache2.2\htdocs) and add a file called phpinfo.php with the following content:
This will render a page containing information about your PHP setup and about the various modules/extensions that are currently loaded. Point your browser to <a href="http://localhost/phpinfo.php"
rel="nofollow noreferrer noopener">http://localhost/phpinfo.php.
Installing and Configuring xdebug
- Point your browser to Xdebug Installation Wizard. This page will assist you to find a suitable version of Xdebug.
- Copy the entire page of the phpinfo page we ran above and paste it into the textarea and follow the instructions provided to install.
XDebug Resources
- The PHP Manual Excellent and up to date documentation with valuable additional comments from users. Downloadable versions are available.
- The Xdebug 3 Documentation
Visual Studio Code Extras
Introduction
Visual Studio Code is a source code editor developed by Microsoft for Windows, Linux and macOS (including M1 Macs). It includes support for debugging, embedded Git control and GitHub, syntax highlighting, intelligent code completion, snippets, and code refactoring.
The main characteristic of the editor is that it is extensible and it has a huge collection of extensions maintained by users and by Microsoft itself.
As a general introduction, this is a presentation about the topic Joomla Development with Visual Studio Code (PDF, 1Mb), by René Kreijveld, Joomla developer Destiny B.V. Joomla User Group London, 16th march 2021.
On this page, we detail a list of recommended extensions to configure VSCode to support PHP and Joomla.
This is a list of extensions to support PHP on VSCode:
- PHP Debug felixfbecker.php-debug. Debug support for PHP with XDebug.
- phpcs ikappas.phpcs. PHP CodeSniffer for Visual Studio Code.
- PHP Intelephense bmewburn.vscode-intelephense-client. PHP code intelligence for Visual Studio Code. Alternative: PHP IntelliSense felixfbecker.php-intellisense
- PHPUnit emallin.phpunit. Run PHPUnit tests from VSCode.
- phpfmt kokororin.vscode-phpfmt. The missing phpfmt extension for Visual Studio Code. phpfmt formatter can parse and format even a PHP file version 4 in case needed.
- php cs fixer junstyle.php-cs-fixer: In case of opting for the PSR-2: Coding Style Guide. PHP CS Fixer extension for VS Code, php formatter, php code beautify tool, format html.
- PHP Namespace Resolver MehediDracula.php-namespace-resolver: PHP Namespace Resolver can import and expand your class. You can also sort your imported classes by line length or in alphabetical order.
- PHP Phan (Analyzer) tysonandre.php-phan. Phan - static analyzer for PHP, minimizing false positives.
- phpmd linyang95.phpmd. VS Code extension for php, using phpmd.
The Git protocol is natively supported on VSCode. However, there are extensions to improve code and repository management. This is a list of featured extensions for this task:
- Git History donjayamanne.githistory: Git History, Search and More (including git log).
- GitHub KnisterPeter.vscode-github: This vscode extension integrates with GitHub.
- GitHub Pull Requests and Issues GitHub.vscode-pull-request-github: Review and manage your GitHub pull requests and issues directly in VS Code
- gitignore codezombiech.gitignore: A extension for Visual Studio Code that assists you in working with .gitignore files.
- Visual Studio Code Commitizen Support KnisterPeter.vscode-commitizen: This vscode extension adds commitizen support.
This is a list of extensions to support Joomla on VSCode:
- Joomla Snippets anibalsanchez.vs-code-joomla-snippets. Snippets for Joomla. Including Joomla 3.x and Joomla 4 Snippets.
- PHP Getters & Setters phproberto.vscode-php-getters-setters. Create PHP getters and setters from class properties.
This is a list of extensions to support remote SSH development:
- Remote - SSH ms-vscode-remote.remote-ssh: The Remote - SSH extension lets you use any remote machine with an SSH server as your development environment. This can greatly simplify development and troubleshooting in a wide variety of situations. For more information: Remote development over SSH
- Live Share MS-vsliveshare.vsliveshare: Visual Studio Live Share enables you to collaboratively edit and debug with others in real-time, regardless of what programming languages you're using or app types you're building. It allows you to instantly (and securely) share your current project, and then as needed, share debugging sessions, terminal instances, localhost web apps, voice calls, and more!
This is a list of handy extensions highly recommended to ease the development:
- EditorConfig for VS Code editorconfig.editorconfig EditorConfig Support for Visual Studio Code
- change-case wmaurer.change-case: Quickly change the case (camelCase, CONSTANT_CASE, snake_case, etc) of the current selection or current word
- Project Manager alefragnani.project-manager: It helps you to easily access your projects, no matter where they are located. Don't miss those important projects anymore.
PHP Debug Configuration
The extension supports the most common configurations of PHP XDebug. It fully integrates all VSCode features to debug PHP scripts.
To configure the extension, visit the official documentation
As a sample configuration for VSCode debugging, this is a common launch.json:
{
    // Use IntelliSense to learn about possible attributes.
    // Hover to view descriptions of existing attributes.
    // For more information, visit: https://go.microsoft.com/fwlink/?linkid=830387
    "version": "0.2.0",
    "configurations": [

        {
            "name": "Listen for XDebug",
            "type": "php",
            "request": "launch",

            // Server Remote XDebug Port - 9000 is the default XDebug port
            "port": 9000,

            // Server Remote Path -> Local Project Path
            "pathMappings": {
                "/app/www": "${workspaceRoot}/www"
            }
        },
        {
            "name": "Launch currently open script",
            "type": "php",
            "request": "launch",
            "program": "${file}",
            "cwd": "${fileDirname}",

            // Local XDebug Port - 9000 is the default XDebug port
            "port": 9000
        }
    ]
}
Related to the launch.json configuration that felixfbecker/vscode-php-debug requires, it is the configuration of PHP XDebug itself.
At this time, your development environment could have xdebug-2 or xdebug-3. They differ in the required parameters. To configure PHP XDebug, these are the most common settings for php.ini.
XDebug 2 configuration
[XDebug]
;;;;;;;;;;;;;;;;;;;
; xdebug-2.9.8
;;;;;;;;;;;;;;;;;;;
xdebug.remote_enable = 1
xdebug.remote_autostart = 1
; xdebug.remote_port = 9000
XDebug 3 configuration
[XDebug]
;;;;;;;;;;;;;;;;;;;
; xdebug-3.0.0
; https://xdebug.org/docs/upgrade_guide
;;;;;;;;;;;;;;;;;;;
xdebug.mode = debug
xdebug.start_with_request = yes
xdebug.discover_client_host = true
; xdebug.client_port = 9000
To know more about how XDebug works internally to connect to the Editor, check the [documentation](Xdebug 3 — Documentation).
phpcs Configuration
To configure the extension, visit the official documentation. The extension supports the most common configurations of PHP_CodeSniffer.
By default, PHP_CodeSniffer comes with several coding standards. Once the extension is installed, it works with PSR2.
"phpcs.standard": "PSR2",
To configure the extension to apply the Joomla! Coding Standards, install the rules following the official guide Once the Joomla! Coding Standards is installed, configure the User Settings following this sample configuration:
"phpcs.standard": "/home/YOUR-USER/.../Joomla",
Configuration of PHP Intelephense
To configure the extension, visit the intelephense documentation. The extension does not require additional configuration.
VSCode comes with basic support of the PHP language. So, it is probably a good idea to disable the default support to avoid conflicts:
    // Disable basic suggestions
    "php.suggest.basic": false,

    // To activate code suggestions in comments
    "editor.quickSuggestions": { "comments": true },
As an alternative, it is also a very popular extension: PHP IntelliSense felixfbecker.php-intellisense Advanced Autocompletion and Refactoring support for PHP.
PHPUnit Configuration
To configure the extension, visit the vscode phpunit documentation
The extension integrates PHP Unit with VSCode, so all features of PHP Unit are integrated with VSCode and can also be parametrized for further integration with the user interface.
This is a sample configuration of the extension:
    "phpunit.preferRunClassTestOverQuickPickWindow": true,
    "phpunit.driverPriority": [
        "Path",
        "Command",
        "Composer",
        "Phar",
        "Ssh",
        "GlobalPhpUnit"
    ],
php cs fixer Configuration (Only for PSR2)
To configure the extension, visit the vscode php cs fixer documentation. The extension integrates PHP-CS-Fixer with VSCode, so all features of PHP-CS-Fixer are integrated with VSCode and can also be parametrized for further integration with the user interface.
To automatically, apply PHP-CS-Fixer to PHP files, configure the user settings in this way:
    "[php]": {
        "editor.defaultFormatter": "junstyle.php-cs-fixer",
    },
    "php-cs-fixer.onsave": true,
PHP Phan (Analyzer) Configuration
To configure the extension, visit the official documentation. This is a sample configuration of the extension:
    "phan.phpExecutablePath": "/usr/bin/php",
    "phan.analyzedFileExtensions": [
        "php"
    ],
phpmd Configuration
To configure the extension, visit the official documentation. The extension does not require additional configuration.
This is a sample configuration of the extension:
    "phpmd.command": "php /home/YOUR-USER/.../phpmd/phpmd.phar",
    "phpmd.rules": "/home/YOUR-USER/.../phpmd-rulesets/phpmd_config.xml",
Configure EditorConfig for VS Code
EditorConfig is a file format and collection of text editor plugins for maintaining consistent coding styles between different editors and IDEs.
To configure the editor according to your preferences, create a file .editorconfig:
; EditorConfig helps developers define and maintain consistent
; coding styles between different editors and IDEs.

; For more visit http://editorconfig.org.
root = true

; Choose between lf or rf on "end_of_line" property
[*]
charset = utf-8
end_of_line = lf
indent_size = 2
indent_style = space
insert_final_newline = true
trim_trailing_whitespace = true

# editorconfig-tools is unable to ignore longs strings or urls
max_line_length = null

[*.html]
indent_style = tab

# PSR-2
# [*.php]
# indent_size = 4
# indent_style = space

# Joomla! Coding Standards
[*.php]
indent_size = 4
indent_style = tab

[*.md]
trim_trailing_whitespace = false

[*.yml]
indent_style = space
indent_size = 2
Visual Studio Code Primer
VS Code - A Popular Free IDE
From Wikipedia:
Visual Studio Code, also commonly referred to as VS Code, is a source-code editor made by Microsoft for Windows, Linux and macOS. Features include support for debugging, syntax highlighting, intelligent code completion, snippets, code refactoring, and embedded Git. Users can change the theme, keyboard shortcuts, preferences, and install extensions that add additional functionality.
Installation
The VS Code site default page has a drop-down list for each supported platform. The chances are that your platform is pre-selected. So download and install and you are ready to go.
Getting Started
The VS Code Get Started page has some Start items, a list of Recent items, and a short list of Walkthroughs. If you are completely new to VS Code these are recommended viewing. They only take a few minutes.
The VS Code Documentation is available from the Help / Documentation menu. The Introductory Videos are well worth viewing. Each takes 2 to 6 minutes and give an excellent introduction to VS Code features.
The official documentation is the place to go to if you want to look up specific information.
VS Code Extensions
VS code can be used for any type of text, including a wide range of programming languages. It works with JavaScript without adding extensions. Other languages are detected by context so if you start creating and saving PHP code you are likely to be prompted to install a PHP Support pack.
Click on the Extensions icon in the left Activity Bar to see what you have installed and what is recommended. You will need the PHP Debug extension!
The VS Code Screen Layout
Some terms used in subsequent instructions:
- Activity Bar the narrow bar at the left of the screen. Select any icon to open or close the Primary Sidebar.
- Primary Side Bar when open shows details of the selected activity.
- Status Bar at the bottom of the screen. It shows what is going on.
- Panel an area beneath the text editors to display other information.
Select a layout icon at the top right to open or close any one of these items.
Coding a Joomla Extension
To create an extension your objective is to create a zip file that you can install in a working Joomla site. So you need a folder to contain your code. This should be within your personal file space on your laptop or desktop computer used for local development. It should not be in your website tree. For example you could use ~/jextensions to contain subfolders for different extensions. I use ~/git because it is short and easy to spell although potentially confusing because each subfolder uses a separate git repository.
Sample Code
If you would like some sample code to work on there is an extension available on GitHub named mod_debugme. As the name implies, it is a module with some bugs. In addition to the module code there is a build.xml file to illustrate one way to automate building for testing and creating a zip file.
The module is designed to show the next few (3 by default) events (birthdays) from a list stored in a database table. You might imagine this being used in an office or family site in the expectation of cake.
It may be best to get going by using git commands from the command line. First create a folder for your code and then clone the remote repository:
    mkdir ~/git
    cd ~/git
    git clone https://github.com/ceford/j4xdemos-mod-debugme
The response should take just a few seconds:
    Cloning into 'j4xdemos-mod-debugme'...
    remote: Enumerating objects: 23, done.
    remote: Counting objects: 100% (23/23), done.
    remote: Compressing objects: 100% (16/16), done.
    remote: Total 23 (delta 3), reused 23 (delta 3), pack-reused 0
    Unpacking objects: 100% (23/23), done.
You should take a moment to look at the contents of the folder:
    cd j4xdemos-mod-debugme
    ls -al
    total 16
    drwxr-xr-x   6 ceford  staff   192  2 Sep 17:48 .
    drwxr-xr-x   3 ceford  staff    96  2 Sep 17:48 ..
    drwxr-xr-x  12 ceford  staff   384  2 Sep 17:48 .git
    -rw-r--r--   1 ceford  staff  1402  2 Sep 17:48 README.md
    -rw-r--r--   1 ceford  staff   927  2 Sep 17:48 build.xml
    drwxr-xr-x   8 ceford  staff   256  2 Sep 17:48 mod_debugme
The .git folder contains information about the repo. The README.md file is a markdown document that describes this repo. The build.xml file is a file used to build the extension with an external tool, Phing - described later. The mod_debugme folder contains the code of the extension.
Install in Joomla
Compress the extension folder to create an installable zip file:
zip -r mod_debugme.zip mod_debugme
You can now install the zip file in the Joomla site you use for testing. After installation you need to create a Site module and assign it to a module position. As it is a broken module you could assign it to a position on All pages while you work on it; or you could assign it to a position on a single page; or you could position it in an article that has its own menu item.
After installation, delete the zip file.
Turn on Debug Mode
In Joomla's Global Configuration, set Debug System to Yes and Error Reporting to Maximum.
When you open a page containing the buggy module you will see a stack trace telling you where an error was triggered.

Sometimes the coding error is on the first line of the stack trace. Otherwise, if the error is triggered in library code, for example by passing invalid data to a database function, the coding error may be further down the list of function calls.
Open Extension Folder in VS Code
In VS Code, use the File / Open Folder menu item to locate and open the folder containing your local copy of the mod_debugme extension code. You should see something similar to the following:
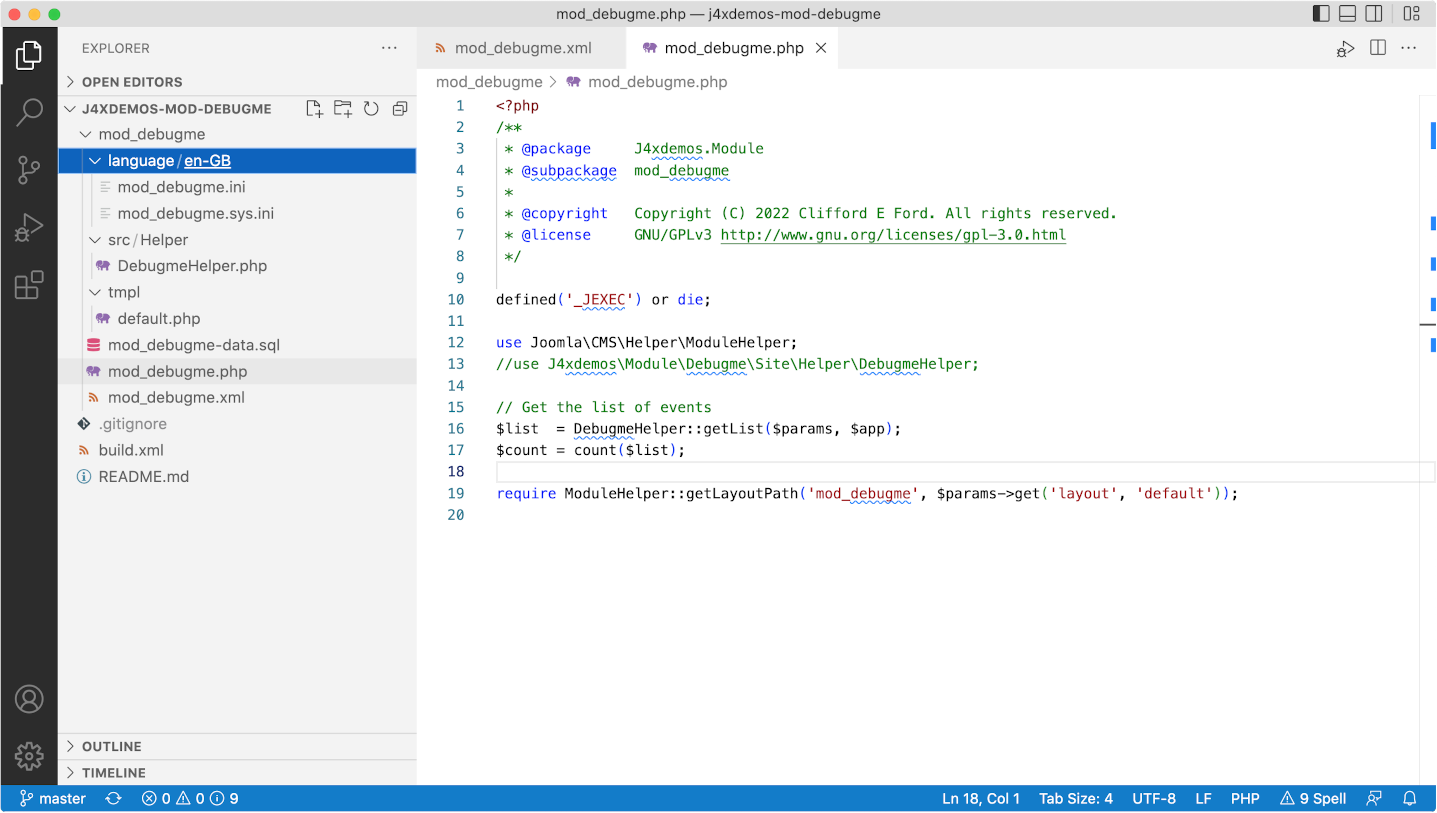
You may be able to diagnose the problem just by reading the code. In the case of the Class "DebugHelper" not found error you will see that a use statement has been commented out a few lines previously. Forgetting to insert a use statement is a common error during initial development!
Fix that problem and then compress and install the module again. That step gets a bit tedious when you have multiple problems. Which is where build tools come in useful.
Phing
Phing is a command line tool, available for all platforms, used to build software packages using instructions stored in an xml file, named build.xml by default. For working with extension code it can be used to do two things:
- copy changed files from your extension source folder to the correct places in your website folder.
- generate a new zip file for new installations.
Download and install Phing. Other build tools are available! You could install Phing in your own bin folder or in a system bin folder. You need to note the path to your Phing code. In this example it is ~/bin/phing-latest.phar. You can try it out from the command line after changing into the folder containing your extension code:
    cd ~/git/j4xdemos-mod-debugme
    php ~/bin/phing-latest.phar
Response:
    Buildfile: /Users/ceford/git/j4xdemos-mod-debugme/build.xml

    mod_debugme > main:
          ... Any copied files will be mentioned here
          [zip] Building zip: /Users/ceford/zips/mod_debugme.zip

    BUILD FINISHED

    Total time: 0.0863 seconds
VS Code Tasks
To run Phing from within VS Code you need to create a tasks.json file in the .vscode folder in the root of the j4xdemos-mod-debugme folder. If the latter does not exist, first create it. Then create the tasks.json file and enter the following code:
    {
        // See https://go.microsoft.com/fwlink/?LinkId=733558
        // for the documentation about the tasks.json format
        "version": "2.0.0",
        "tasks": [
          {
            "label": "Build mod_debugme",
            "type": "shell",
            "command": "php ~/bin/phing-latest.phar",
            "windows": {
              "command": "php ~/bin/phing-latest.phar"
            },
            "group": "build",
            "presentation": {
              "reveal": "always",
              "panel": "shared"
            }
          }
        ]
    }
Windows users need to fix the Windows-specific command. You can now build the extension using the menu Terminal / Run Build Task. The result of the command should appear in the Terminal Panel beneath the Edit area.
      *  Executing task: php ~/bin/phing-latest.phar

    Buildfile: /Users/ceford/git/gitdemo/j4xdemos-mod-debugme/build.xml

    mod_debugme > main:

          [zip] Nothing to do: /Users/ceford/zips/mod_debugme.zip is up to date.

    BUILD FINISHED

    Total time: 0.1031 seconds

     *  Terminal will be reused by tasks, press any key to close it.
There may be incomprehensible error messages. The most likely cause is in having invalid paths to folders in the build.xml file or a folder has not been created. Just another sort of problem to debug!
Debugging
You should be able to fix the first bug by code inspection. More complicated problems require stepping though the code with the debugger. That allows you to inspect variables to see if they contain values that you expect, for example when passing arguments to library functions.
php.ini Settings
To set up debugging with Xdebug you need to make some entries at the top of your php.ini file.
    zend_extension="xdebug.so"
    xdebug.mode="debug"
    xdebug.client_port=9003
    xdebug.start_with_request = yes
After saving any changes, restart your Apache server.
Add Website Window
Your extension folder contains just a few files, the sources of the files installed in your website. Runtime debugging involves setting breakpoints in your site files so you need access to those files. You could use the File / Add Folder to Workspace... menu to add the site folder to your Workspace. However, there is a very good chance you will end up making changes to site files instead of source files. So it is probably best to open a separate VS Code window for debugging.
- Open new window: From the VS Code menu, select File / New Window and select the folder containing your Joomla website.
- Open folder: In the newly opened window, select File / Open Folder... from the VS Code menu. Find your website folder and select it. You should see a list of all the files in your Joomla website in the Primary sidebar.
Launch Configuration
For debug to actually work in VS Code you need a launch configuration. In the root of your website create a folder named .vscode (note the leading stop) containing a file named launch.json with the following content:
    {
        "configurations": [
            {
                "name": "Listen for XDebug",
                "type": "php",
                "request": "launch",
                "hostname": "0.0.0.0",
                "port": 9003,
                "stopOnEntry": true,
                "pathMappings": {
                    "/Users/ceford/Sites/j421rc2": "${workspaceFolder}"
                }
            }
        ]
    }
Remember to replace the pathMappings item in this example with the actual pathMappings on your own site. The stopOnEntry item will pause execution on the very first line of PHP code executed.
Debug mod_debugme
Now you are ready to find and fix the bugs in the installed module.
- Find module code: Find the first bug on line 16 of JROOT/modules/mod_debugme/mod_debugme.php.
- Set breakpoint: Click in the space to the left of the number 16. A pale red blob will appear as you hover and turn full red after you click to indicate a break point has been set.
- Start debug: From the VS Code menu select Run / Start Debugging. In your browser reload your site. Your VS Code window should reappear with the code stopped at the first line of the site index.php file. At the top of the screen are some icons to control the debug process. They should be self-explanatory. If not, look them up in the VS Code Help / Documentation.
- Continue: Select the continue button - the code will run on to your first breakpoint. Examine the code to see what the problem is.
- Hover: If you hover over a variable that has been assigned a value a small Tooltip will appear summarizing that variables attributes. There is no Tooltip for variables that have not been assigned values.
- Variables: The left column contains more information about the state of the code at the breakpoint. There are too many to cover here. Explore them as required!
- Stop Debugging: It is probably best to select the Continue icon, otherwise the web page is delivered blank. Otherwise you could use the Stop button or the Run / Stop Debugging menu.
Fix a Bug
Remember: Do not fix the bug in the website code! Fix it in the source code!
Fix the source code and then use Terminal / Run Build Task....
Restart debug.
Tips
A few not so obvious problems:
- You fix the first bug but it sill crashes on that line. Look in mod_debugme.xml to see where the src of namespaced classes is defined. When fixed in the source you need to reinstall the zip file or delete administrator/cache/autoload_psr4.php. When absent, Joomla rebuilds that file from manifest files. But if it has an incorrect or missing entry it does not get fixed until the extension is reinstalled.
- Sometimes you need to set a breakpoint a few lines before the line where the error occurs, especially if you wish to check values passed to function calls.
- Table xxx.yyy\debugme doesn't exist. Ah yes, the code to create a table on install and remove on uninstall was never created. You will need to run an sql query in phpMyAdmin using the content of the mod\debugme.sql file. Remember to change #\ in the table names for your database prefix. And when it still fails check the table name in the code.
Screenshot
When all is fixed this is what you might see:
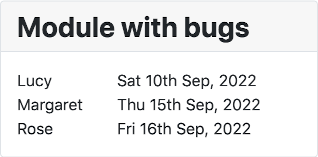
Cake days?
References
From Joomla! Documentation: Visual Studio Code also covers configuration of other tools, for example CodeSniffer and PHPUnit.