Templates
Cassiopeia Customisation
Introduction
Cassiopeia is the site template supplied with Joomla 4 and higher. It is an excellent general purpose accessible and responsive template. It can be customised via the template options and the user.css file by users with a little knowledge of HTML and CSS.
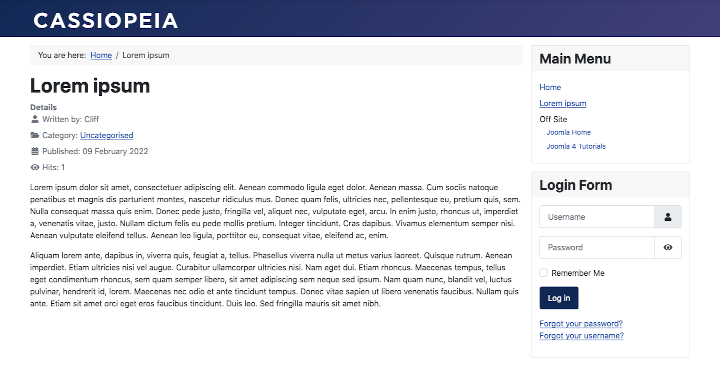
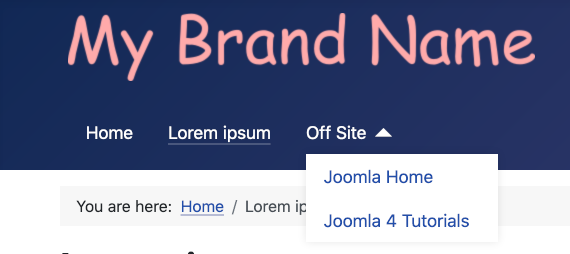
The following illustration shows the appearance of a Joomla 4 site with one article and a few menu items created.
Templates: Edit Style
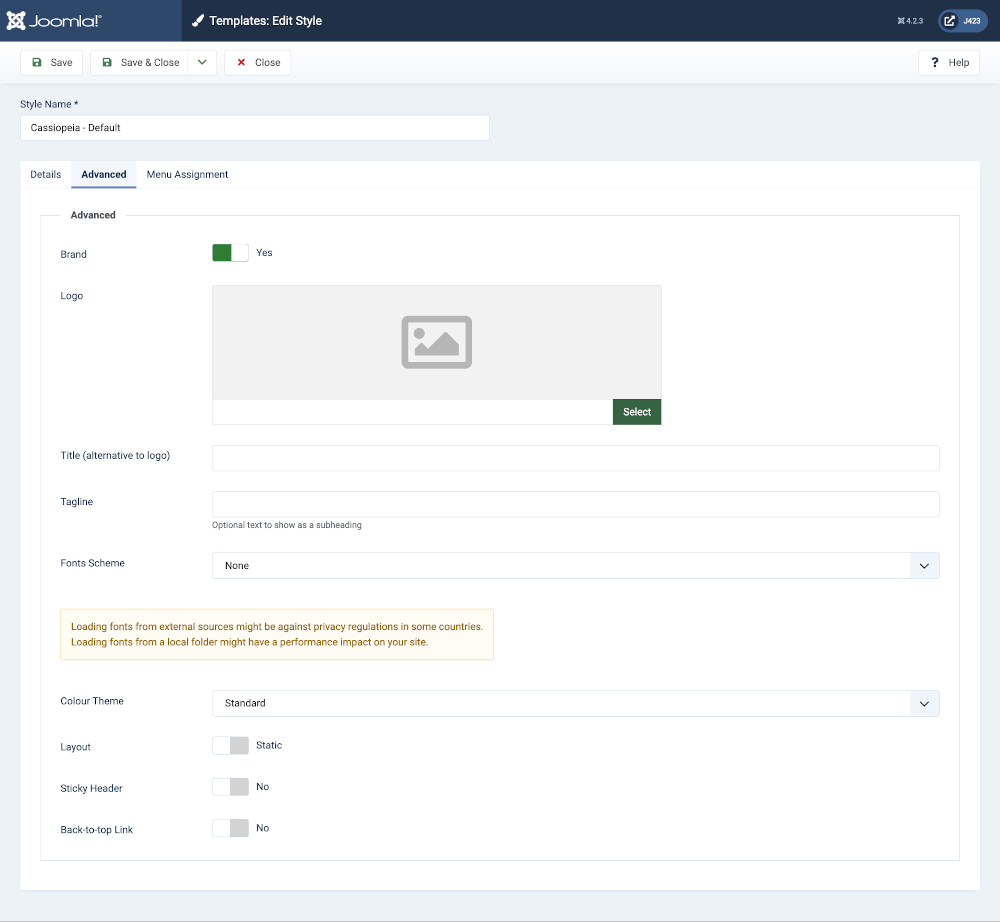
You can experiment with the site appearance by opening the Edit Style form. Go to System → Templates → Site Template Styles and select the template title in the Style column, Cassiopeia - Default. The Advanced tab contains settings you can adjust:

To try the options have one browser tab or window open with the Administrator interface and a second tab or window with the Site interface and switch back and forth after each saved change.
Brand
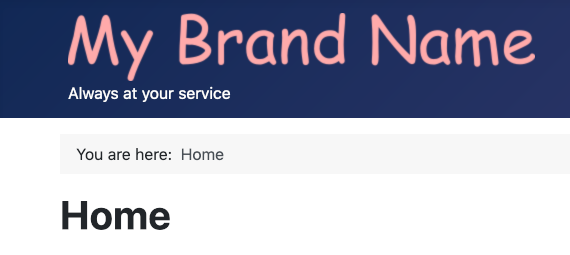
- Yes the default. The Cassiopeia logo bar containing a Logo or Brand name is displayed with a dark background, blue by default.
- No The logo bar is not displayed. The options to select a Logo, Title and Tagline disappear.
The default brand image is the word Cassiopeia as an image in an SVG file. That is what is displayed in the first illustration above.
You might set the Brand to No if you wish to provide branding in a custom HTML module.
Logo
- None The default Cassiopeia image logo will be used unless a Title is defined.
- Logo Image The selected Logo will appear in place of the Cassiopeia logo even if a Title is defined.
Title (alternative to logo)
- My Brand Name If present and you have not selected a Logo image, the words in the Title field will appear but underlined in the blue top bar.
Tag Line
- Always at your service If present the words in the tag-line field will appear in a small font size beneath the logo image or Brand name.
Fonts Scheme
- None the default. The font family specified in the template style sheet is used, which usually means the site will use the fonts you are familiar with available on your own computer.
- Others A font family located in the template folder hierarchy or downloaded from the web will be used. You can see the changed appearance of the text on a page when you reload the site after changing this option.
Color Theme
- Standard A dark blue background color for the Brand bar and other features such as the Login button.
- Alternative A maroon background color instead of dark blue.

Layout
- Static the default. The maximum width is set to 1320px. On wider screens the margin just gets wider.
- Fluid There is no maximum width.
The view on a narrow screen mobile device:
Sticky Header
- No the default. Header items and content scroll upwards out of the viewport.
- Yes Except on narrow screens, header items remain fixed to the top of the viewport while the content items scroll upwards. That is only evident where page content is taller than the viewport.
Back-to-top Link
- No the default. There is no Back-to-top link.
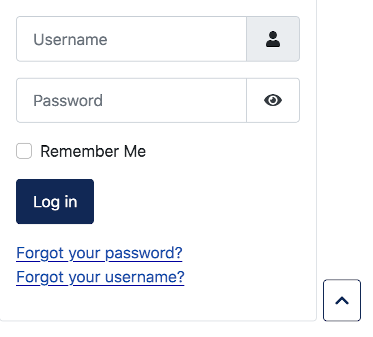
- Yes Where content is taller than the viewport, at the bottom right of the page is a button marked with an Up chevron. Select it to scroll back to the top of the page.
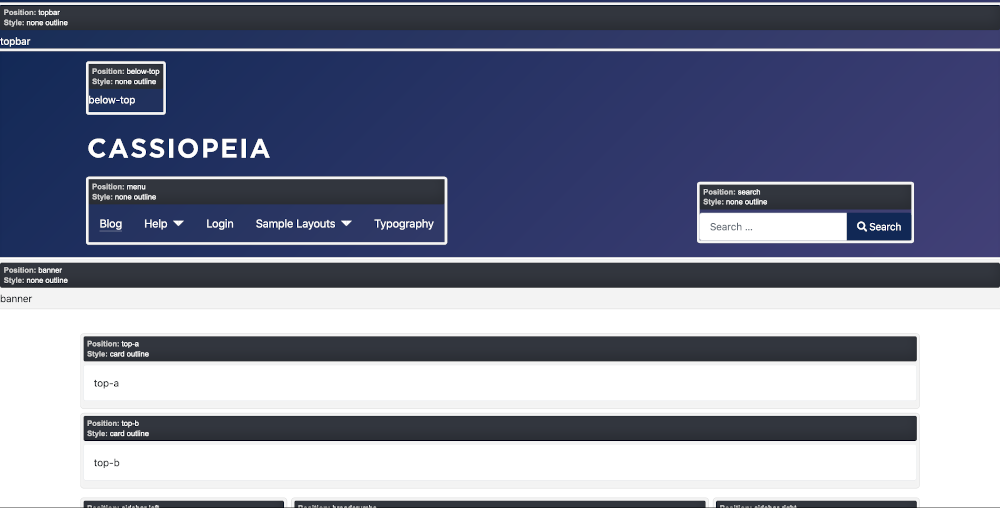
Cassiopeia Template Positions
As you build a site with Cassiopeia it becomes really useful to know the locations of the positions you can use for modules. Some are descriptive, like menu and bottom-a but it is not so obvious where they are until you use them. This illustration should help:

Try the following:
Move the Menu Module to the menu Position
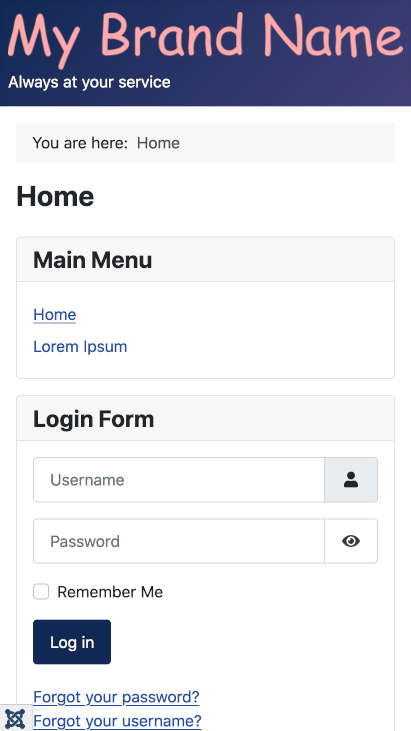
A newly installed Joomla 4 site has a menu in the sidebar-right position, seen in the first illustration above. For this tutorial some menu items have been added, one of which is a parent with two child items. To move this menu to the menu position go to Content → Site Modules in the Administrator menu. In the list there are three modules including Main Menu. Select it to open the Modules: Menu edit form.
In the Module tab, change the Position field at the right to Menu [menu]. Save and have a look at the result in the Site display. The menu looks fine but the child items are not there.
In the menu edit form select the Advanced tab and scroll down to the Layout field. It is a drop-down list with four options. --From Module-- / Default is selected by default. Try the other options and view the result. (Remember to Save in the edit form and reload in the Site view.) Neither of the --From Module-- options show the child menu items but both of the --From Cassiopeia Template-- do.
So what difference does Collapsible make?
- Collapsible Dropdown: On narrow screen mobile devices the menu collapses to a Hamburger icon until selected. On selection it expands to show a vertical list.
- Dropdown: The menu always appears as a vertical list.
Move the Menu Module to the topbar Position
In the edit form Module tab set the Position to Top Bar [topbar] and have a look at the result. There is a snag - the menu is positioned further to the left than when it was in the menu position. That is because menu position and logo location have a CSS class of grid-child but the topbar does not. That can be fixed with an entry in the user.css file, coming below.
Customise Cassiopeia
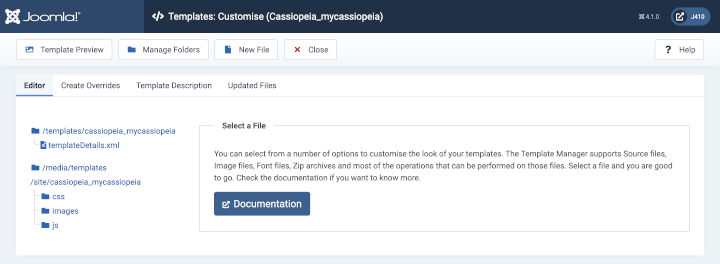
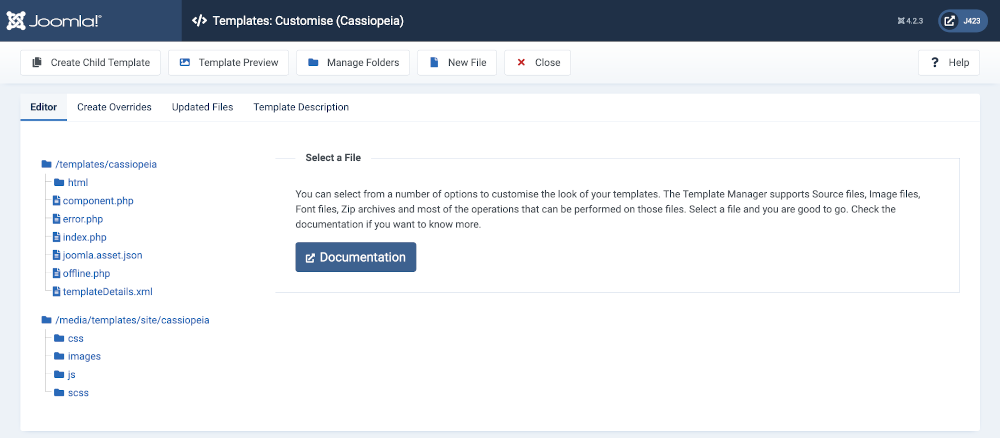
What if you do not care for the dark blue header background colour? Suppose you would prefer a dark green theme. To fix that you need a little knowledge of CSS. Go to System → Site Templates → Cassiopeia Details and Files to open the Template: Customise (Cassiopeia) form.
The illustration below shows two folder groups. The first group consists of the template folders and files that you should not change but you may add to. In particular you may add template override HTML files to the html folder, The second group contains the template media files that you should not change. However, you may add a user.css file to the css folder and/or a user.js file to the js folder. You would do this if you wanted to make a few simple changes to site appearance.
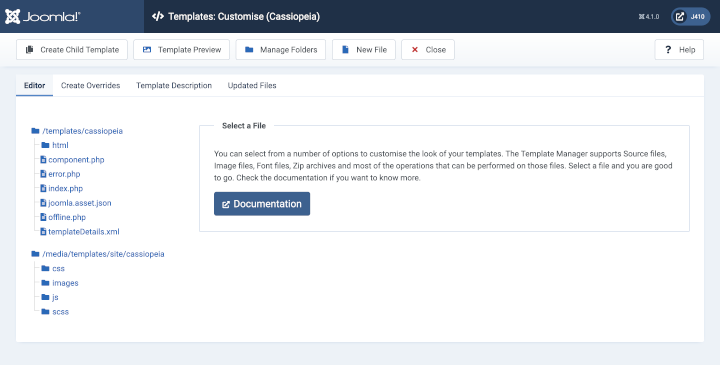
Note that there is no user.css file present in the css folder. That is one you create yourself so that you can override previously defined styles. If it is not present, create it now by selecting the the css folder and then the New button. In the New File modal dialog select the css folder otherwise the new file will appear in the wrong place. Enter user (lower case and without .css) in the File Name field and select .css from the File Type field. Select the Create button to create the file. If user.css is already present, select it to open the edit form.
Headings
As a simple starter, change the colour of headings to dark green. Headings are tags in the range h1, h2, h3, h4, h5 and h6. In the user.css file enter the style definition:
    h1, h2, h3, h4, h5, h6 {
      color: darkgreen;
    }
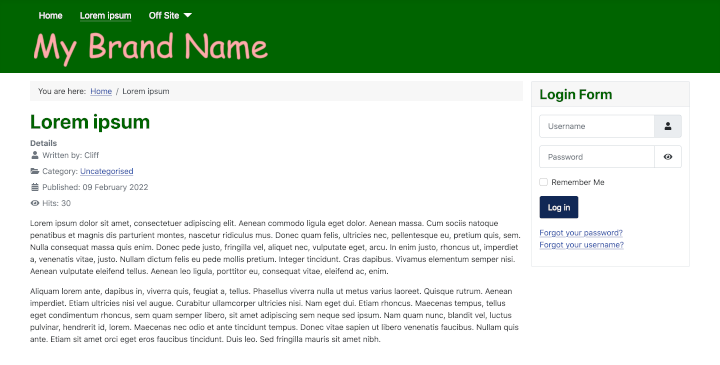
Save and reload the site to see the result. The Page or Article title should be dark green. If not, check what you have typed. The formal language for Joomla documentation is British English, so colour rather than color as in American English. But in CSS it must be color. Is the punctuation correct?
Not so obvious is that some tags other than headings may be styled to look like headings. So add this:
    .h1, .h2, .h3, .h4, .h5, .h6 {
      color: darkgreen;
    }
Note here that the leading dot (.) is a class selector, for example Dummy H1 - so there is a dot in the CSS file but not in the class name.
Header Background
In the browser tab containing the Site, open your browser Developer Tools, Firefox in this example, and select the header tag.

That shows the styles used. The container-header style is where the background-color and background-image are set. They need to overriden in the user.css file. Try this:
    .container-header {
      background-color: darkgreen;
      background-image: none;
    }
topbar Style
Remember that comment about the menu being too far to the left in the topbar? That is because it does not have a maximum width and appropriate margins set. Put this in user.css file to fix that:
    .container-topbar {
      max-width: 1320px;
      margin-left: auto;
      margin-right: auto;
    }
This is the working green theme:
Accessibility
Note that there must be a sufficient contrast between background and foreground colours to meet web accessibility standards. You can check your contrast at the WebAIM Contrast Checker. Dark green is #006400.
Overrides
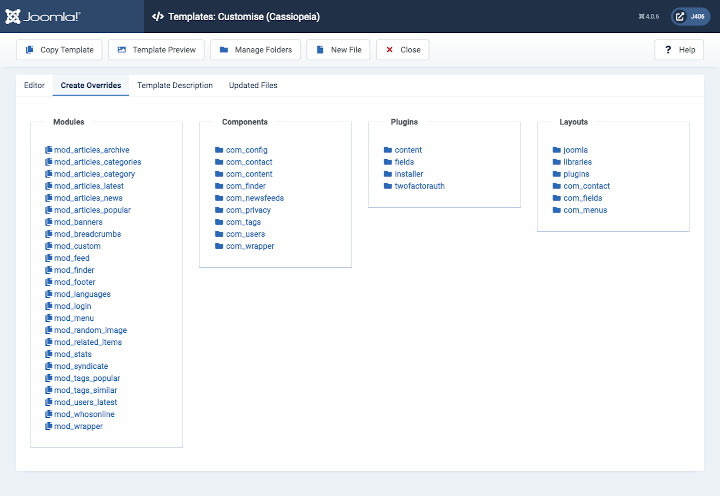
The Templates: Customise (Cassiopeia) form Create Overrides tab shows the list of extensions for which you can create an override. Note the different symbols: select a folder symbol to show a list of the folders and files it contains; select a multi-file symbol to immediately create an override for that extension; the created item disappears from the list - select the Editor tab and locate the created override in the html folder. There may be more than one file created - the created files are copied from the original extension ready for you to edit. For that you need to know some HTML and PHP!
This is the Create Overrides tab:
If you are just experimenting and do not really want an override, you can Close the edit form, Select the Manage Folders button in the Toolbar and select the Delete button at the bottom of the Manage Folders modal form.
Overrides are really about customising extensions rather the Cassiopeia template and that is another story.
Child Templates
If you want to make more substantial changes to site appearance you could create a child template. That copies just a small selection of folders and files for you to change or add to but otherwise continues to use the parent template folders and files. By using child templates you could have some pages with one theme colour and other pages with a second theme colour. Child templates are covered elsewhere. This is an illustration of the file structure in a child of Cassiopeia:
Cassiopeia templateDetails.xml
Location and Purpose
You can see an example of a templateDetails.xml file listed in System → Site Templates → Cassiopeia Details and Files. You can edit it there too if you have good reason to do so. Otherwise, leave it alone! Every template has such a file and a child template initially consists of a file structure containing only this one file.
The templateDetails.xml file contains the data that Joomla! needs to manage and display the template. This includes meta-data used to provide information about the template, the locations of folders and files, the template module positions and the user selectable configuration options. The content of the templateDetails.xml file will differ from template to template.
Cassiopeia templateDetails.xml
Files in xml format have a well-defined structure. An xml file must be have the correct syntax or it will not work!
XML Format
The first line of every templateDetails.xml must start with the XML doctype definition.
The next line tells Joomla! that the data in this file is for a site template extension. All template data is contained within the opening and the closing tags.
<extension type="template" client="site">
...
</extension>
Metadata
The first section of template data usually defines template information, for example: names, dates, contact information, copyrights, version number and description.
<extension version="3.1" type="template" client="site">
<name>cassiopeia</name>
<version>1.0</version>
<creationDate>2017-02</creationDate>
<author>Joomla! Project</author>
<authorEmail>This email address is being protected from spambots. You need JavaScript enabled to view it. </authorEmail>
<copyright>(C) 2017 Open Source Matters, Inc.</copyright>
<description>TPL_CASSIOPEIA_XML_DESCRIPTION</description>
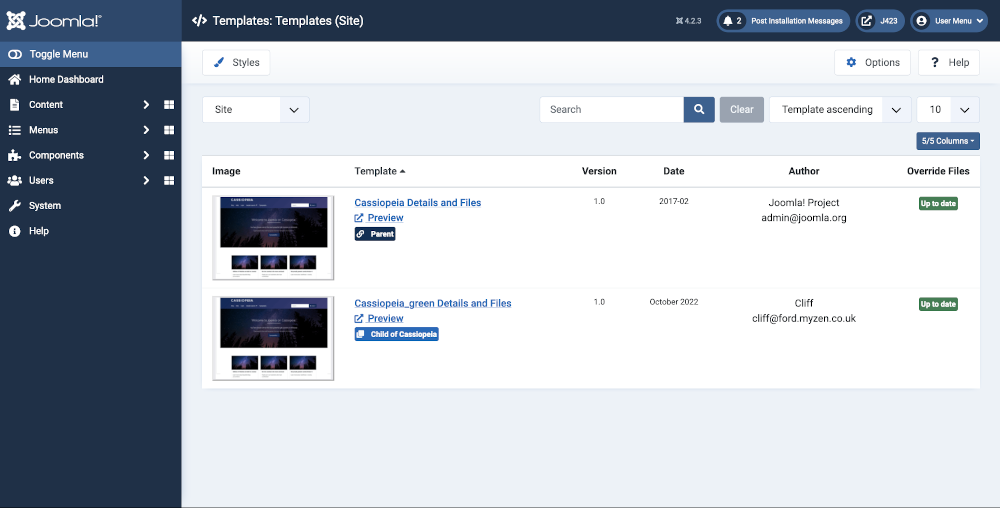
<inheritable>1</inheritable>
Notice that a template that can have child templates has the inheritable value set to 1. Child templates have this value set to 0. This data is used in the Templates: Templates (Site) listing as shown below.
The description contains a language key and not the actual description text string. The key is replaced by the text obtained from a language file at run time. The language files are defined in the in the language section of templateDetails.xml.

Folders and Files
Folders and files for the Cassiopeia template are stored in two separate places. The php and related files are stored in the site/templates folder. The media files (css, images, js and scss) are stored in the site/media folder. Those locations are defined in the xml file as follows:
    <files>
        <filename>component.php</filename>
        <filename>error.php</filename>
        <filename>index.php</filename>
        <filename>joomla.asset.json</filename>
        <filename>offline.php</filename>
        <filename>templateDetails.xml</filename>
        <folder>html</folder>
    </files>
    <media destination="templates/site/cassiopeia" folder="media">
        <folder>js</folder>
        <folder>css</folder>
        <folder>scss</folder>
        <folder>images</folder>
    </media>
This is the pattern seen in all modern Joomla 4 and 5 templates. The structure can be seen in the Templates: Customise (Cassiopeia) form:
Module Positions
The available module positions are defined as follows:
    <positions>
        <position>topbar</position>
        <position>below-top</position>
        <position>menu</position>
        <position>search</position>
        <position>banner</position>
        <position>top-a</position>
        <position>top-b</position>
        <position>main-top</position>
        <position>main-bottom</position>
        <position>breadcrumbs</position>
        <position>sidebar-left</position>
        <position>sidebar-right</position>
        <position>bottom-a</position>
        <position>bottom-b</position>
        <position>footer</position>
        <position>debug</position>
    </positions>
Each tag creates a module position that is available from the position list in a module edit form. The simple format of the position list means it can be customized easily. For example, to add a new module position to the list in a child template, simply add a new tag inside the tag with a unique name using all lowercase letters with no spaces. Keep in mind that this only adds the position to module edit forms and additional development in other template files is required to render the new position on the front end.
Cassiopeia has enough template positions! If you think you need an extra one you are probably wrong. Remember that any number of modules can be assigned to a single position and sorted into order in the Modules list page. Available positions:
You can also see the module positions in any template: from System → Site Templates select the Options button in the Toolbar. In the Options form set the Preview Module Positions field to Enabled. Save and Close. Go to your site and add ?tp=1 to the end of any url (or &tp=1 if there is already a ? in the url). Joomla will display all of the available template positions, even those that have not been used:
Languages
Language files allow translation of static text in the template. The tpl_cassiopeia.ini file contains key to text translations for text that will be viewed by the User. The tpl_cassiopeia.sys.ini file contains key to text translations for text that will be seen by the Administrator.
    <languages folder="language">
        <language tag="en-GB">en-GB/tpl_cassiopeia.ini</language>
        <language tag="en-GB">en-GB/tpl_cassiopeia.sys.ini</language>
    </languages>
The language files for the default English GB language are are stored in site/language/en-GB/. Other languages would be stored similarly in files with the appropriate ISO language code, for example fr-FR for French in France or de-DE for German in Germany (which might be different from Swiss German and Austrian German).
Options
A template may offer display options that can be chosen by the Administrator in the Template: Edit Style form. For example, the Advanced tab of the Cassiopeia template allows an Administrator to change the Brand, add a Logo, select a Fonts Scheme, and more.
The template options are defined within a structure that creates fields within fieldsets. Each feildset appears as a tab in the edit form. This is the structure that creates the Advanced tab seen above.
    <config>
        <fields name="params">
            <fieldset name="advanced">
                <field
                    name="brand"
                    type="radio"
                    label="TPL_CASSIOPEIA_BRAND_LABEL"
                    default="1"
                    layout="joomla.form.field.radio.switcher"
                    filter="boolean"
                    >
                    <option value="0">JNO</option>
                    <option value="1">JYES</option>
                </field>
                ...
            </fieldset>
        </fields>
    </config>
Individual options are defined with the <field> tag. Each <fieldset>, and each <field> parameter within a <fieldset>, requires a unique name defined by a name attribute. This name defines the parameter itself and is used to pass settings to the front end files. Each parameter also contain a label attribute and a description attribute. The label text appears with the parameter in the settings screen to identify what the setting is used for and more detailed information can be included in the description.
A parameter field can be virtually any type of form input with corresponding options. This is selected by the type attribute. Any necessary options, such as radio button or select choices, are defined in <option> tags. CSS class names can be defined with the class attribute and a default value can be defined using the default attribute.
Below are the option definitions in the default Cassiopeia template. In this example, all Labels, Descriptions and Options are using language string definitions from the Language files defined in the previous section, as well as some from the Joomla! core, so they can be translated into different languages as necessary.
<config>
<fields name="params">
<fieldset name="advanced">
<field
name="brand"
type="radio"
label="TPL_CASSIOPEIA_BRAND_LABEL"
default="1"
layout="joomla.form.field.radio.switcher"
filter="boolean"
>
<option value="0">JNO</option>
<option value="1">JYES</option>
</field>
<field
name="logoFile"
type="media"
default=""
label="TPL_CASSIOPEIA_LOGO_LABEL"
showon="brand:1"
/>
<field
name="siteTitle"
type="text"
default=""
label="TPL_CASSIOPEIA_TITLE"
filter="string"
showon="brand:1"
/>
<field
name="siteDescription"
type="text"
default=""
label="TPL_CASSIOPEIA_TAGLINE_LABEL"
description="TPL_CASSIOPEIA_TAGLINE_DESC"
filter="string"
showon="brand:1"
/>
<field
name="useFontScheme"
type="groupedlist"
label="TPL_CASSIOPEIA_FONT_LABEL"
default="0"
>
<option value="0">JNONE</option>
<group label="TPL_CASSIOPEIA_FONT_GROUP_LOCAL">
<option value="media/templates/site/cassiopeia/css/global/fonts-local_roboto.css">Roboto (local)</option>
</group>
<group label="TPL_CASSIOPEIA_FONT_GROUP_WEB">
<option value="https://fonts.googleapis.com/css2?family=Fira+Sans:wght@100;300;400;700&display=swap">Fira Sans (web)</option>
<option value="https://fonts.googleapis.com/css2?family=Noto+Sans:wght@100;300;400;700&family=Roboto:wght@100;300;400;700&display=swap">Roboto + Noto Sans (web)</option>
</group>
</field>
<field
name="noteFontScheme"
type="note"
description="TPL_CASSIOPEIA_FONT_NOTE_TEXT"
class="alert alert-warning"
/>
<field
name="colorName"
type="filelist"
label="TPL_CASSIOPEIA_COLOR_NAME_LABEL"
default="colors_standard"
fileFilter="^custom.+[^min]\.css$"
exclude="^colors.+"
stripext="true"
hide_none="true"
hide_default="true"
directory="media/templates/site/cassiopeia/css/global/"
validate="options"
>
<option value="colors_standard">TPL_CASSIOPEIA_COLOR_NAME_STANDARD</option>
<option value="colors_alternative">TPL_CASSIOPEIA_COLOR_NAME_ALTERNATIVE</option>
</field>
<field
name="fluidContainer"
type="radio"
layout="joomla.form.field.radio.switcher"
default="0"
label="TPL_CASSIOPEIA_FLUID_LABEL"
>
<option value="0">TPL_CASSIOPEIA_STATIC</option>
<option value="1">TPL_CASSIOPEIA_FLUID</option>
</field>
<field
name="stickyHeader"
type="radio"
label="TPL_CASSIOPEIA_STICKY_LABEL"
layout="joomla.form.field.radio.switcher"
default="0"
filter="integer"
>
<option value="0">JNO</option>
<option value="1">JYES</option>
</field>
<field
name="backTop"
type="radio"
label="TPL_CASSIOPEIA_BACKTOTOP_LABEL"
layout="joomla.form.field.radio.switcher"
default="0"
filter="integer"
>
<option value="0">JNO</option>
<option value="1">JYES</option>
</field>
</fieldset>
</fields>
</config>
In this example, the <fieldset name="advanced"> tag encloses all of the parameters and it uses the name attribute to create the Advanced tab in the interface. All that is necessary to create another tab in the interface is another <fieldset> tag with a different name attribute. With this in mind, it is relatively simple to create as many additional tabs and parameters as necessary in a template.
One potential use of extra parameters is in overrides or layouts for either parent or child templates.
Summary
This is the templateDetails.xml file used by Cassiopeia:
<?xml version="1.0" encoding="utf-8"?>
<extension type="template" client="site">
<name>cassiopeia</name>
<version>1.0</version>
<creationDate>2017-02</creationDate>
<author>Joomla! Project</author>
<authorEmail>This email address is being protected from spambots. You need JavaScript enabled to view it. </authorEmail>
<copyright>(C) 2017 Open Source Matters, Inc.</copyright>
<description>TPL_CASSIOPEIA_XML_DESCRIPTION</description>
<inheritable>1</inheritable>
<files>
<filename>component.php</filename>
<filename>error.php</filename>
<filename>index.php</filename>
<filename>joomla.asset.json</filename>
<filename>offline.php</filename>
<filename>templateDetails.xml</filename>
<folder>html</folder>
</files>
<media destination="templates/site/cassiopeia" folder="media">
<folder>js</folder>
<folder>css</folder>
<folder>scss</folder>
<folder>images</folder>
</media>
<positions>
<position>topbar</position>
<position>below-top</position>
<position>menu</position>
<position>search</position>
<position>banner</position>
<position>top-a</position>
<position>top-b</position>
<position>main-top</position>
<position>main-bottom</position>
<position>breadcrumbs</position>
<position>sidebar-left</position>
<position>sidebar-right</position>
<position>bottom-a</position>
<position>bottom-b</position>
<position>footer</position>
<position>debug</position>
</positions>
<languages folder="language">
<language tag="en-GB">en-GB/tpl_cassiopeia.ini</language>
<language tag="en-GB">en-GB/tpl_cassiopeia.sys.ini</language>
</languages>
<config>
<fields name="params">
<fieldset name="advanced">
<field
name="brand"
type="radio"
label="TPL_CASSIOPEIA_BRAND_LABEL"
default="1"
layout="joomla.form.field.radio.switcher"
filter="boolean"
>
<option value="0">JNO</option>
<option value="1">JYES</option>
</field>
<field
name="logoFile"
type="media"
default=""
label="TPL_CASSIOPEIA_LOGO_LABEL"
showon="brand:1"
/>
<field
name="siteTitle"
type="text"
default=""
label="TPL_CASSIOPEIA_TITLE"
filter="string"
showon="brand:1"
/>
<field
name="siteDescription"
type="text"
default=""
label="TPL_CASSIOPEIA_TAGLINE_LABEL"
description="TPL_CASSIOPEIA_TAGLINE_DESC"
filter="string"
showon="brand:1"
/>
<field
name="useFontScheme"
type="groupedlist"
label="TPL_CASSIOPEIA_FONT_LABEL"
default="0"
>
<option value="0">JNONE</option>
<group label="TPL_CASSIOPEIA_FONT_GROUP_LOCAL">
<option value="media/templates/site/cassiopeia/css/global/fonts-local_roboto.css">Roboto (local)</option>
</group>
<group label="TPL_CASSIOPEIA_FONT_GROUP_WEB">
<option value="https://fonts.googleapis.com/css2?family=Fira+Sans:wght@100;300;400;700&display=swap">Fira Sans (web)</option>
<option value="https://fonts.googleapis.com/css2?family=Noto+Sans:wght@100;300;400;700&family=Roboto:wght@100;300;400;700&display=swap">Roboto + Noto Sans (web)</option>
</group>
</field>
<field
name="noteFontScheme"
type="note"
description="TPL_CASSIOPEIA_FONT_NOTE_TEXT"
class="alert alert-warning"
/>
<field
name="colorName"
type="filelist"
label="TPL_CASSIOPEIA_COLOR_NAME_LABEL"
default="colors_standard"
fileFilter="^custom.+[^min]\.css$"
exclude="^colors.+"
stripext="true"
hide_none="true"
hide_default="true"
directory="media/templates/site/cassiopeia/css/global/"
validate="options"
>
<option value="colors_standard">TPL_CASSIOPEIA_COLOR_NAME_STANDARD</option>
<option value="colors_alternative">TPL_CASSIOPEIA_COLOR_NAME_ALTERNATIVE</option>
</field>
<field
name="fluidContainer"
type="radio"
layout="joomla.form.field.radio.switcher"
default="0"
label="TPL_CASSIOPEIA_FLUID_LABEL"
>
<option value="0">TPL_CASSIOPEIA_STATIC</option>
<option value="1">TPL_CASSIOPEIA_FLUID</option>
</field>
<field
name="stickyHeader"
type="radio"
label="TPL_CASSIOPEIA_STICKY_LABEL"
layout="joomla.form.field.radio.switcher"
default="0"
filter="integer"
>
<option value="0">JNO</option>
<option value="1">JYES</option>
</field>
<field
name="backTop"
type="radio"
label="TPL_CASSIOPEIA_BACKTOTOP_LABEL"
layout="joomla.form.field.radio.switcher"
default="0"
filter="integer"
>
<option value="0">JNO</option>
<option value="1">JYES</option>
</field>
</fieldset>
</fields>
</config>
</extension>
Child Templates
Introduction
Child templates use all of the files of their parent templates except for any files of the same name you place in the child template. Child template files are not affected by Joomla updates. So you could place your own index.php file in a child template and have it deliver something quite different from the default template, such as extra module positions or alternative extension overrides.
An example scenario: suppose you want some of your pages to appear with a blue theme, the default Cassiopeia colours, and other pages to appear with a green theme. An easy way to do that is with a child template that uses its own user.css style sheet,
Worked Example
Create a Child Template
Starting from System → Templates panel → Site Templates
- Select Cassiopeia Details and Files.
- Select the Create Child Template button.
- Fill out the form and select the Create Child Template button:
- Name: Green
- Additional Template Styles: Leave blank.

- Select Close from the Toolbar to close the parent template form.
- Select the new template, Cassiopeia_green Details and Files, from the list of Templates.
At this stage there is a folder structure but only one file: templateDetails.xml. That file can be changed if you wish to change aspects of the template configuration, for example template positions to be added or removed.
Create a user.css File
- Select the New File button in the Toolbar.
- In the Create or Upload a new file form make sure you select the
cssfolder - Fill out the filename with
user. Do NOT add a suffix! - Select the
.cssFile Type. - Select the Create button.

The user.css file is empty, ready for your to enter some custom styles. Enter the following to start the green theme:
    .container-header {
      background-color: darkgreen;
      background-image: none;
    }
    h1, h2, h3, h4, h5, h6 {
      color: darkgreen;
    }
    .h1, .h2, .h3, .h4, .h5, .h6 {
      color: darkgreen;
    }
    a, a:hover, a:focus {
      color: darkgreen;
    }
    .btn-info {
        background-color: darkgreen;
        border-color: #30638d;
        color: #fff;
    }
    .btn-primary, .btn-primary:focus, .btn-primary:hover {
        background-color: darkgreen;
        border-color: var(--cassiopeia-color-hover);
    }

    .btn-check:focus + .btn-info, .btn-info:focus, .btn-info:hover {
        background-color: darkgreen;
        border-color: #264f71;
        color: #fff;
    }
You may need to come back to this user.css file to add more styles later.
- Select Save & Close.
- Select Close to close the Customise form.
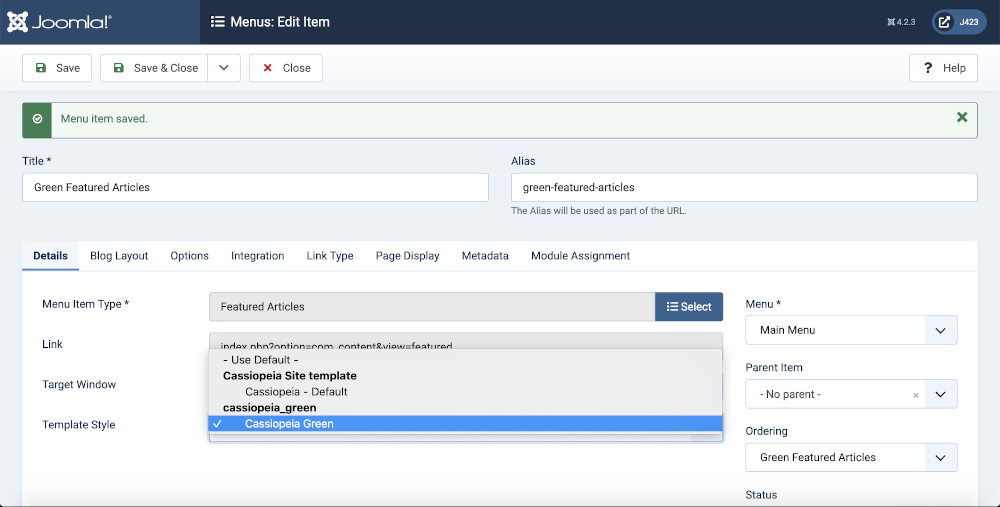
Add a Menu Item Using the Child Template
At this stage a menu item is needed to make use of the child template. A new Joomla installation has the Main Menu in the right sidebar position with one item in it. That seems like a good place for a new menu item.
- Select Menus → Main Menu from the Administrator menu.
- Select the New button from the Toolbar.
- Enter a suitable title, Green Featured Articles seems appropriate in this case.
- Select the Menu Item Type → Select button.
- Select a menu item type from the Menu Item Type popup dialog - Featured Articles in this example.
- Select cassiopeia_green - Default from the Template Style form field.
Site View
- in the Home page of your site select the newly created menu item.

Edit the Style
- Select System → Templates panel → Site TemplateStyles from the Administrator menu.
- Select Cassiopeia_green - Default from the Style list.
- Change the Style Name to Cassiopeia Green. That just tidies up the name as it appears in lists.
- Select Save and Close.
Favicons
The Joomla! Favicons
Favicons are the small icons that appear in the browser tab alongside your site name. Near the top of the template index.php are three instructions to load favicons into the page:
    // Browsers support SVG favicons
    $this->addHeadLink(HTMLHelper::_('image', 'joomla-favicon.svg', '', [], true, 1), 'icon', 'rel', ['type' => 'image/svg+xml']);
    $this->addHeadLink(HTMLHelper::_('image', 'favicon.ico', '', [], true, 1), 'alternate icon', 'rel', ['type' => 'image/vnd.microsoft.icon']);
    $this->addHeadLink(HTMLHelper::_('image', 'joomla-favicon-pinned.svg', '', [], true, 1), 'mask-icon', 'rel', ['color' => '#000']);
For the Cassiopeia template, Joomla will look for the favicons in the following locations:
- media/templates/site/cassiopeia/images - they are not there so Joomla will look in the next location.
- media/system/images - they are there so Joomla will use them from there.
If you want to use your own favicons rather than Joomla favicons you upload them to the first location: media/templates/site/cassiopeia/images. You can do that using the Templates: Customise form. They will not be affected by any update to the Cassiopeia template.
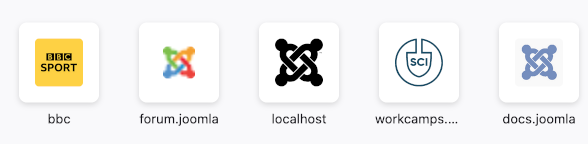
Favicons are sometimes used at larger sizes and in places other than the browser tab. For example, this is a screenshot of part of a Firefox start page showing some of the User's favourite locations:
All modern browsers support SVG icons so you should make creation of an SVG icon a priority.
About SVG
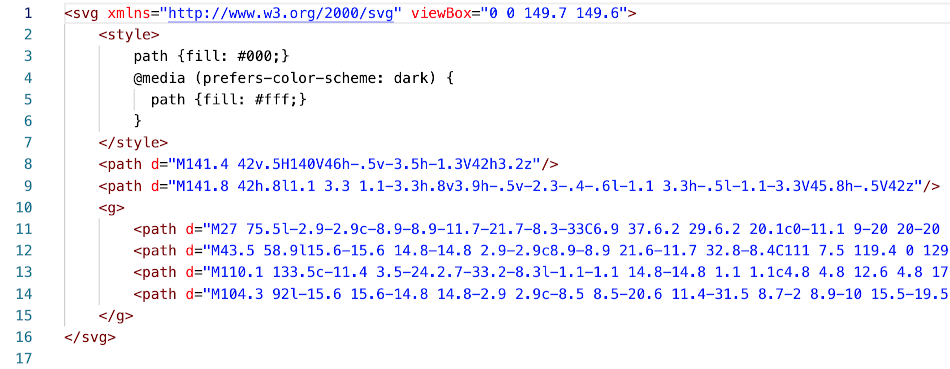
SVG is an acronym for Scalable Vector Graphics. An SVG file contains text in a format that defines the locations and shapes of lines with line colours, fill colours and so on. The following screenshot shows the joomla-favicon.svg file opened in a text editor. The line numbers are created by the text editor. They are not present in the file. The long lines represent curves and are truncated here for display purposes.
To create an SVG file you need to use an appropriate application such as Inkscape. Raster graphics applications such as Photoshop or The GIMP will not do. If you would prefer to design an icon in a raster graphics application, or you have an existing raster graphic logo that can be adapted for an icon you can import the resulting PNG file into Inkscape and there trace it to produce an SVG file. The traced image must be deleted after tracing!
Actual creation of an SVG favicon is beyond the scope of this article. Creation of a standard favicon.ico file starting from a joomla-favicon.svg file is very simple--plenty of sites do it online for free.
How to Create Favicons
If you want to create your own favicons the best way to do it is to create an SVG favicon and then use an online tool to generate all of the other formats with that as input. In this example an icon is needed to suit a child template named Cassiopeia Green. An icon needs to be square and not too elaborate as the minimum display size is 16x16 pixels. Some devices need higher resolutions, such as 32x32 or 180x180, and Google recommends multiples of 48x48 pixels. If you start with an SVG you do not need to worry about any of that - just create a nearly square image with a suitable design. In this example, the favicon will be the letters J4 in dark green.
Inkscape
Inkscape is a free, Open Source, cross-platform, vector graphics application used to work with SVG files. It works on Linux, Mac and Windows. Go to the Inkscape (inkscape.org) site to download a copy for your platform. The following illustrations shows the Inkscape screen part way through the following instructions.
Create an SVG
- Start Inkscape and make the window a comfortable size: select View / Zoom / Zoom Page
- Select the Text Tool, marked with letter A in the left Toolbar
- Select Arial, Normal, 48 and px
- Drag to define box anywhere on the page
- Type in Text: J4
- Select View / Zoom Selection
- Select Path / Object to Path - no visible change but the words are no longer text
- Select File / Document Properties
- Select Resize to Content
- Zoom out for a better view - but make sure all of the letters are still selected
- Set the height box to the same value as the width box. Type it!
- Close the Document Properties dialog
- View / Zoom Page again - the characters need to be centered
- Edit / Select All
- Objects / Align and Distribute
- Move selection as group / Relative to Page / Center on horizontal axis - you should see J4 move to the vertical mid point
- Select the Fill and Stroke right - the right hand panel has a dropdown list marked with a down chevron
- In the Fill and Stroke panel, select Fill and the first filled square
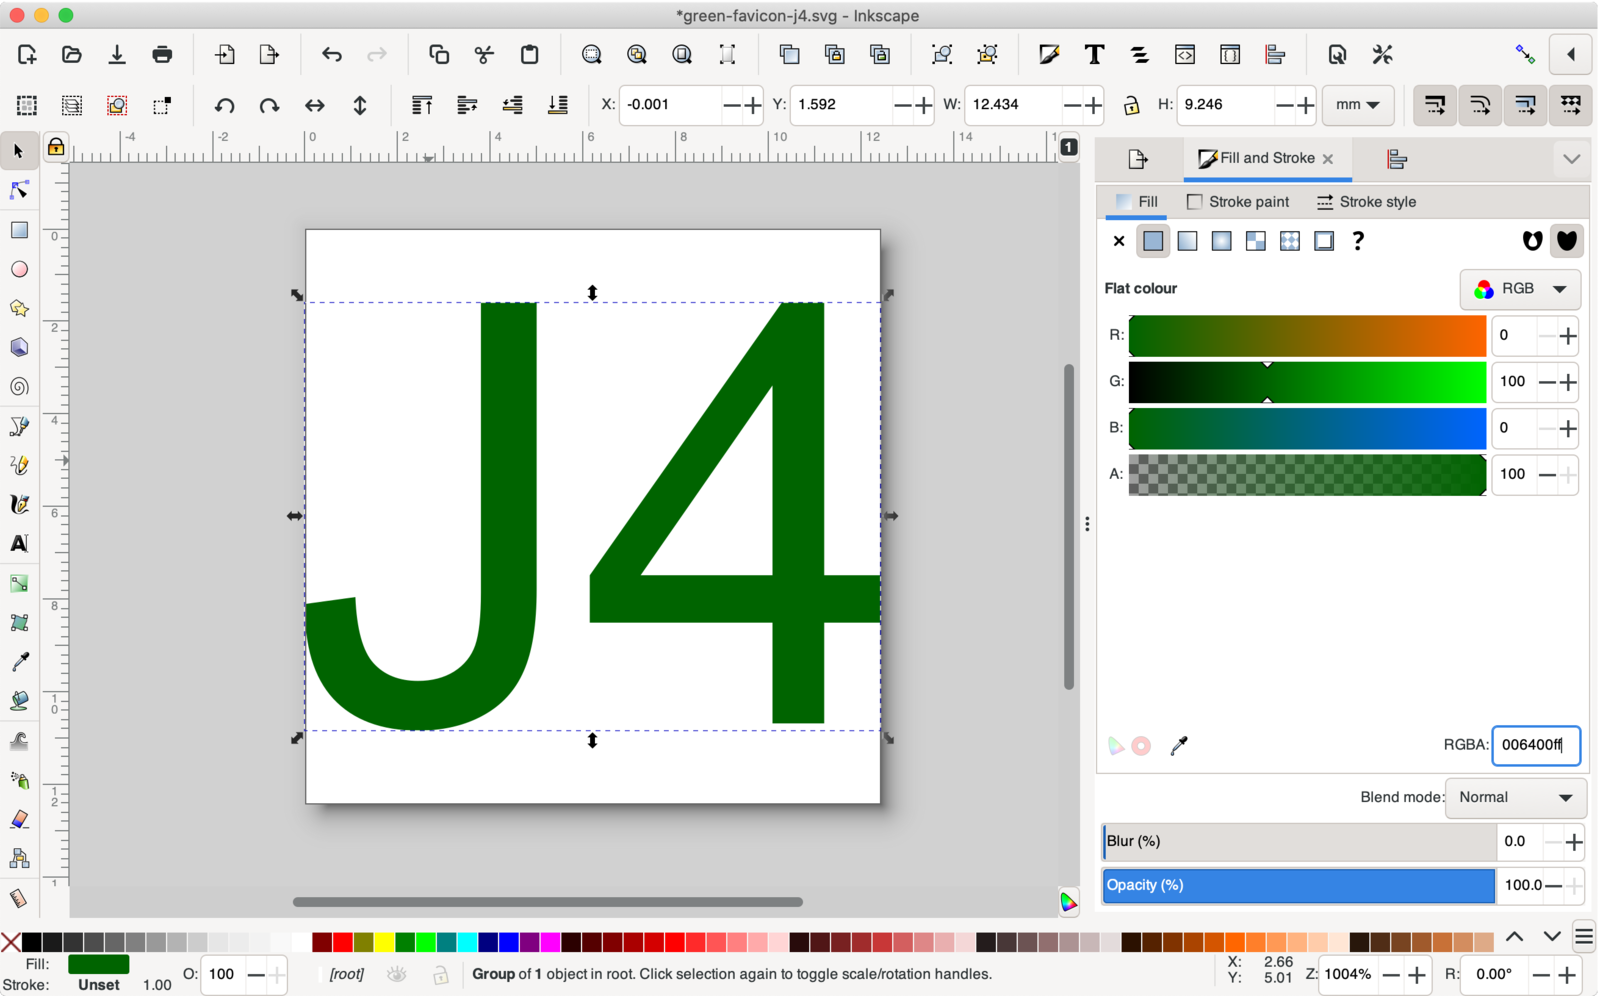
- In the RGB panel enter 006400ff in the RGBA field near the bottom right - the code for CSS style darkgreen
- File / Save
- In the Save dialog, enter a suitable file name, for example green-favicon-j4.svg
- Select a suitable location, for example ~/Documents/joomla-dev/svgs
- Select Optimised SVG (.svg) from the dropdown list at the bottom of the form.
- Select Save
- Select OK for all of the Defaults in the Optimised SVG Output form
- Close the SVG you are working on - there is an opportunity to save the image in Inkscape format but you don't really need to do that.
Edit the SVG with a Text Editor
Start your favourite text editor to make some changes that were not possible in Inkscape.
- Open your newly created SVG file - notice that the first line is an XML specification
- You can delete the second line - a comment containing Created with Inkscape
- If present, you can delete the line containing as there is no text
- Open the original joomla-favicon.svg file - it is in joomla_root/media/system/images
- Copy the style block and paste it into your SVG on the line following the SVG statement
- Close the original joomla-favicon-svg file to avoid accidental changes to it
- In the style block of your own SVG file change path {fill: #000;} to path {fill: #006400;}, the value in the line
- Remove fill="#006400" from the line
- Save
- Open the image in your browser. For Firefox that is File / Open File...
You should see the image in your browser. The example shows J4 at 47 pixels square. The next stage is to create the other type of icons you need using your newly created SVG as a master.
Online Processing
Go to the Real Favicon Generator site. Other sites are available but this one seems particularly comprehensive.
- Select the button labled Select your Favicon image
- The site will show you your Master Image. It also says Your picture is not square (688x512). We can fix this by adding transparent margins
- Select the Continue with this picture button below the Master Image.
- There are subforms with pale blue backgrounds for several types of icon - fill out each one checking the preview suits you.
- Best to stick with Favicon Generator Options defaults unless you know better. Except:
- Path, select the I cannot ... option and enter: media/templates/site/cassiopeia-green/images
- Select the Generate your Favicons and HTML Code button
- After a short delay, there is a new form, select the Download your package: Favicon package button
- Save the download ...
- Select and copy the block of links to save somewhere.
- Close the online processing site
The download is a zip file containing 10 items: favicon.ico, safari-pinned-tab.svg, six PNG files, browserconfig.xml and site.webmanifest.
Deployment
To use the standard set of Joomla favicons you need to rename and move the icons to joomla_root/media/templates/site/yourtemplate/images:
- Your master SVG image, green-favicon-j4.svg, must be renamed to joomla-favicon.svg
- The downloaded safari-pinned-tab.svg file needs to be renamed to joomla-favicon-pinned.svg
- The downloaded favicon.ico file just needs to be moved
The Link Block
The link block copied previously contains:
<link rel="apple-touch-icon" sizes="180x180" href="/media/templates/site/cassiopeia-green/images/apple-touch-icon.png">
<link rel="icon" type="image/png" sizes="32x32" href="/media/templates/site/cassiopeia-green/images/favicon-32x32.png">
<link rel="icon" type="image/png" sizes="16x16" href="/media/templates/site/cassiopeia-green/images/favicon-16x16.png">
<link rel="manifest" href="/media/templates/site/cassiopeia-green/images/site.webmanifest">
<link rel="mask-icon" href="/media/templates/site/cassiopeia-green/images/safari-pinned-tab.svg" color="#5bbad5">
<link rel="shortcut icon" href="/media/templates/site/cassiopeia-green/images/favicon.ico">
<meta name="msapplication-TileColor" content="#ffc40d">
<meta name="msapplication-config" content="media/templates/site/cassiopeia-green/images/browserconfig.xml">
<meta name="theme-color" content="#ffffff">
You probably don't need to make use of it!
Font Awesome Fonts
How to Use
The Joomla! CMS comes with its own custom Font Awesome Font Set. These icon fonts are available by default for use in the Cassiopeia and Atum templates.
Icon fonts that are mapped in /media/system/scss/_icomoon.scss can be called with a name-of-icon"> tag and a {space} </span>. eg
<span class="icon-joomla"> </span>
Will show the Joomla! icon:
Icon fonts that are not mapped can be called with a <span class="far fa-name-of-icon"> tag and a {space} </span>. Example:
<i class="fa fa-adjust"></i>
Will show an adjust icon:
Font Size
Because the icons are fonts, you can control the size of them with an added class or style= statement. Of course you will have to define the class in your .css or .less stylesheet file.
<span class="icon-joomla large-icon"> </span>
<span class="icon-joomla" style="font-size:24px;"> </span>
Here is the resized Joomla! icon:
Available Fontawesome Icons
This is the complete list of the Font Awesome libraries included in Joomla 4
/media/vendor/fontawesome-free/webfonts/fa-brands-400
/media/vendor/fontawesome-free/webfonts/fa-regular-400 and /media/vendor/fontawesome-free/webfonts/fa-solid-900