Multilingual
Debugging a Translation
Joomla Language Files
Whenever text is to be output to the screen Joomla coders insert a language constant such as JYES or JNO. During the rendering process language files are loaded with translations in the appropriate langauge. The language files all end in .ini. You can look in languages/en-GB/joomla.ini for some basic examples. Lines starting with a semi-colon are ignored. They can be used for comments. The remaining lines consist of key="value" pairs. Each language has the same set of keys but values are the appropriate translations.
Each Joomla extension has its own language files so there are hundreds in total. Sometimes, there are problems such as missing language constants, mis-spelled language constants or sytntax errors in the translation strings that can render a whole language file invalid.
Debug Language
Joomla provides some useful debugging mechanisms that can make it easier to locate untranslated strings and diagnose problems with language translations in installed extensions. To try it out:
From the Home Dasboard:
- Select the Global Configuration button in the System panel.
- Select the System panel and set Debug Language to Yes.
- Language display is normally set to Value. If set to Constant the layout is disrupted by long constants that do not wrap.
With Debug Language active all translatable values are shown surrounded with special characters that indicate their status:
**Joomla CMS**Text surrounded by two asterisks indicates that a match has been found in a language file and the constant has been translated.??Joomla CMS??Ttext surrounded by pairs of question marks indicates that the constant is translatable but no match was found in a language file.Joomla CMSText with no surrounding characters indicates that the value is not translatable. |
Debug System
Additional language debugging information can be obtained by activating System debugging.
From the Home Dasboard:
- Select Plugins and then find and enable the System - Debug plugin.
- Select the Home Dashboard again and then...
- Select the Global Configuration button.
- Select the System panel and set Debug System to Yes.
With System Debug active all screens have additional debugging information at the bottom of each page. It can be expanded from a Joomla icon and the top border dragged vertically to show more lines.
The debug information comes under several headings:
- J! Info Basic installation information.
- Request Server Request fields.
- Session Session information
- Profile The amount of time taken to execute code up to various mark points in the code.
- Queries The SQL queries executed in the process of building the page.
- Loaded. A list of all the language files loaded in the process of building the page, including full path information. This can be useful to check that the expected files have been loaded.
- Untranslated A list of all the untranslated constants found and the likely file location given where the translation call was made.
- Errors
System - Debug Plugin
This system plugin controls what is displayed when debugging is activated in Global Configuration. There are three settings of interest to translators.
In the Language tab:

- Errors When Parsing Language Files Display an error if a language file fails to load.
- Language Files. If set to Show then ...
- Language String If set to Show then ...
- Strip First Word.
- Strip From Start _ Strip From End
The following Explanation needs revision!
Note that untranslated strings will only display the value passed to the appropriate Text method. For example, with the following code:
echo Text::_( 'Reports Import Configuration' );
If untranslated will display as:
# /administrator/components/com_reports/views/reports/tmpl/default.php
REPORTS IMPORT CONFIGURATION=Reports Import Configuration
If the Strip Key Prefix is set to "Reports", then the display would change slightly to:
# /administrator/components/com_reports/views/reports/tmpl/default.php
REPORTS IMPORT CONFIGURATION=Import Configuration
Note that the path shown is only a best guess based on a call to the PHP debug_backtrace function. Sometimes it is accurate, sometimes it is not and there are also cases where no file could be determined. In those cases you have to use your best judgement.
Language Overrides
Language File Locations
Most Joomla! language files are located in language folders, one in the site root and another in the administrator folder. Each language has its own subfolder based on the RFC3066 standard language codes. Each extension stores its translations with a name derived from the extension name. Some examples:
siteroot/language/en-GB/com_content.ini
siteroot/administrator/language/en-GB/com_content.ini
siteroot/administrator/language/en-GB/com_content.sys.ini
The files contain lines consisting of a key and its translation:
COM_CONTENT="Articles"
COM_CONTENT_ADD_NEW_MENU_ITEM="New Menu Item"
COM_CONTENT_ARTICLE_CONTENT="Content"
COM_CONTENT_ARTICLES_TABLE_CAPTION="Table of Articles"
COM_CONTENT_ARTICLES_TITLE="Articles"
The Joomla PHP code uses the key. It is replaced by the text translation at run-time. The .ini file contains translations used by the extension. The sys.ini files contain translations used by Joomla to manage the extension. There may be hundreds of lines in a language file.
Third party extensions are advised to store their language files in language folders within the extension. There they are safe from deletion should an administrator decide to uninstall a language. Example:
siteroot/components/com_countrybase/language/en-GB/com_countrybase.ini
siteroot/administrator/components/com_countrybase/language/en-GB/com_countrybase.ini
siteroot/administrator/components/com_countrybase/language/en-GB/com_countrybase.sys.ini
Never edit any Joomla! core or third party language file! Any changes you make will be lost at the next update. If you wish to change the wording of any language item use the formal Language Override component.
Language overloads are your replacements for core or extension language key translations. These are individual translations, one or two, not a whole file! The language overrides for a given language are all stored in one file:
siteroot/language/overrides/en-GB.override.ini
siteroot/language/overrides/fr-FR.override.ini
siteroot/language/overrides/de-DE.override.ini

siteroot/administrator/language/overrides/en-GB.override.ini
siteroot/administrator/language/overrides/fr-FR.override.ini
siteroot/administrator/language/overrides/de-DE.override.ini
Language Load Order
On each page load, the en-GB language translations are loaded first. This ensures that no keys are seen by site users. If another language is in use the translations for that language are loaded next, replacing the en-GB translations. Other languages tend to lag behind en-GB in creating translations so users may occasionally see words or phrases in English amongst those of their own language.
Finally, translations are loaded from the language override file. This allows the site to use alternative words or phrses to suit local circumstances.
Language Overrides
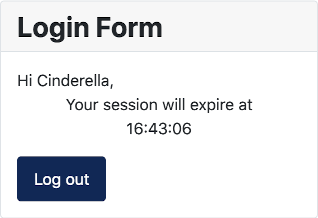
Occasionally, you may wish to replace a single translated language item with something more suited to local circumstances. A common case is where you create a template override or layout and wish to add some content that uses a new language key. The following example illustrates a case where some text has been added to the logout layout of the login module, described in the article on Template Layouts. The alternative layout has this code:
<p class="text-center">
Your session will expire at <br><?php echo $endTime; ?>
</p>
For a multilingual site using English, French and German the code needs to change:
<p class="text-center">
<?php echo Text::_('TPL_CASSIOPEIA_MOD_LOGIN_SESSION_EXPIRES_AT')?><br><?php echo $endTime; ?>
</p>
Note: if you have followed the Template Layout tutorial you may already have a key TPL_CASSIOPEIA_MOD_LOGIN_LAYOUT_EXPIRES that translates as Expires. But that is used in siteroot/administrator/language/overrides.
The new key can now be translated into each language. The translations will be saved in siteroot/language/overrides.
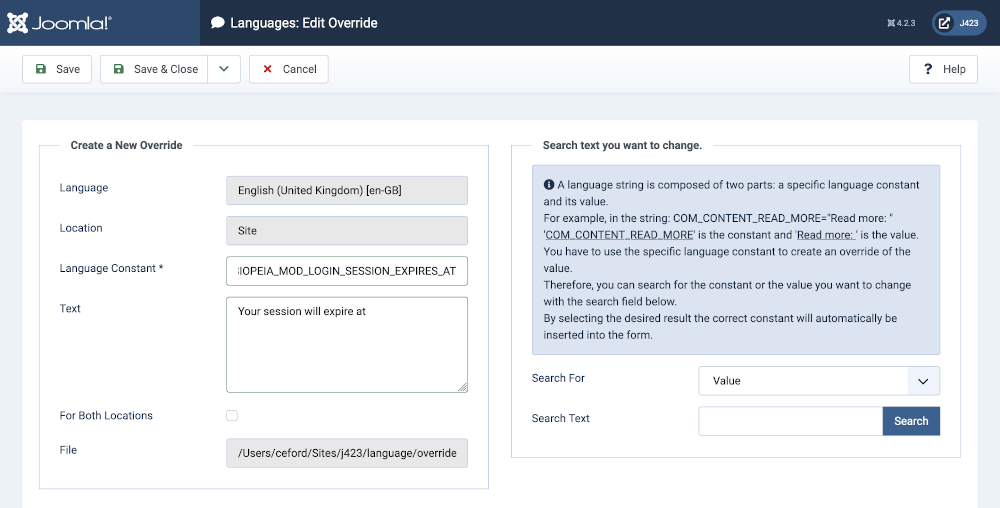
- Select System → Manage panel → Language Overrides
- Select your language and the Site location.
- Select the New button and fill out the form. In this example the language key is TPL_CASSIOPEIA_MOD_LOGIN_SESSION_EXPIRES_AT and the text might be Your session will expire at
- Save & Close the form.
- Repeat the translation process for each language.
Finally, check that the translation has been implemented.
Multilingual Associations
Multilingual Sites
Install additional languages in your site and you may think you have a multilingual site. Almost, but not quite. Human entered text has to be translated by humans. That includes such things as article titles and content, menu item titles, module titles and in some cases content, and more. You can just create the same items in each language that you use. That works just fine but it can be a bit tedious. That is where the Multilingual Associations component comes in useful. It is designed to display content in different languages side by side so that you can easily translate from one language to another.
Items for Association
The following items can be included in associations:
- Content: Articles and Categories
- Contacts: Contacts and Categories
- Menus: Menu Items
- News Feeds: News Feeds and Categories
- Others: Third party components may be coded to use associations.
The following screenshot shows an example list of articles in English with their equivalents in other languages.
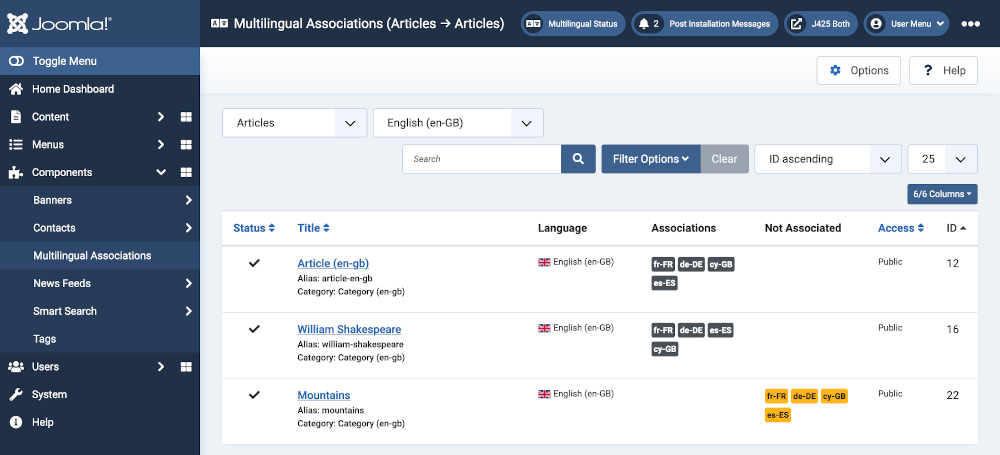
The last article on Mountains has not yet had equivalent articles created in other languages. The missing articles can be translated from the original English from this page.
Creating an Article Translation
If you have created a multilingual site you will have created a language category for each language and perhaps an article in your default language. If not, do that now. The example article is entitled Mountains. You can create the associated articles directly from the Article: Edit form. This example uses the Multilingual Associations list instead. The translated text for this example has been obtained with Google Translate.
- Select Components → Multilingual Associations from the Administrator menu.
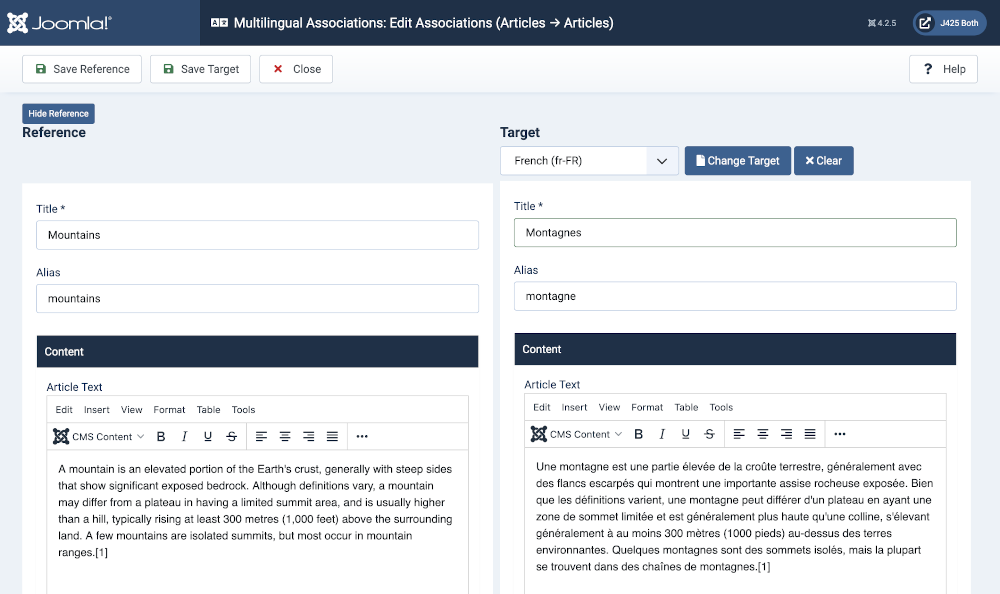
- For the article without associations, select one of the buttons in the Not Associated column, fr-FR in this example.
- In the Multilingual Associations: Edit Associations form enter a Target Title: Montagne
- In the Target Article Text enter the new text, translated or copied and pasted from a translation service.
- Set the Category to the the language category, French (fr-FR) in this example (not shown in the screenshot - it is further down).
- Select Save Target From the Toolbar.
- Select Close.
- Repeat for the other languages.
Creating a Menu Translation
Continuing with the Mountains example:
- Select Menus → Main Menu (en-GB) assuming that is your default language specific menu.
- Select the New button from the Toolbar.
- In the Menus: New Item form enter a Title: Mountains.
- Use the Select button in the Menu Item Type field.
- Select Articles → Single Article from the popup Menu Item Type form.
- Use the Select button in the Select Article field.
- Select the Mountains from the Select an Article list.
- Select English (en-GB) from the Language drop-down list.
- Save.
- Select the Associations tab.
- For each Language use the +Create button to create an equivalent translated menu item.
- Enter the translated Title.
- Make sure the Menu is set to that for the selected language.
- Save & Close
Site View
Open or reload the site view to check that your menus and articles are displayed as expected.

Setup a Multilingual Site
Sample Data
Joomla comes with two sets of sample data: Blog and Multilingual. There is a third Testing set but only for users working with the Joomla Development version. If you have an existing site with articles, menus and modules, it will be similar in principle to a site with Blog sample data installed.
In the Home Dashboard, the Multilingual Sample data says Before launching, make sure you have at least 2 languages installed with their Content Languages and that no sample data has been installed. That will probably lead you to create a Multilingual site by manually executing the required steps one by one. That is an error-prone procedure in which you are likely to make a mistake, especially if you are using several languages. Mistakes can be fixed but the whole process is a little tedious and can be confusing.
You can ignore that advice and use the Multilingual Sample Data to set up a multilingual site if you understand how to make some corrections to the original menus and modules later.
Initial Site
A newly installed Joomla site has a Main Menu in the right sidebar. It contains a single menu item named Home of Featured Articles type. There is also a Login Form in the right side bar.
Initially, there are no featured articles so the main part of the page is empty.
Blog Sample Data
If you have created your own site content you should not install the Blog Sample Data. However, please read through this section to see how it compares. Otherwise:
- Select Install from the Multilingual Sample Data section of the Home Dashboard. The installation stages will briefly appear and then disappear.
- You should notice that several new menus are installed (reload the administrator page and expand the Menus menu):
- Main Menu Blog.
- Bottom Menu, containing Login/Logout menu items.
- Special Menu, seen after login.
- Select the Open frontend icon from the top Status bar or reload the Site if it is already open in a separate tab.
You should expect to see a layout full of Featured Articles information:
- At the top is the new Main Menu Blog menu for various blog layouts and articles.
- In the right sidebar are modules for a Login Form, a Main Menu and a My Blog RSS feed.
- After login, the right sidebar has a Special Menu for Administrator only actions.
- The Main Menu Home item leads to the Featured Articles layout.
- The top Blog menu item leads to a Category Blog layout somewhat different from the Featured Articles layout.
Take a few minutes to explore the menu items and the types of information they lead to.
Install and Publish Content Languages
First install all the languages you intend to use. If you need to install an additional language later you will need to complete the configuration steps for that language one by one manually. That will be covered elsewhere. For this tutorial French, German and Welsh were added to the site default English language during Joomla Installation. To add languages after installation:
- Select System → Install Languages from the Administrator menu.
- Select the Install button for each language you propose to use.
Installed languages must be Published to make them available. From the Administrator menu:
- Select System / Manage panel / Content Languages
- In the Status column Publish each of the languages you wish to use.
Multilingual Sample Data
Installation of the Multilingual Sample Data has effects that you will have to deal with later:
- Menus in the right sidebar will be unpublished. That means that the Main Menu module will be unpublished and there will be no link to the Featured Articles layout. If you had other links in the Main Menu they will be unavailable too.
- The Special Menu will be unpublished. That provided a link to create a new post.
The Multilingual Sample Data provides the following additional features:
- An article category for each language.
- An article configured for each language, although in Lorem ipsum pseudo text.
- A separate menu for each language. You will see this in the Administrator → Menus list.
- A Main Menu xx-YY menu module in the Site right sidebar, where xx-YY is a language code such as en-GB.
- The Main menu item now leads to a Category Blog layout for articles in the selected Language. It contains just one article.
- There is a Language Switcher module in the right sidebar. It is untitled to avoid the need for a separate module for each language with translated titles. Selection is by language flag. Try it out.
Something to notice: words that are supplied by Joomla will be translated, for example in the Breadcrumbs and the Login Form. Words that are typed by users need to be manually translated, for example Login Form and Main Menu. More on that later.
Fixing Initial Problems
Language Order
You may notice that the language switcher has languages in reverse alphabet order. To change the order:
- Select System → Content Languages from the Administrator menu.
- Use vertical ellipsis icons to drag the languages into the desired order.
- Reload the Site and see the Language Switcher now has languages in your preferred order.
Right Sidebar Module Order
The module order in the right sidebar is a matter of personal preference. To change the order:
- Select Content → Site Modules from the Administrator menu.
- Filter by Position → sidebar-right.
- Select the order column icon to reveal the ordering drag handles (vertical ellipsis icons). The column heading icon should be a chevron pointing upwards.
- Drag items into order:
- Language Switcher
- Main Menu (all variants - order does not matter).
- Special Menu
- Login Form
- Archived Articles
- Syndication
Featured Articles
The original Main Menu is unpublished but the Home menu item it contains can be reproduced elsewhere. The most convenient place is the top menu.
- Select Menus → Main Menu Blog from the Administrator menu.
- Select the New button from the Toolbar.
- Enter a Title in the Menus: New Item form, for example Featured.
- Use the Select button in the Menu Item Type field.
- Select Articles → Featured Articles from the Menu Item Type list.
- Select Save from the Toolbar.
- In the Ordering field select - First -.
- In the Blog Layout tab set Intro Articles to 3.
- Select Save & Close from the Toolbar.
Site Module Assignment
The original Home page Featured Articles layout was produced by assigning selected modules to appear only on that one page. The new Featured page needs to be added for each of those modules.
- Select content → Site Modules from the Administrator menu.
- Find and select the Image item.
- In the Menu Assignment tab, find and check the Featured item in the Main Menu Blog section.
- Select Save & Close from the Toolbar.
- Find and select the Latest Posts item.
- In the Menu Assignment tab, find and check the Featured item in the Main Menu Blog section.
- Select Save & Close from the Toolbar.
Reload Site
When you reload the site the first item in the top menu will be the Featured link leading to the Featured Articles layout. The adjacent Blog item is a more compact Category Blog layout. Try the language switcher. The Joomla supplied text, in the breadcrumbs and Login Form changes accordingly. Also, the Featured articles now include one article from the Multilingual Sample Data, that in the selected language. It may be on the last page.
Hybrid or Pure Multilingual Site
At this stage you have a hybrid site: some content is available in all languages and some content is available in a specific language. If you want a pure Multilingual Site you will need to unpublish the top Main Menu Blog module and perhaps others. In some cases you may wish to produce language specific modules, for example the Login Form could have versions with titles Formulaire de connexion, Login Formular and Ffurflen Mewngofnodi.
What you do next is up to you!
Original Main Menu
Your original Main Menu module, which is now unpublished, may have contained additional menu items. You could publish it. The snag is that the Home item links to the same location as each of the language specific menu Home pages, but in English only. You can get around that as follows:
- Select Menus → Main Menu from the Administrator menu.
- Select the Home menu item.
- Select the Link Type tab.
- Set Display in Menu to No.
- Select Save & Close from the Toolbar.
- Select Content → Site Modules from the Administrator menu.
- Find the Main Menu and Publish it, turning the grey cross to a green tick.
The visible items in the original Main Menu should now work normally. If the Main Menu has no visible items it will not be displayed.
Adding an Extra Language
After the initial setup of a multilingual site, if you wish to add another language you will have to go through the steps manually one by one:
Step 1: Install the Language
- Select System → Install → Languages from the Administrator menu.
- Find the required language in the Extensions: Languages list.
- Select the Install button.
- There will be a message: Installation of the language pack was successful.
In this example sequence the extra language is Spanish.
Step 2: Publish and Order
- Select System → Manage → Content Languages from the Administrator menu.
- Enable the newly installed language: select the Status button to turn the grey cross into a green tick.
- Use vertical ellipsis icons to drag the languages into the desired order.
Step 3: Create a Menu
- Select Menus → Manage from the Administrator menu.
- Select the New button from the Toolbar.
- Enter a suitable menu title and unique name, examples: Main Menu (es-ES) and mainmenu-es-es.
- Enter a Description, example: The main menu for the site in language Spanish (es-ES).
Step 4: Add Menu Module
- Select Menus → Manage from the Administrator menu.
- Select the Add a module for this menu button for the newly created menu.
- Enter a suitable title, example: Main Menu es-ES
- Select a Position: Sidebar-right
- Select a Language: Spanish (es-ES)
- Select Save.
- Order the module: from the Ordering list select the item after which this new item should appear.
- Select Save & Close.
Step 5: Add a Category
- Select Content → Categories from the Administrator menu.
- Select the New button in the Toolbar.
- Enter a suitable title, example: Categoría (es-es)
- Select the correct language: Spanish (es-ES)
- Select the Associations tab.
- For each language select a Category. There is only one choice in each case.
- Select Save & Close.
Step 6: Add a Menu Item
- Select Menus → Main Menu (es-ES), the newly created menu.
- Select the New button in the Toolbar.
- Enter a suitable title, example: Página de inicio
- Use the Select button at the end of the Menu Item Type field to select an item type.
- From the popup list select Articles → Category Blog.
- In the Choose a Category field use the Select button.
- From the popup Category list select the Categoría (es-es) category.
- Set the Default Page field to Yes.
- In the Language drop-down list select Spanish (es-ES).
- Save & Close
Step 7: Add an Article
The easy way to add an article for the new language is to copy an existing article.
- Select Content → Articles from the Administrator menu.
- Select the article to copy, in this example Article (en-GB).
- In the Articles: Edit form change the title to Article (es-ES).
- Change the Category to Categoria (es-es) (es-ES).
- Change the Language to Spanish (es-ES).
- Select Save as Copy from the Save & Close drop-down list in the Toolbar. Care!
- Select the Associations tab.
- For each language select an article to be associated - the equivalent article in each language.
- Select Save & Close from the Toolbar.
Adding a Multilingual Article
Suppose you wish to create an article in each of your selected languages.
- Select Content → Articles → + from the Administrator menu or the New button from the Toolbar in the Articles list.
- Enter a title for the article, example William Shakespeare.
- Set the Category field to Category (en-gb) (en-GB).
- Set the Language field to English (en-GB).
- Enter the Article Text, example from Wikipedia:
“William Shakespeare (bapt. 26 April 1564 – 23 April 1616) was an English playwright, poet and actor. He is widely regarded as the greatest writer in the English language and the world's greatest dramatist. He is often called England's national poet and the "Bard of Avon" (or simply "the Bard"). His extant works, including collaborations, consist of some 39 plays, 154 sonnets, three long narrative poems, and a few other verses, some of uncertain authorship. His plays have been translated into every major living language and are performed more often than those of any other playwright. He remains arguably the most influential writer in the English language, and his works continue to be studied and reinterpreted.”
- Select Save from the Toolbar.
- Select the Associations tab.
- For each language:
- Select the Create button.
- In the popup New Article form enter a translated title, William Shakespeare.
- Set the Category to that for the language you selected.
- Enter the translated text into the Article Text field (you can try https://translate.google.com/).
- Select Save & Close.
- After a new article for each language has been created, select Save & Close.
Main Menu
If you have a link to an article for All Languages in the Main Menu and you later use that article as a basis for associated articles in other languages you will need to change the Main Menu link. Otherwise, switching languages with that article selected will lead to a Page Not Found error in the selected language.
- Select Menus → Main Menu from the Administrator menu.
- Select the menu item you need to change, for example William Shakespeare.
- Change the Language field to English (en-GB).
- Select Save & Close from the Toolbar.
If there is only that one item in the Main Menu that module will disappear when switching to other languages.