Hosting
Auto Installer Installation
Overview
Some hosting companies offer script installers for commonly used website software such as Joomla!. This allows someone to Install Joomla! on a hosting server easily. There is no need to create a database, upload files or configure the programs for use. All things are done by these Auto Installers with a small amount of interaction. This article covers two of the most commonly offered automatic script installers:
- Fantastico
- Softaculous
Installation on cPanel
- Login to your cPanel account.
- Look for Fantastico or Softaculous in the Category Software / Services and select its icon or name.
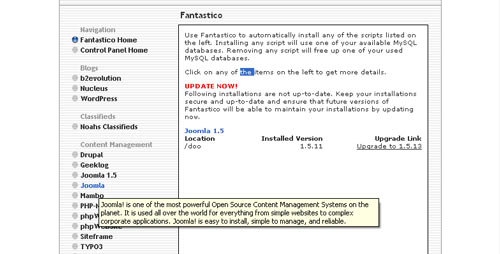
Fantastico
- On the left hand side of Fantastico there is a Content Management Category containing Joomla!.
- Select the New Installation Link in the Joomla! Overview
- Fill in the various details and Submit. For each step keep selecting Submit!
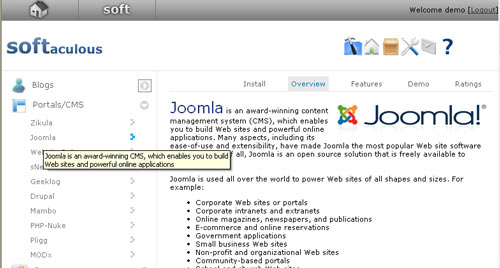
Softaculous
- In Softaculous there is a Portals/CMS Category. Expand the category and Joomla will be there.
- Select the Install tab.
- Fill in the various details. There will be an option to import the Sample Data included in Joomla.
- After completing the Details select Submit.
Its really fast to install and update using Auto Installers.
Resources
Auto Installers are selected by hosting services so clients often have no choice. These references are provided for consultation purposes.
Bitnami Installation
Preface
NOTE: BitNami Joomla! stack no longer exists as a standalone installer. Instead, it delivers as: 1) A cloud based instance, 2) In a container, either Kubernetes or Docker or 3) A virtual machine. The virtual machine will run on your operating system in a hypervisor such as Virtual Box or VMware Player. It still comes with all the required dependences as in the standalone installer.
Option 1 below no longer applies. Also, in Option 2, BitNami Lamp Stack further down, delivers in the cloud or virtual machine. In any case, Bitnami makes having a performing local installation of Joomla! easy and complete.
You can download the latest version of the Bitnami package for Joomla! for Windows, Linux and Mac at http://bitnami.org/stack/joomla.
Revision Needed!
BitNami Joomla! Stack is an all-in-one installer that makes it easy to install Joomla on your computer. It is free, easy to use and self-contained. That means that it bundles and automatically configures every piece of software (dependency) necessary to run Joomla for development or production purposes, including Apache HTTP Server, MySQL and PHP.
Option 1: Joomla! stack (Recommended)
This method assumes you already have a (Windows/Linux/Mac)...AMP(Apache HTTP Server, MySQL, & PHP) environment installed.
Installing Joomla! Stack
Regardless of which operating system you are running (Windows / Linux / Mac), the install process is the same.
Download the latest version of Joomla! Stack from the BitNami website.
Find the installer you just downloaded (the filename will be similar to bitnami-joomla-VERSION-linux-installer.run. Double click on the icon to launch the installer.
If you are using Linux you will have to give executable permissions to the file first, using this command:
chmod +x /path/to/bitnami-joomla-VERSION-linux-installer.run

Click "Next".

Select the components you want to install. If you are not sure, leave the default components checked. Click "Next" when you are done.

Now it will ask where do you want to install the program. Provide the location where you want to install the BitNami Joomla! stack and click "Next" when you are done.

The user and password you provide here will be used to create the admin account in Joomla! Click "Next" when you are done.

Type in the name you want to use for your Joomla site, and click "Next".

The installer allows you to configure an email account so Joomla! can send notifications via email . Click "Next".

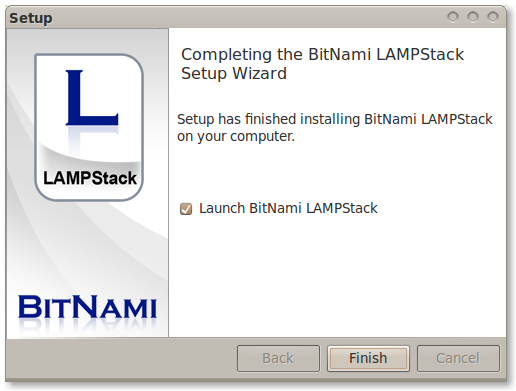
Wait a minute while the installer copies the files and configures your Joomla! installation.

Joomla! is now set up and ready to be used. Click "Finish" to launch the application.

Using the manager tool is easy to start/stop the Apache and MySQL servers.

You can manage the Joomla! database with phpMyAdmin easily.

Option 2: BitNami LAMPStack and Joomla!
What is BitNami LAMPStack?
BitNami LAMPStack is a free, easy to install package that bundles every piece of software (dependency) necessary to setup a LAMP (Apache, MySQL and PHP for Linux) environment up and running for development or production purposes. It is self-contained, it makes no modifications to your system and can be uninstalled easily. You can download the latest version of BitNami LAMPStack for Linux at http://bitnami.org/stack/lampstack. A Windows version and a OS X version are also available.
Regardless of which operating system you are running (Windows / Linux / Mac), the install process is the same.
Installing BitNami LAMPStack
Find the installer you just downloaded from the BitNami website (the filename will be similar to bitnami-lampstack-VERSION-linux-installer.run). Double click the icon to launch the installer.

Click "Forward".

Now it will ask where you want to install the program. Select the location on your machine and click "Forward" when you are done.

Type your MySQL root password. This will be the password for the "root" user for the database.

The installer is now ready to begin the installation process. Click "Forward".

Wait a minute while the installer copies the files and configures your LAMPStack installation.
BitNami LAMPStack is now set up and ready to be used. Click "Finish" to launch the application.
Installing Joomla! manually
Follow the instructions outlined in the article Installing Joomla.
cPanel Hosting
Introduction
cPanel Hosting
When you login to your cPanel hosting service, this is what you should expect to see:

Database Setup
The Databases panel is used to create a database and database user for Joomla.
Select the MySQL Databases item and enter a database name in the form. The first part of the form is predefined. The rest is up to to you. It should be short and perhaps not obvious - jblog for example.
In the same form, go down to the Add New User section. Enter a user name. This can be anything you like. It will be used in your Joomla configuration file so it is not something you need to remember. Use the password generator to create an unmemorable password and copy it to a text editor - you will need it during Joomla installation.
In the same form, go down to Add User to Database. Select the user you created and the database you created from the drop-down lists and then click the Add button. A form to Manage Privileges opens. Select the All Privileges check box and then click the Make Changes button.
That is it - you now have a database ready for a Joomla installation.
Upload Joomla Source
At some stage you will have downloaded the Joomla source code zip file to your own laptop or desktop computer. You now have to decide how to structure your site. The document root for your site is the public_html folder. You could put Joomla there. However, that prevents you from using another application on the same site. For example, you could have two entirely separate Joomla installations, one for production (public viewing) and one for testing (private viewing). So you could create a folder within public_html, named j4 for example, and upload Joomla there. You could have another folder named j4test and put another copy of Joomla there. The illustration below shows such a set-up with two Joomla websites.

When you have decided on your structure, select you chosen Joomla folder in File Manager and click the Upload button. In the upload form, select the Joomla source zip file on your local computer to upload it to the selected folder. After upload, go back to File Manager, select the zip file and click the Extract button. After extraction, you can select and delete the zip file.
That is it! You are ready to install Joomla.
Free Hosting
What is joomla.com?
joomla.com is a domain name used to allow individuals to create personal instances of the Joomla CMS in subdomains of the form alice.joomla.com, bob.joomla.com and so on. The subdomains are managed by the CloudAccess.net hosting service. With your own subdomain you can build and maintain a completely free Joomla website for an unlimited time. The free site features all of the Joomla CMS core functionalities that make building a website easy and flexible.
Launching your first Joomla.com site
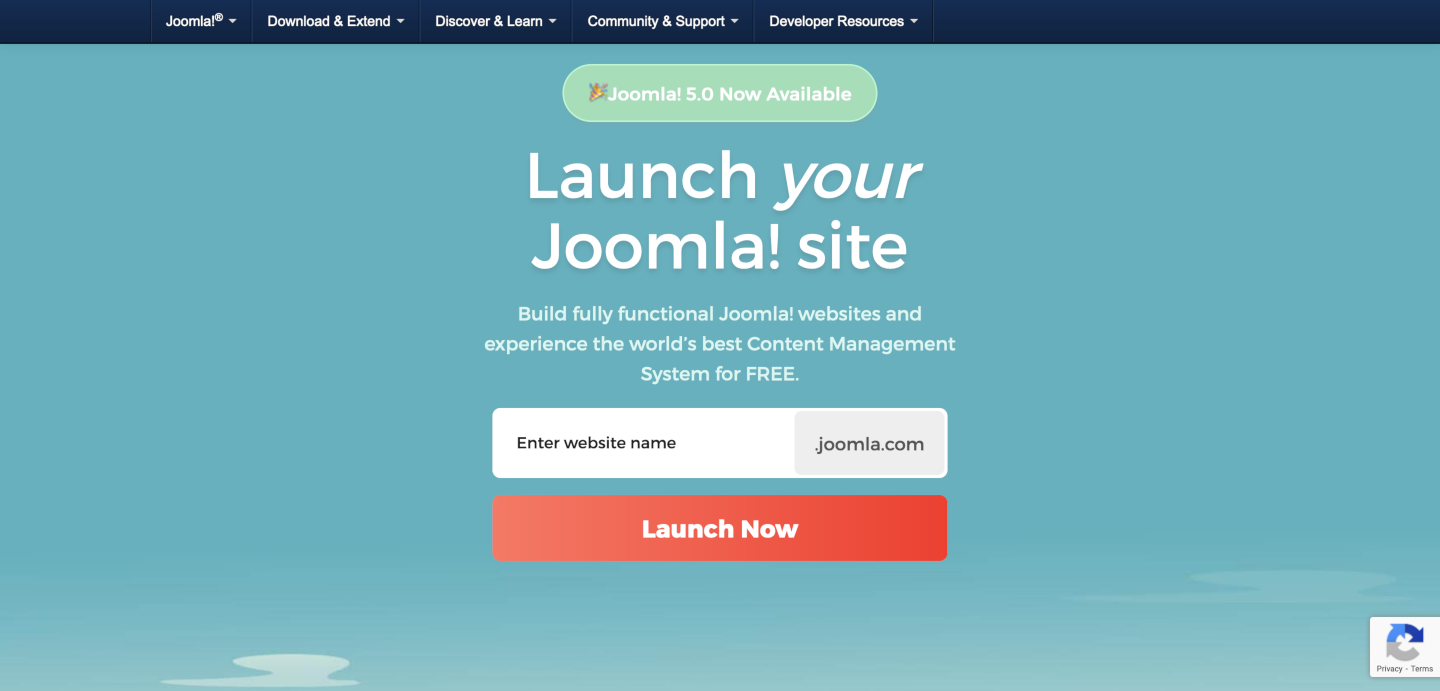
If you are new to Joomla and would like to see it in action without downloading and setting it up yourself the process to launch your new Joomla website has never been easier! To get started, navigate to the main launch.joomla.org page and enter the information requested in the sequence of forms, mostly appearing in pop-up dialog boxes.
Step 1: Enter a suitable subdomain name
Alice and Bob are probably taken but you can choose any name that is easy to type and to remember.
Step 2: Select Your Joomla Version
As this is a new installation it is best to select the latest stable version.

Step 3: Create an account
Fill in your personal details and select the Register button.

Notes
- Email Address: Your email address is used to login to your Cloud Control Panel (CCP) and to send you messages to complete the set up of your account. It must be a valid account. It is also used for a Super User account in your free joomla.com site.
- Country: This data is used to track where the signups come from.
- Terms of Service: You are required to agree to the Terms of Service available from the link adjacent to the check box. If you agree to sign up for the Joomla marketing campaign you will be sent occasional Joomla marketing emails. This is not a requirement.
- Problems: If the form does not accept your personal data please send an e-mail with your registration details, whether you want Joomla 4 or 5 and what .joomla.com subdomain you want to
This email address is being protected from spambots. You need JavaScript enabled to view it. - the account will then be created manually.
Step 4: Unlock Premium Features
If you do not wish to Unlock Premium Features for $5 per month you can select NOT NOW to proceed with your free site.
You will shortly receive a 6 digit token on the phone number that you entered.
Step 5: Verify Account
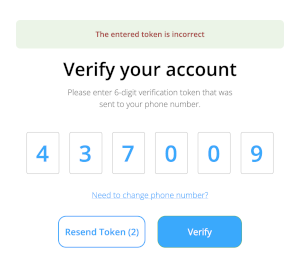
Use the token to complete the process - you will be logged in to the CloudAccess.net control panel (CCP).
Step 6: CloudAccess.net Control Panel

You will also receive an email with your free site login credentials. It may take a few minutes for your free Joomla site to become available. If you have any problems, open a New Ticket in the CPP and the support team will fix whatever needs fixing.
Important: Remember to login at least once a month and select the Renew button in time to keep your free site alive!
Step 7: Access your site
To access your site you can select the Login button in your CPP Your Products panel. It will take you directly to the Administrator Dashboard of your site. Or you can go directly to the subdomain you created (for example myalias.joomla.org/administrator/) and login with the credentials sent to the email address you registered with.
It is a simple as that and once your site is up and running, you can start creating content (articles, menu items, modules) right away. You do not need any extensions to build a stunning fully functional website!
CPP Tools
Joomla is managed almost entirely from its Administrator pages. However, from time to time it is useful to have access to system tools for problem solving purposes. Select the Manage button in the CPP Your Products page for access to these tools.

phpMyAdmin
phpMyAdmin is a utility used to work directly with databases. It really requires experience but experience can be built up as and when problems occur. For access, navigate via Application / Database and then Login to phpMyAdmin.
Backup
It is important to keep regular site backups of the files and database. Many users install a free Akeeba backup extension to do site backups from within Joomla. You can also create backups via Applications / Manage Backups and select the Create Backup button.
File Explorer
Access to files is sometimes useful, for example to examine Joomla log files that are not directly available from within the Joomla Administrator pages. Access is available via Server / File Explorer and the httpsdocs drop-down list.
How to get help when using joomla.com?
Since most of the platform’s functionality overlaps with that of the Joomla! CMS, users are also encouraged to seek help in the Joomla! Forum and in this Wiki Documentation.
Test upcoming releases with joomla.com
Tests are important in an open source project like Joomla as they provide quality assurance for upcoming releases. You can help with testing of new features and bug fixes by installing the Joomla Patchtester](https://github.com/joomla-extensions/patchtester/releases) extension in your free Joomla site. No special skills are required to become a tester! If you have never tested pull requests, the Joomla Documentation provides all the [tutorials you need. So be part of it, start testing Joomla today.

Caveats: You will need a GitHub account and a GitHub token. You will not be able to test pull requests involving CSS and JavaScript changes requiring NPM Resource Changes.
Local Hosting on Linux
Introduction
This article covers hosting Joomla on a personal Linux based computer for testing and development purposes. The Linux versions covered are from the Debian-Ubuntu family, and specifically Linux Mint. Other distributions are similar but have different command syntax and file locations.
You need to install a set of software packages often referred to as LAMP stack. The letters refer to Linux, Apache, MySQL and PHP. You can install software using either the Graphical User Interface (GUI) or the command line in a Terminal window. They are different ways of using the Synaptic Package Manager.
Install Apache with the GUI
From the system Menu, marked with the LM logo, select Administration / Synaptic Package Manager. You will be prompted for your password. Enter your login password to open the GUI. At the top right is a Search button. Select it and enter apache and select Search. Select the apache2 checkbox and in the pop-up label select Mark for Installation. Another pop-box will show a list of additional packages required to support apache. Select Mark:

Select the Apply button in the top Toolbar and the Apply button in the Summary dialog. Apache will be installed and configured, the process ending with a Changes Applied dialog. Select Close.
You can confirm that Apache is installed and working by opening your browser, Firefox by default in a new Linux Mint install, and entering localhost in the URL bar. You should see the Ubuntu Apache2 Default Page:

The page contains some useful information about file locations that may not be so readily available later so you might like to print this page to paper or a pdf file.
Install PHP with the CLI
It is probably best to install PHP using the command line. One reason for this is that, at the time of writing, the Synaptic Package Manager only offers PHP8.1 although PHP8.2 has been available for some time and can be installed from a third party repository. There is a good description of the procedure in this tutorial with Quickstart and Detailed sections.
First close your Synaptic Package Manager GUI and then open a Terminal window and enter the following commands one at a time:
sudo add-apt-repository ppa:ondrej/php
sudo apt update
sudo apt install php8.2 php8.2-cli php8.2-{bz2,curl,mbstring,intl}
sudo apt install php8.2-fpm
sudo a2enconf php8.2-fpm
sudo systemctl reload apache2
In your browser, check that the localhost default page is still working.
Install MySQL or MariaDb
You can search the web for information on each of these database packages. MySQL is the traditional choice but was taken over by Oracle and is now less popular. MariaDB is a drop-in Open Source replacement with additional features. Both work with Joomla! 5 but it is not easy to change from one to the other. Tables have to be exported and imported. Joomla! 5 requires specific minimum versions which Linux Mint offers via the Synaptic Package Manager.
Open the Synaptic Package Manager GUI and search for either mysql-server or mariadb-server. Select the checkbox for the item ending in -server. Select Mark for Installation and them Apply in the top Toolbar. You can open the Details panel to see what is happening during the installation. Select Close when done.
You can test to see whether your database is working by entering mysql in the command line. This is the the same for both MySQL and MariaDB. You should see an Access denied error message, which is fine as it indicates your database installation is actually working.
Install phpMyAdmin
phpMyAdmin is a GUI database management tool that you will need to create and manage your databases. In the Synaptic Package Manager GUI search for phpmyadmin. Select its checkbox and Mark for Installation. After download there is a prompt to select the Webserver to reconfigure automatically. Select the chckbox for apache2 and then the Next button. At the next configuration screen leave the Configure database... checkbox checked and select Next.
Select an application password for the user phpmyadmin. Test: in your bowser enter localhost/phpmyadmin in the URL bar. You should see the phpMyAdmin login screen. With the username phpmyadmin and the password you entered during installation you will be able to login. But you will not be able to create any databases! To solve the problem you need to edit the configuration file as root in the Terminal window:
sudo nano /etc/phpmyadmin/config.inc.php
Find the two lines containing // $cfg['Servers'][$i]['AllowNoPassword'] = TRUE; and remove the leading slashes to uncomment them. Both of them!
Then login to mysql from the command line and create a new user and grant that user all privileges:
sudo mysql
CREATE USER 'admin'@'localhost' IDENTIFIED BY '';
GRANT ALL PRIVILEGES ON *.* TO 'admin'@'localhost' WITH GRANT OPTION;
exit
Then go back to phpMyAdmin and try to login with username admin and no password. You should see all databases and be able to create new databases.
Index File Priority
The default location for web pages on Ubuntu/Linux Mint is /var/www/html. If you list the contents of that directory you will see it contains index.html containing the content of the Ubuntu Apache2 Default Page. Create a file named index.php in that directory with the following content:
<?php echo phpinfo();
Reload localhost. There is no change! Enter localhost/index.php in the URL bar and you will see a page containing PHP Version information. This behaviour is controlled by the default Apache configuration which it can be changed by enabling the Apache dir module and editing its configuration:
sudo a2enmod dir
sudo nano /etc/apache2/mods-enabled/dir.conf
Move index.php to the front of the list. Then restart Apache:
sudo systemctl restart apache2
This time using localhost alone in the URL bar you should see the content of the index.php file, a PHP Information page.
Virtual Hosts
In a default Linux installation the system files are in the root folder (/) and user data files are in the home folder (/home/myusername). This is a potential because the default Apache user, www-data, may not have appropriate permissions to create files in user file space. The best solution is to create Virtual Hosts.
First, a module is needed that allows Apache to switch its user and group to suit each user:
sudo apt-get install libapache2-mpm-itk
sudo a2enmod mpm_itk
Next, make a copy of the default site configuration file and edit it:
cd /etc/apach2/sites-available
sudo cp 000-default.conf username.localhost.conf
sudo nano username.localhost.conf
The default site configuration file contains comments to explain its content. They are left out in the illustration below. Uncomment the ServerName line and change all instance of username to your own username.
<VirtualHost *:80>
        ServerName username.localhost
        ServerAdmin webmaster@localhost
        DocumentRoot /home/username/public_html
        <IfModule mpm_itk_module>
                AssignUserId username username
        </IfModule>
        <Directory /home/username/public_html/ >
                Options Indexes FollowSymLinks
                AllowOverride None
                Require all granted
        </Directory>
        ErrorLog ${APACHE_LOG_DIR}/error.log
        CustomLog ${APACHE_LOG_DIR}/access.log combined
</VirtualHost>
Enable the new site and restart Apache:
sudo a2ensite username.localhost
sudo systemctl reload apache
Make an entry in the /etc/hosts file to add an entry for the new virtual host. Otherwise your browser will be looking for it on the internet.
sudo nano /etc/hosts
When done it will look something like this:
127.0.0.1       localhost
127.0.0.1       username.localhost
127.0.1.1       hostname

# The following lines are desirable for IPv6 capable hosts
::1     ip6-localhost ip6-loopback
fe00::0 ip6-localnet
ff00::0 ip6-mcastprefix
ff02::1 ip6-allnodes
ff02::2 ip6-allrouters
Hostname: This is the name you gave to your computer when you installed Linux. You will need it shortly. You can change it if you wish - but best to read up on that and do it first.
All being well, with a URL of the form username.localhost you will see a directory listing of your public_html directory. Public display of directory listings is considered bad practice, a security risk, and usually disallowed by another Apache configuration setting. However, for a personal site on a personal computer used for development and testing it is very useful. Many different sites may be set up in different sub-directories. For example, Joomla 4 and Joomla 5 sites, Bulletin Boards, Wikis and so on. When you have a lot of test sites it is difficult to remember all of the subdirectory names!
Home Network Access
If you have another computer on your home network you would probably like to access your Linux site from there too. To make that work you need another virtual host. Copy and edit the one just made:
cd /etc/apache2/sites-available
sudo cp username.localhost.conf username.conf
sudo nano username.conf
Change the ServerName from username.localhost to username.hostname and then enable the new virtual site and restart Apache.
sudo a2ensite username
sudo apachectl restart
Go to your other computer on the home network and edit its personal hosts file. For example, on a Mac edit /private/etc/hosts and add the following line at the bottom:
192.168.178.20 username.hostname www.username.hostname
Where 192.168.178.20 is the IP address of your Linux computer.
Now on your second computer you should be able to access the web server on you Linux computer by entering username.hostname in the URL bar of your browser.
Partition Notes
Software installed using the Synaptic Package Manager is usually in the Linux root directory (/). User data is located in the home directory (/home). In a simple installation these directories are in the same physical disk partition.
In a more complex installation, perhaps with the option to boot different operating systems (Windows or Linux) or different versions of the same operating system, the root and user data are often in separate partitions. This allows access to the same user data from each operating system.
There is a snag: a Joomla site located in a /home/username directory needs database data that is usually in the root directory, specifically in /var/lib/mysql. You can move the MySQL/MariaDB data directory to a location available to both operating systems, either in the /home partition or in a separate partition. This tutorial describes how to Change the MySQL Data Directory in Ubuntu and Debian Linux. That needs to be done for each operating system but is not covered here.