Modules
Administrator Modules
Introduction
The Atum Administrator template is provided with a complete set of Administrator modules installed and configured for everyday use. The following illustration shows the Home Dashboard positions to indicate where modules are located.
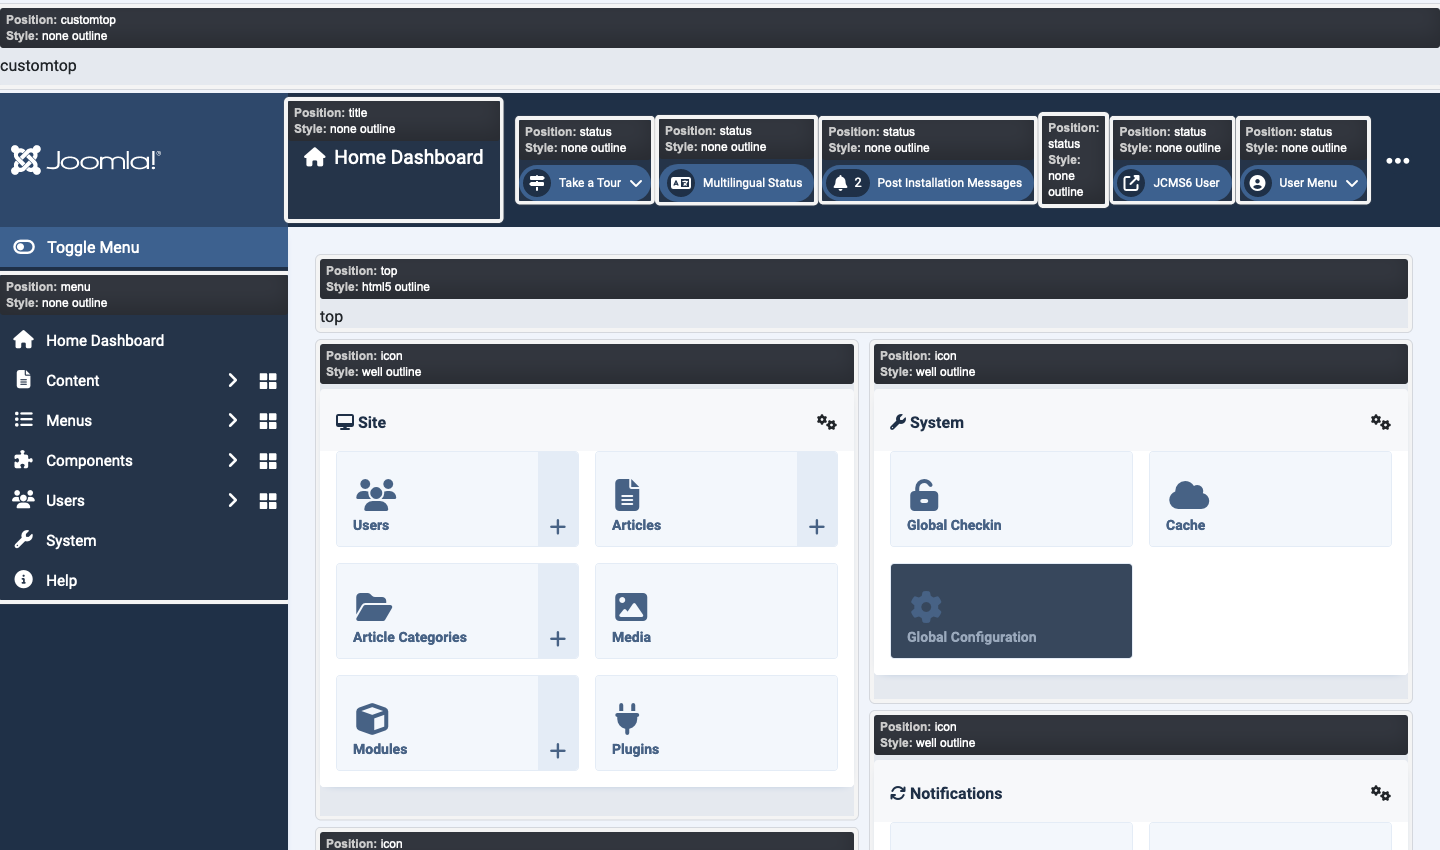
In the illustration above the panels are instances of the Quick Icon module linked to quickicon plugins.
Notes on some Module positions
- Custom Top is above the banner and is useful if you wish to publish a Custom menu or a Custom module containing an important message. For example, to warn Administrators that the site will close shortly for system maintenance.
- Status is for the icons shown right aligned in the Banner.
- Menu is in the left sidebar of the Atum screen.
- Toolbar is above the Main content area in list and edit screens but is not present in dashboard screens.
- Top is below the Toolbar but above any System Message and component content.
- Bottom is below the component content.
- Debug is below everything.
Atum template positions by name
  <positions>
    <!-- used directly in the template -->
    <position>bottom</position>
    <position>cpanel</position>
    <position>customtop</position>
    <position>debug</position>
    <position>icon</position>
    <position>login</position>
    <position>menu</position>
    <position>sidebar</position>
    <position>status</position>
    <position>title</position>
    <position>toolbar</position>
    <position>top</position>
  </positions>
Add a Custom Module
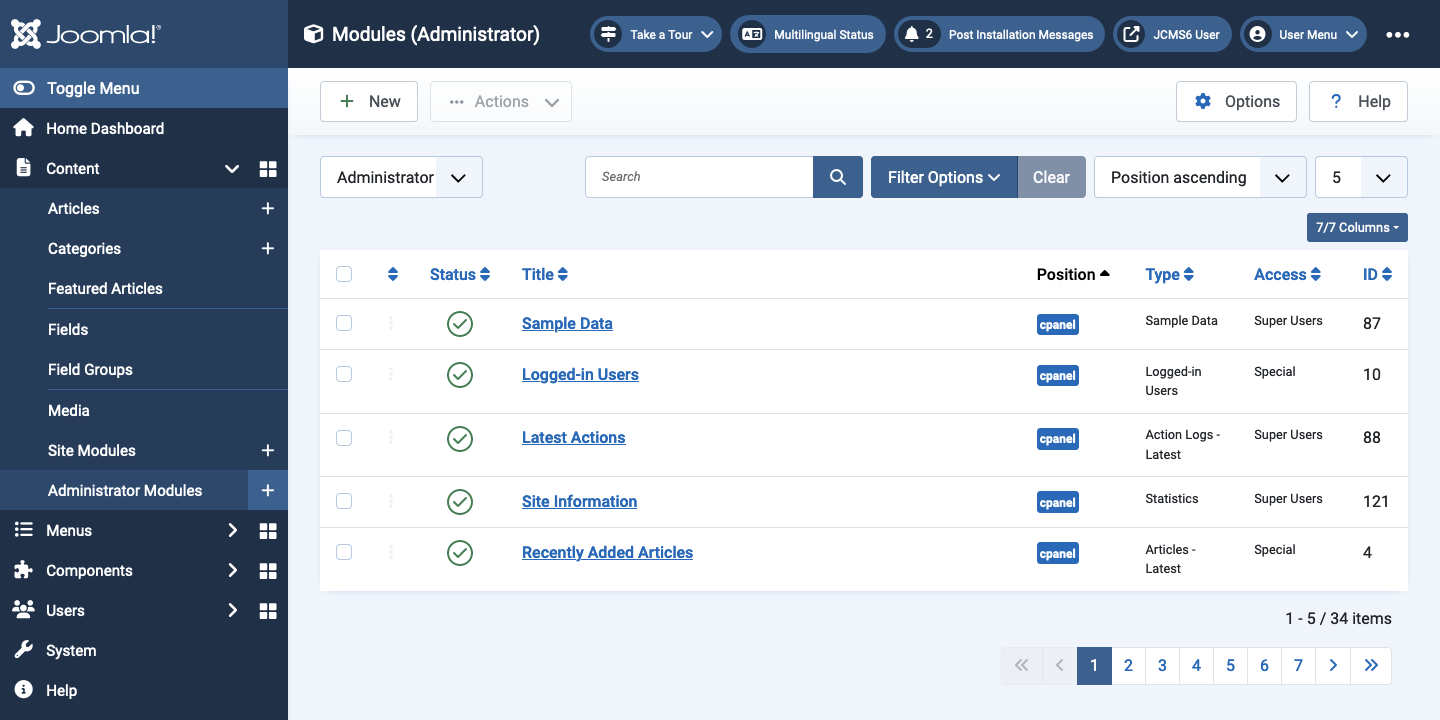
You may wish to add a Custom module to advise Administrators of some system problem. Select Content → Administrator Modules from the Administrator menu. The list of installed modules is quite long:
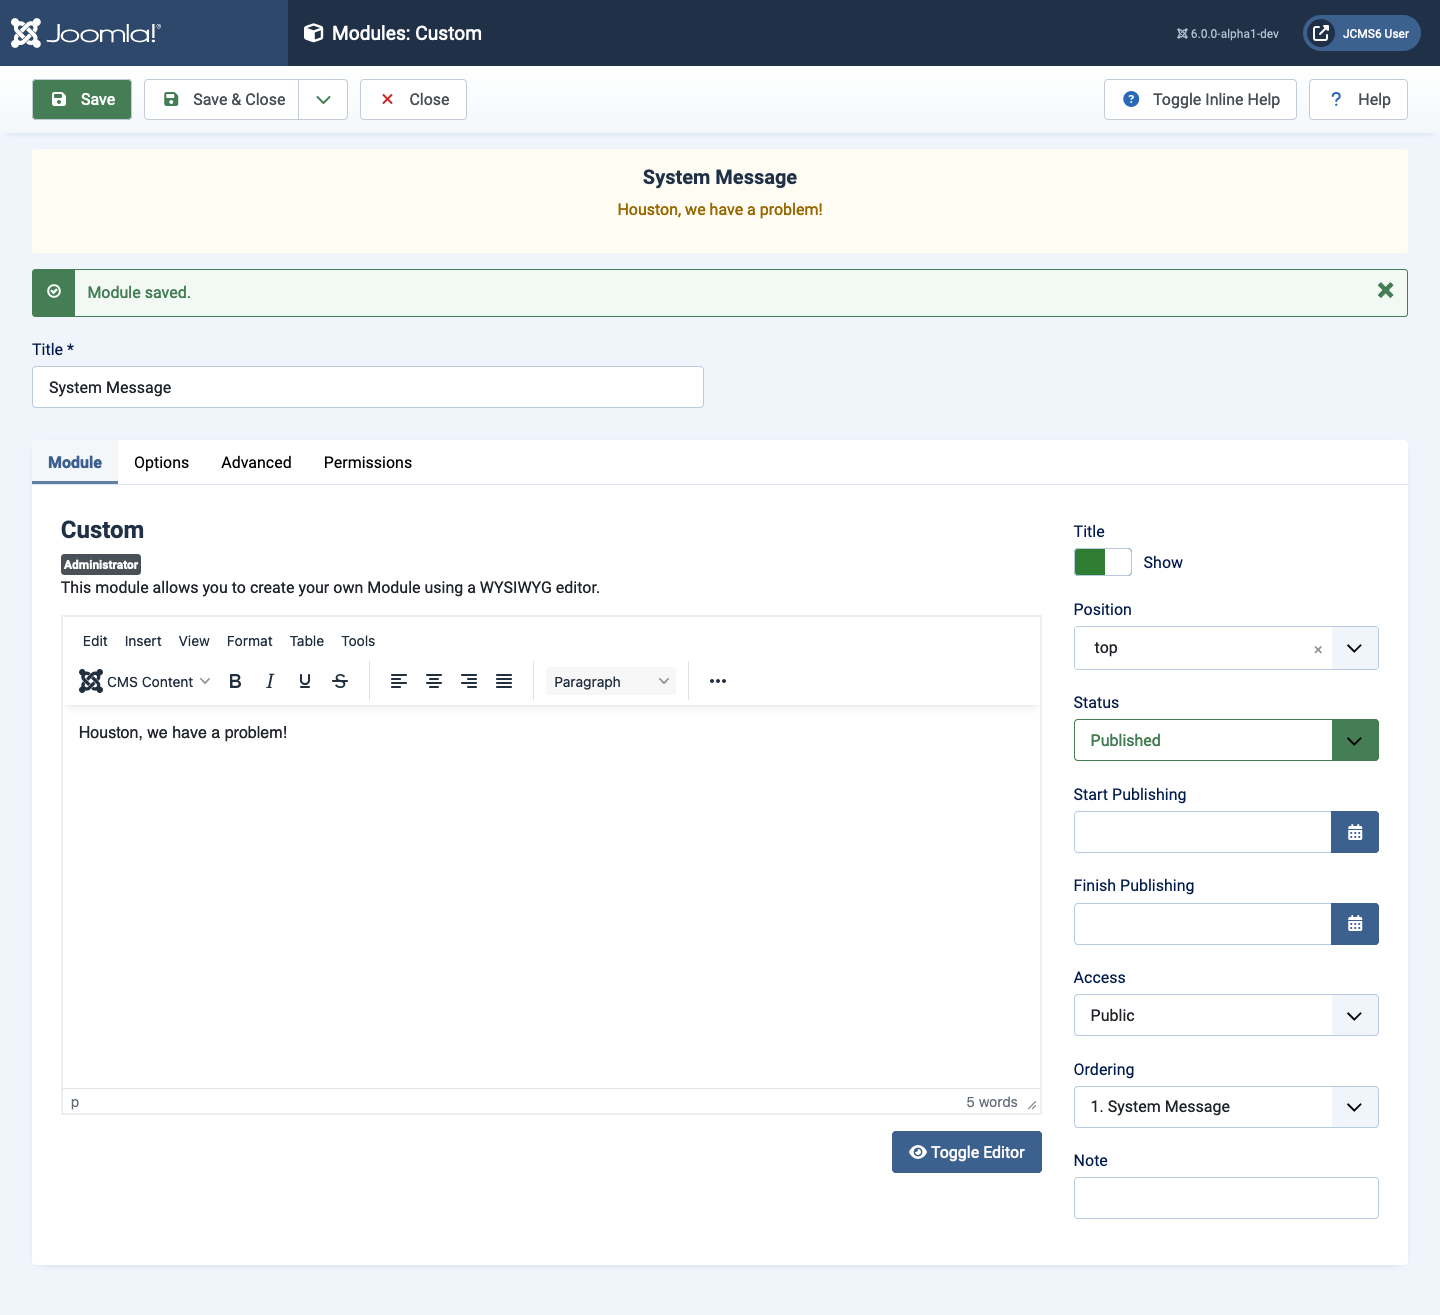
Select the New button and then the Custom module. In the Modules: Custom edit form enter a Title, a Custom message and select a Position for the module. In the example below the Top position has been selected. Also, in the Advanced tab, Module Class field some styles have been entered to centre the text and provide some padding: alert alert-warning text-center. Save to see the result. Close to see the result on the Modules list page.
When you have finished with the message you can just select the Status button in the module list to Unpublish the module.
List of Administrator Modules
- Action Logs - Latest This module shows a list of the most recent actions.
- Administrator Dashboard Menu This module displays an administrator submenu module.
- Administrator Menu This module displays an administrator menu module.
- Articles - Latest This module shows a list of the most recently created Articles.
- Custom This module allows you to create your own Module using a WYSIWYG editor.
- Feed Display This module allows the displaying of a syndicated feed.
- Frontend Link This module shows a link to the frontend and is intended to be displayed in the 'status' position.
- Joomla! Version Information This module displays the Joomla! version and is intended to be displayed in the 'status' position.
- Logged-in Users This module shows a list of the Logged-in Users.
- Login Form This module displays a username and password login form. It should not be unpublished.
- Login Support Information This module displays some useful links to Joomla support sites on the login screen.
- Messages This module shows the count of private messages and is intended to be displayed in the 'status' position. It is only displayed when there are messages to read.
- Multilingual Status This module shows the status of the multilingual parameters and is intended to be displayed in the 'status' position.
- Popular Articles This module shows a list of the most popular published Articles that are still current. Some that are shown may have expired even though they are the most recent.
- Post Installation Messages This module shows a counter and a link to the latest post installation messages. It is only displayed when there are messages to read.
- Privacy Dashboard The Privacy Dashboard Module shows information about privacy requests.
- Privacy Status Check The Privacy Status Check Module shows information about your sites privacy status.
- Quick Icons This module shows Quick Icons that are visible on the Home Dashboard (administrator area home page)
- Sample Data This module lets you install sample data.
- Statistics The Statistics Module shows information about your server installation together with statistics on the website users and the number of Articles in your database.
- Title This module shows the Toolbar Component Title.
- Toolbar This module shows the toolbar icons used to control actions throughout the Administrator area.
- User Menu This module shows the User Menu and is intended to be displayed in the 'status' position.
Archived Articles
Introduction
Archiving articles is one of the ways Joomla! helps to manage a website’s articles as it helps to reduce clutter in the backend. But what website visitors should be able to access archived articles?
One way to do this is to show a calendar month list of archived articles using one of Joomla’s core Modules. In this example an Articles Archived Module will be set to display in the website sidebar.
Create the Articles - Archived Module
Use one of the following methods:
- Select the Modules item from the Home Dashboard. Or...
- Select the Content / Site Modules from the Administrator menu.
- Select the Archived Articles item from the Modules (Site) list.
This will create the new module and open the module for configuration.
Configuring the Module
For standard usage of the module there are just a few settings:
- Title Enter a name for the module.
- # of Months Set the number of Months you want to display. These will appear as links on the frontend. Set by using the up/down arrows or directly enter a number into the field.
- Title Show/Hide Choose whether or not to show the title by toggling to Show or hide.
- Position Set a position where you want to display the module on the front end. Positions are dictated by your template. This example uses Joomla’s Cassiopeia template Sidebar Right position.
- Status By default, the module status is Published. Other options are Unpublished and Trashed.
- Start Publishing You can schedule the start of publishing of the module.
- Finish Publishing You can schedule when to stop publishing the module.
- Access If you want to control who can see the module on the frontend you can choose an access level.
- Ordering Used to control where the module displays within the position you have selected. For example, you may have a number of modules in the sidebar and want this one to be at the top or bottom – or somewhere between others in the sidebar. It can be a little confusing at first as the field shows a numbered position and a module name. The name can be a module that is unpublished. The thing to remember is that the lowest number will be at the top and highest number is at the bottom.
- Note Can be helpful to use the note field if for example you are using the same module type in several places.
Menu Assignment Tab
By default the module will be published On all pages.
Alternatively you can choose via a drop down list No pages, Only on the pages selected or On all pages except those selected. The last two options provide you with a menu tree of the menus used on the website where you can select/deselect pages.
Other Settings
The Advanced tab has settings related to layout of the module when it is output.
The Permissions tab allows you to control what user groups can do with the module.
Publishing the Module
When you are ready, select the Save & Close button.
The module will be published in the sidebar of the website and display a list of links dictated by the number of months to display set the module.

Tips
The more archived articles you have the greater the number of the links displayed by the module. It may be more appropriate to limit the number of links by using categories or you can use multiple Archived Articles Modules named accordingly.
Custom Module
Purpose
The Custom module allows you to create Module content using a WYSIWYG editor. It is great for simple messages, optionally with images.
Create the Custom module
Use one of the following methods:
- Select the Modules item from the Home Dashboard. Or...
- Select the Content / Site Modules from the Administrator menu.
- Select the Custom item from the Modules (Site) list.
This will create the new module and open the module for configuration.
Configuring the Module
For standard usage of the module there are just a few settings:
- Title Enter a name for the module.
- Module Content Type in content as you would for an article.
- Title Show/Hide Choose whether or not to show the title by toggling to Show or hide.
- Position Set a position where you want to display the module on the front end. Positions are dictated by your template. This example uses Joomla’s Cassiopeia template Sidebar Right position.
- Status By default, the module status is Published. Other options are Unpublished and Trashed.
- Start Publishing You can schedule the start of publishing of the module.
- Finish Publishing You can schedule when to stop publishing the module.
- Access If you want to control who can see the module on the frontend you can choose an access level.
- Ordering Used to control where the module displays within the position you have selected. For example, you may have a number of modules in the sidebar and want this one to be at the top or bottom – or somewhere between others in the sidebar. It can be a little confusing at first as the field shows a numbered position and a module name. The name can be a module that is unpublished. The thing to remember is that the lowest number will be at the top and highest number is at the bottom.
- Note Can be helpful to use the note field if for example you are using the same module type in several places.
Menu Assignment Tab
By default the module will be published On all pages.
Alternatively you can choose via a drop down list No pages, Only on the pages selected or On all pages except those selected. The last two options provide you with a menu tree of the menus used on the website where you can select/deselect pages.
Other
The Options tab allows you to set a background image for the module.
The Advanced tab has settings related to layout of the module when it is output.
The Permissions tab allows you to control what user groups can do with the module.
Publishing the Module
When you are ready, select the Save & Close button.
The module will be published in the sidebar of the website and display whatever text you entered.

Login Form
Site Login Methods
There are two ways to allow registered users to login to the frontend of a website. There is a Login Form menu item found in the Users group of menu items. It needs its Access permissions set to Guest. A second Logout menu item is needed with its Access permissions set to Registered.
The alternative is the Login Form module. It is installed by default in the sidebar-right position in a new Joomla installation. This module can be moved to another position, unpublished, trashed and deleted. The latter actions apply to an instance of the module and not the module code. So you can create a new Login Form module or make a duplicate, perhaps for use in different templates. The Login Form module changes its display after login to present a Logout button.
The Login Form Module
To publish an unpublished Login Form:
- Select Content → Site Modules from the Administrator menu.
- Locate the Login Form module.
- If the Status icon is a green tick inside a circle it is already enabled. If the Status icon is a grey cross it is currently disabled. Select the icon to enable the module.
- If the Login Form module is not present in the list set the Filter Options, *- Select Status - field to All or Trashed to see if it has been trashed. If so it can be published by selecting its trash icon.
- If the Login Form module is missing create a new one.
To create a new Login Form or a second Login Form:
- Select Content → Site Modules from the Administrator menu.
- Select the New button from the Toolbar.
- From the Modules list select the Login item.
- Fill in the Modules: Login data entry form.
- Enter a unique Title.
- Select a template position or create a named position for use in an article.
- Fill in other fields as appropriate.
- Save & Close
- Test the module appears correctly in the site frontend.
To assign the Login Form module to selected web pages
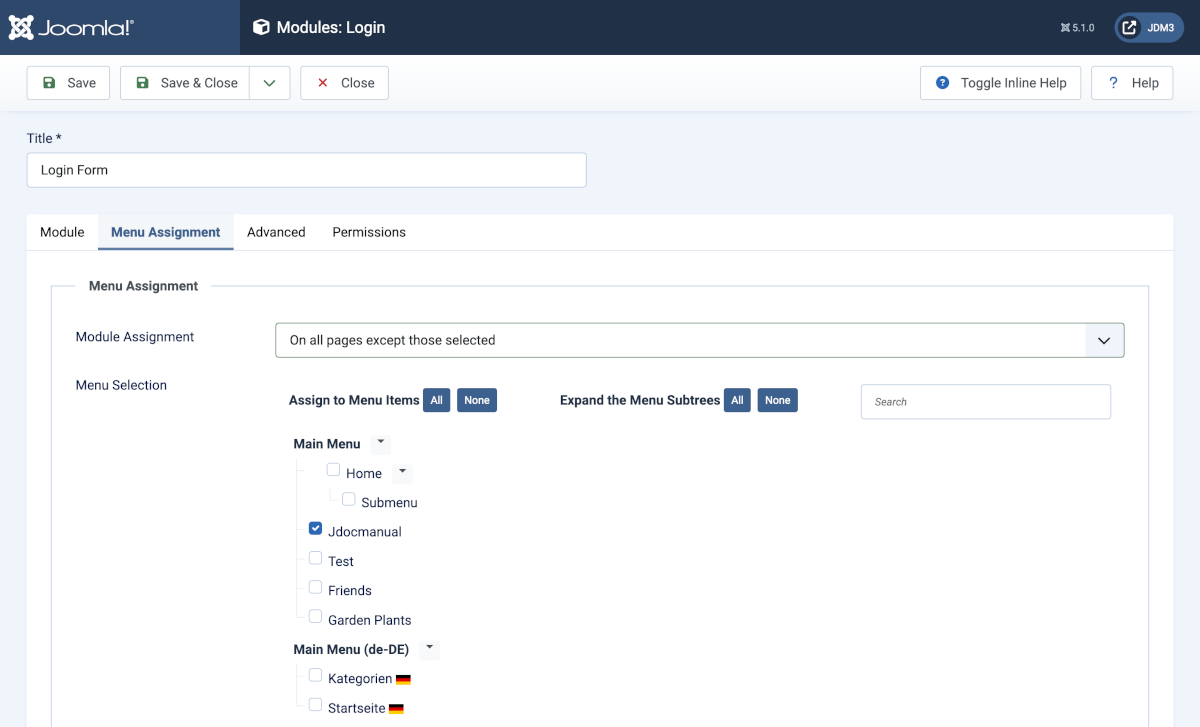
You can make the Login Form module appear on one or more pages by assigning it to selected Menu Items. This is done using the fields in the Menu Assignment group on the Module Edit screen:
- Select the Menu Assignment tab.
- The Module Assignment list has four options:
- On all pages: The Login Form module will appear on all pages.
- No pages: The Login Form module will not appear on any page.
- Only on the pages selected: A list of all menus and menu items on your site will appear. The Login Form module will appear on those pages selected in the this list.
- On all pages except those selected: The Login Form will appear on all pages not selected.
- Menu Selection: Shows a list of all the Menus and Menu Items from which one or more may be selected. This field is only used if the Menus field is set to Select Menu Item(s) from the List.
To customise the Login Form module
If you wish to change the appearance of the Login module you can add styles, either Bootstrap styles or your own styles defined in your template user.css file. Add the styles in the Advanced tab of the Modules: Login edit form.
If you wish to change the information shown in the Login form you can create a template override. See the section on Template Overrides for further details.
Module Display by Menu Item
Introduction
In Joomla it is often the case that different modules appear on different pages. And sometimes different modules are presented to different user groups. Module display behaviour is controlled by a combination of Menu Assignment and Access permission in the module edit form. By default, a module is displayed on all pages and to all user groups.
Access
This field is in the Module tab of the module data entry form. It is in the right-hand panel and should not be confused with the Permissions tab. The options available are:
- Public - visible to all user groups.
- Guest - not visible after login.
- Registered - only visible after login.
- Special - only visible after login to user groups other than Registered.
- Super User - visible only to this user group.
Menu Assignment
There are four menu assignment options:
- On all pages
- No pages
- Only on the pages selected
- On all pages except those selected
For the last two a Menu Selection panel is displayed. Initially, the menus it contains are fully expanded but they can be collapsed with the the Expand the Menu Subtrees None button. Then expand the menu of interest. 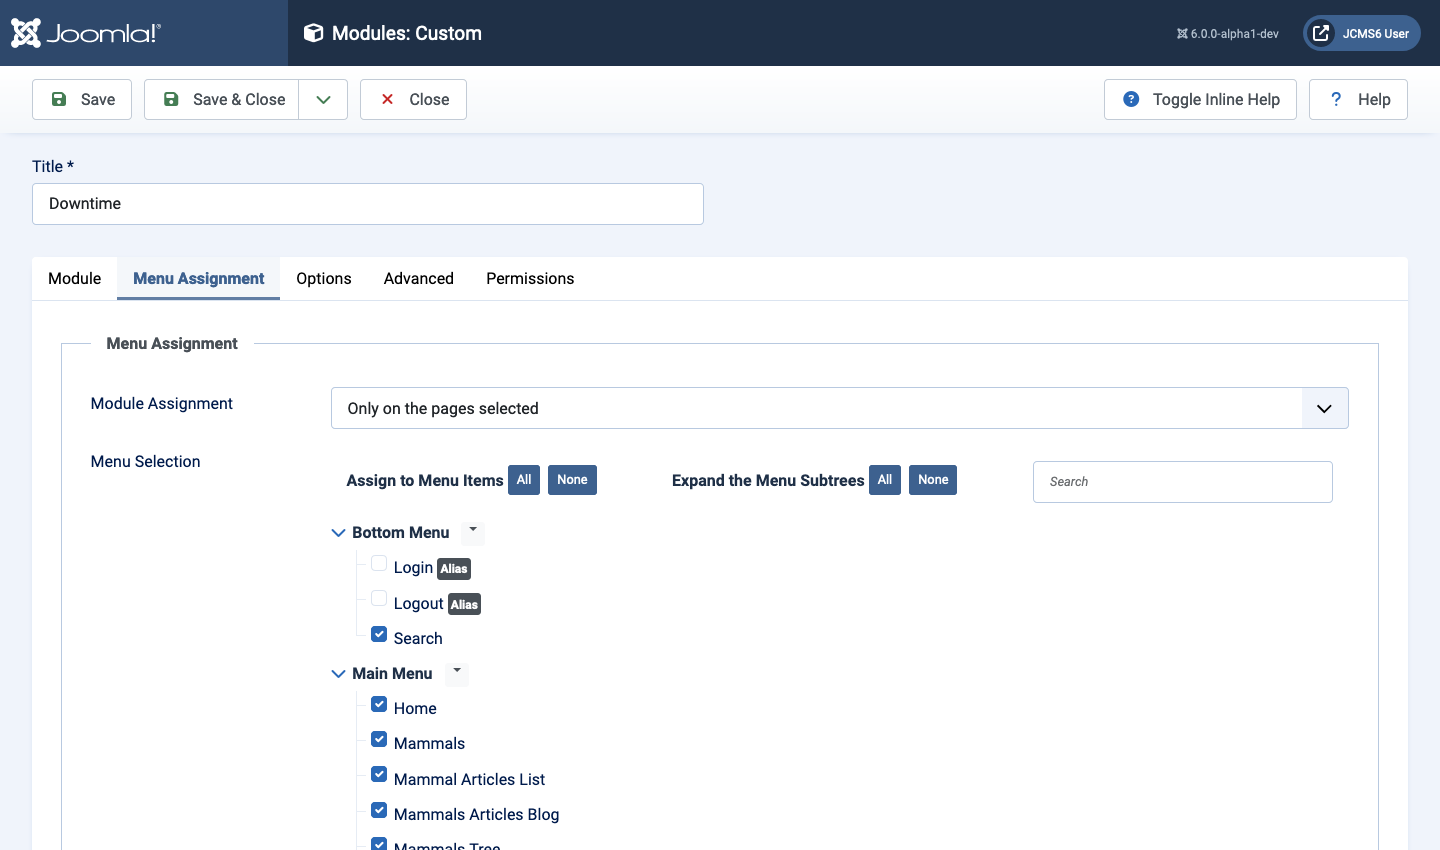
Select the Menu Items to display or not display the module as desired.
Examples
Breadcrumbs Not on Home Page
- Open the Breadcrumbs module.
- Select On all pages except those selected
- Select the None after Assign to Menu Items
- Find the Home page menu item and check its checkbox.
- Save
- Check the site - breadcrumbs should be present on all pages except the Home page.