Menus power the Joomla website experience, providing a customizable way to allow site visitors to view and interact with your website's content and features. This section explains how to add menus and menu items, and walks you through the powerful features that Joomla menus can provide.
Adding a New Menu: While each Joomla site has a single Main Menu out of the box, having multiple menus that serve specific purposes takes your website to the next level. Learn how to create a new menu, add items to it, and make it visible via a module.
Menu Items: Expose your content and components with menu items, the essential starting point for all of your site's URLs. Learn about menu item types and adding a menu item.
Menu Item Types: Joomla comes with several built-in menu item types; additional components and extensions will often add more. Learn how the core Joomla components can become menu items
Adding a New Menu
Introduction
For content to be accessed on your Joomla! website items need to be assigned to a Menu. A standard installation of Joomla! creates a Main Menu for you. In many cases you will use only one menu but you can have more than one. This allows you to create Menus for different types of content, hidden content, user role specific content and more.
There are three steps in the creation of a usable menu:
Create the Menu. This is a container for Menu Items
Create a Menu Module. This allows placement of the Menu on a page.
Create Menu items. These are the user selectable items leading to specific pages.
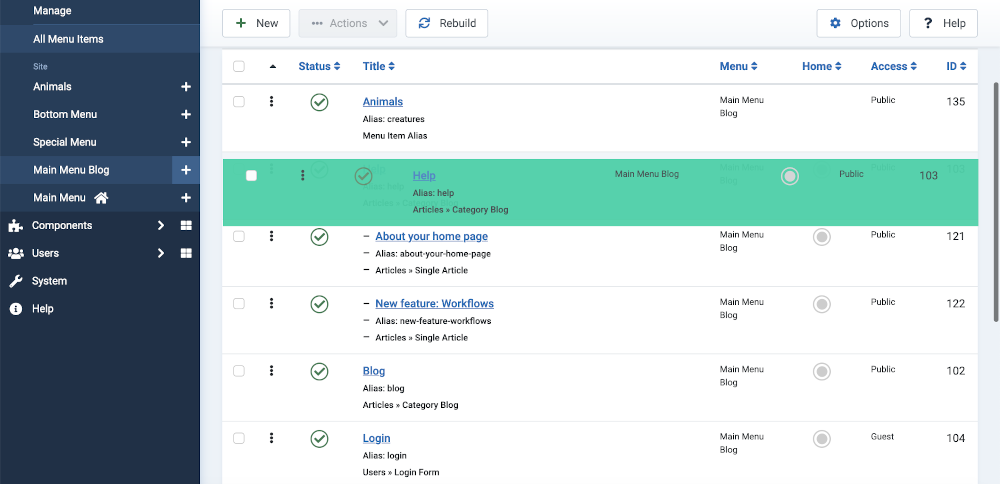
This screenshot shows the menus available in a Multilingual site. In an initial Joomla installation there is a single Main Menu.
The list allows you to select any of the green or red buttons to go directly to the list of menu items in that menu and state.
This tutorial covers the steps involved in creating a Menu in a Joomla! site.
Create a New Menu
Use either of the following steps to create a new menu:
From the Administrator menu select the Menu Dashboard Icon to be taken to the Menu dashboard, then select Manage. Or...
From the Administrator Menu expand the Menus section and then select Manage.
Select the + New button in the Toolbar.
In the Menu data entry form complete the following fielss:
Title: A proper title for the menu. This is used to identify the menu in the Menu Manager.
Unique Name: This should be a unique identification name used by Joomla! to identify this menu. Spaces are not allowed but you may use the '-' character such as resources-menu.
Description: Although not required this is often useful in a site with many menus. It appears below the Title in the menu list as illustrated above.
Save & Close
In the list of Menus the newly created menu has a button laballed Add a module for this menu, which is the next stage in menu creation. You could start adding menu items and come back to create the menu module later.
Create a Module for the Menu
In the Menus list the Linked Modules column allows selection of any existing menu module for editing purposes. You can have a look and then Close without making any changes. For your new menu, select the Add a module for this menu button to open a modal frame containing the Menu module data entry form.
Fields to complete:
The Title field is required, so create a descriptive title.
The Show Title button on the right is used to Show or Hide the module title, a common feature of all modules.
The Select Menu field should show the name of the Menu you just created.
The Position field is used to select a position in your template where you want your menu to appear.
Select Save & Close once the essential information has been added.
There are many options to choose from in the Edit module settings form. They are mentioned in the Help screen available in the Module: Edit form. This is the same form but in a normal page rather than a modal frame. Access it via the Administrator menu, Content / Site Modules route to the list of Site Modules.
Note: getting the Menu to look the way you want it to depends on your template styling.
Add Items to the Menu
To create the links in your menu you need to add Menu Items. There are many Menu Item Types in Joomla and third-party components may add more types. For this tutorial a link to a single article will be added.
You can create an article in advance or you can create an article during the menu creation process. Either way, the article must exist before a menu item can be created for it. In this example the article will also be named Resources. It is intended to contain a list of links to PDF files.
In the Menus list, from the Menu Items column select the icon for the newly created menu, Resources in this example. Initially, there are no menu items so the list merely says No Matching Results.
Select the New button from the Toolbar to create a new menu item.
In the Title field add the title you want to appear in the Menu.
In the Menu Item Type field select the Select button to open a modal dialog containing a list of components. Each has a drop down list revealing. a list of available menu item types.
Select Articles then Single Article.
In the Select Article field: Either:
Use the Select button to select an existing article. It will open a list of articles to choose from. Or:
Use the Create button to create a new article. All you need to enter is the article title. It is probably best to leave detailed content until later.
Check the Menu field is set to the new Menu.
The Status field should be set to Published.
Select Save & Close.
Add more Menu Items to the new Menu as required.
Once items have been added to the Menu check to see that the Menu is displayed on the website in the correct position.
Archived Articles
Introduction
Over time, article lists can grow to be very long. One way to reduce the clutter is to archive older articles. This is done by changing an article Status from Published to Archived in the Articles list page. It can be done simultaneously for multiple articles in the Actions dropdown list.
But what if older articles should be made available to website visitors? There is a menu item type available for that.
Step by Step
Select Main Menu or any other site menu in which the link is to appear.
Select the New button from the Toolbar in the Menus: Items list.
In the Menus: New Item data entry form enter a suitable Title, for example Archived Articles.
In the Menu Item Type field select Articles / Archived Articles from the popup dialog box.
Change any of the other parameters to suit your requirements. For example, you could delete All Categories and choose one or more categories from the dropdown list.
Select Save & Close to create the new menu item.
There are a number of parameters you can change – you can find out more detailed information in the Help screen.
After saving, the new menu item it will appear in the Site menu in the order added or the order adjusted by drag and drop or in this menu edit form.
The Archived Articles Page
The Archived Articles link leads to a page that displays a list of archived articles:
This example is the default output. You may choose to alter this so that, for example, you only show the linked title and the category – Joomla allows you to easily modify it. You may decide you just want to show the title but it’s worth experimenting to set it up how you want it.
You can filter the archived articles by Month and Year by selecting the relevant dropdown list items. You can also control the number of results. Pagination is displayed at the bottom of the page depending on the number of articles and menu item settings. Select the Filter button to apply the filter.
Tips
Remember, use the Menu Item Options tab to tailor the output to your needs.
Dependant on your abilities you can further change the look of the output with the use of custom styles and Template Overrides (mod_articles_archive).
Auto redirect guests to login
Desired Functionality
Suppose you have some menu choices that require a user to be logged in, such as Submit an Article. You would like all users to be able to see the restricted menu item whether or not they are logged in. The desired behaviour is as follows.
If the user is logged in the user goes directly to the restricted menu item.
If the user is not logged in the user is presented with the login form and on successful login continues on to the restricted page.
If the user is not registered, the user has the option to register or navigate to another page.
Solution
Here is how you do this in Joomla!.
Create a new menu from Menus list, named say Hidden Menu.
Add any menu items that will be accessible only to registered users (for example, Submit an Article). Set the required access levels of these menu items to Registered.
Do NOT create a module for the Hidden menu. It will not be displayed on any page, so it doesn't need a module.
Create your real menu, named say Site Menu, and the menu item that will display for all users, say Submit an Article.
The menu item will have a menu item type of Menu Item Alias found in the System Links Menu Item Type.
It's Menu Item parameter will be the Submit an Article menu item in the Hidden Menu*.
The Access Level for this menu item will be Public, since everyone needs to be able to see and use it.
Create a module for Site Menu just like you do for any menu.
If you want sub-menus, make sure you've added the sub-menu items in the Site Menu and not the Hidden menu.
Now when a guest (non-logged-in user) accesses the Submit an Article menu choice it redirects to the login page. If login is successful the user is redirected to the restricted Submit an Article page. If already logged in the redirection is immediate.
Example
For the following menu items:
Home
Blog
Wiki
Directory
Classifieds
FAQS
Shop
Contact Us
All the menu items should be viewable by everyone in the front end but items 3,4,5,6 and 7 should be accesible to Registered users only.
In this case, menu items 3 to 7 are located in the hidden menu with their Access parameter set to Registered. Items 3 to 7 have Alias menu items in the real menu with their Access parameters set to Public.
Custom Administrator Menu
Introduction
Suppose you have a user who you wish to allow to perform one task only on your website. Take the case of an organisation that has branches all over the world and the only task each branch is allowed to perform is to place locations on a map for display on the site. The component for this task is Ffmap but that will not be covered here other than the Administrator menu items involved.
To accomplish this task you need to create a custom User Group, assign a user to that group and create a custom menu for use by that user.
Create a User Group
Select User → Users → Groups in the Administrator menu.
Select the New button in the Toolbar.
Enter a Title for the Group,Branch' in this case.
Select Public as the parent group. This is important - you do not want to inherit permissions from another group.
Select Save and Close from the Toolbar.
Set Global Permissions for the Group
Select Global Configuration from the Home Dashboard.
Select the Permissions tab.
Select the Branch item.
Set Administrator Login to Allowed.
Select Save and Close from the Toolbar.
At this stage any user assigned to the Branch User Group will be able to login to the Administrator interface and see the Home Dashboard. There may be dashboard modules visible because their access level has been set to Public, for example: Logged in Users, Popular Articles and Recently Added articles. Best set access to these modules to Special. There will be no menu items for the user to see.
Set Component Permission for the Group
Either:
Select Ffmap component in the Administrator menu.
Select the FFmap Options button from the Toolbar to open its Configuration screen.
Or:
Select Global Configuration from the Home Dashboard.
Slect Ffmap from the list of components.
Then:
Select the Permissions tab and then the Branch item.
Set Access Administration Interface, Create, Delete, Edit, Edit State, Edit Own and Edit Custom Field Value to Allowed.
Select Save and Close from the Toolbar.
Create a new Administrator menu
Select Menu → Manage from the Administrator menu.
Select Administrator from the Site/Administrator drop down list.
Select the New button from the Toolbar.
Enter a title for the menu, say Branch Menu and a unique id, say branch-menu.
Select Save and Close from the Toolbar.
Create a Module for the menu
In the Menus list, select the Linked Modules button in the Branch Menu record.
Enter a Title for the module, say Branch Menu.
Select Menu to Show: Branch Menu.
Set Check Menu to No, otherwise there are awrning messages about missing Administrator functions.
Select the position: menu.
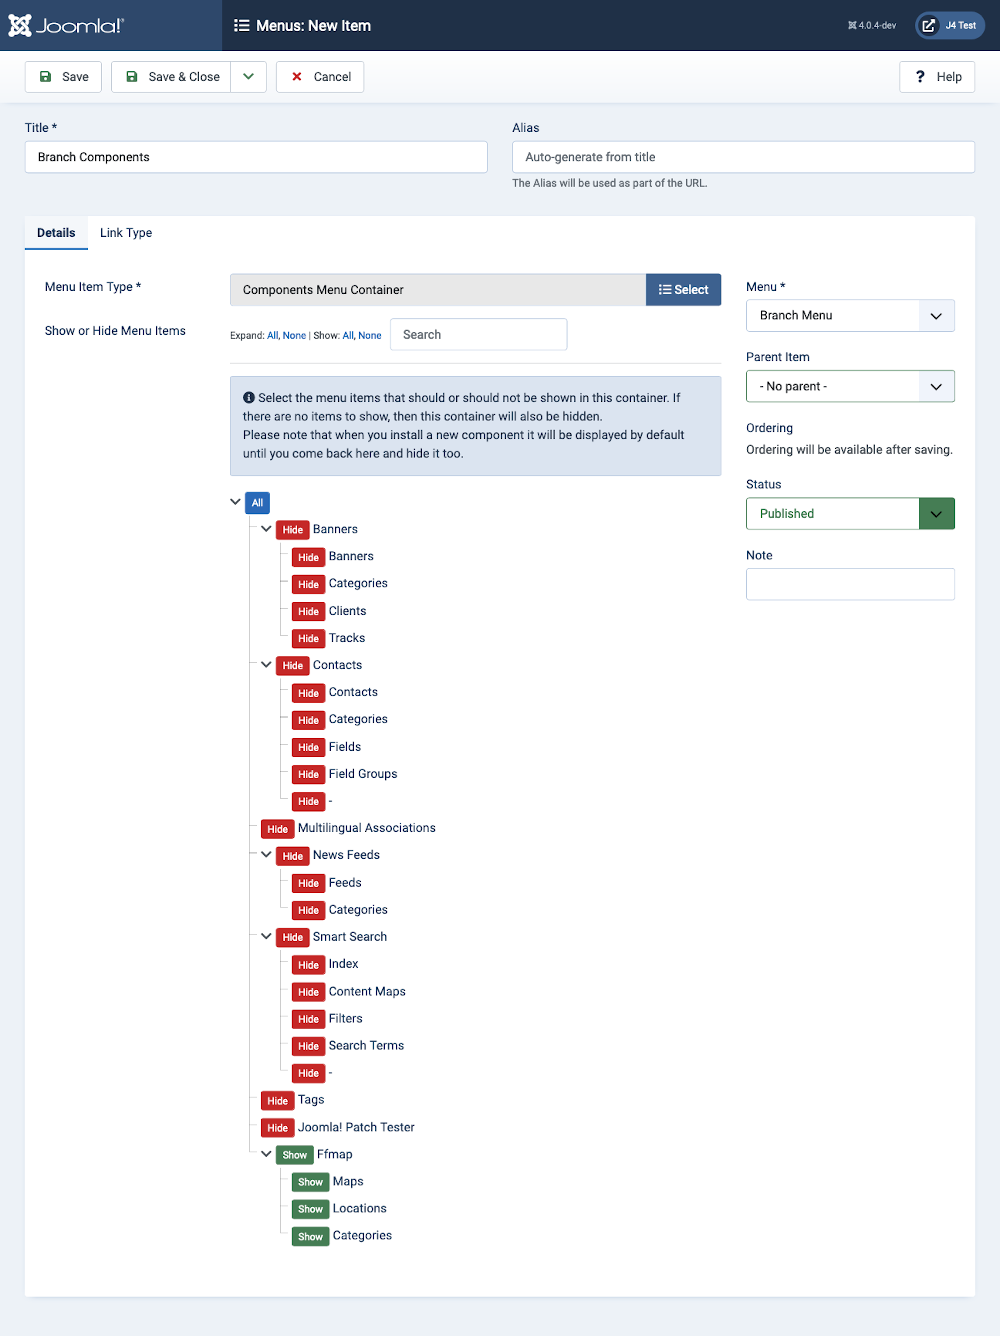
Create a Components Menu Container
In the Menus list select the Menu Items icon for the Branch Menu. This will open the list of items, empty at this stage.
Select the New button from the Toolbar.
Enter a title for the menu item: Branch Components.
Select the Menu Item Type Select Button.
In the modal dialog, scroll down to the System Links item and expand the pane.
Select the Components Menu Container item type.
Back in the menu configuration form, select Show None to Hide all of the Components menu items (red).
Scroll down to the Ffmap items and click the Hide buttons to turn them to Show (green).
Select Save and Close from the Toolbar.
Screenshot
Result
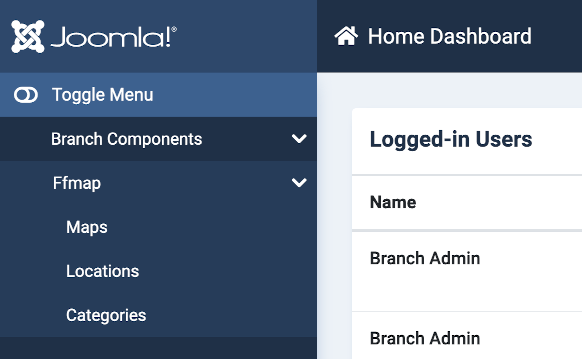
Create a user in the Branch Group for yourself to test with. Login to the Administrator interface as that user to see the result:
Notes
If you later add another component it will be added to the Components Menu Container and visible by default. You will need to go back to Administrator menu item and set the new content to Hide.
If the component is set up to include menu items in each of the Administrator list views, by inclusion of default.xml files, you could add menu items directly to the custom menu and avoid using the Components Menu Container.
The Branch Components menu will remain part of the Administrator menu - unavoidable duplication!
Menu Item Order
Introduction
When a new menu item is created its default position is at the end of the list of menu items. Often this is not the most suitable place and an individual menu item needs to be moved, along with any child items if it is a parent menu item. There are two methods available to change the order of a menu item:
Drag and Drop
List Select
Both methods move child menus with their parent menus. Child items cannot be moved to another parent using these methods.
Drag and Drop Method
Starting from the Administrator menu:
Select Menus → Main Menu or whichever menu contains the item to be moved.
Select the Ordering symbol in the heading of the list of menu items. It is the heading of the second column and has no visible label. If the ordering column is selected a second time the sort order is reversed. Select so that the symbol at the head of the column is a chevron pointing upwards. This is the normal sort order.
When the ordering symbol is selected grab handles appear in that column. They are marked with vertical ellipsis symbols.
Select and drag the symbol of the item you wish to move.
Drop the dragged item into its new position.
This method can be inconvenient if there are parent menu items with many children. You can move a parent item more easily by hiding the children:
Select Filter Options
Set - Select Max Levels - to 1
Drag and Drop
This does not work if a child menu item order is to be changed. In this case:
Select Filter Options
Set the - Select Parent Menu Item - filter to the appropriate parent
Drag and Drop
List Select Method
Starting from the Administrator menu:
Select Menus → Main Menu or whichever menu contains the item to be moved.
Select the title link of the menu item you wish to move to open the menu item edit form.
In the Menus: Edit Item form Ordering field select the item after which you wish to place the item being moved, or the - First - or - Last - positions.
Save or Save & Close
Site Check
Go to your site and reload any page that contains the altered menu to check the items are in the desired order.